There are new requirements for the Tour of Heroes app:
我们收到了《英雄指南》的一些新需求:
Add a Dashboard view.
添加一个仪表盘视图。
Add the ability to navigate between the Heroes and Dashboard views.
在英雄列表和仪表盘视图之间导航。
When users click a hero name in either view, navigate to a detail view of the selected hero.
无论在哪个视图中点击一个英雄,都会导航到该英雄的详情页。
When users click a deep link in an email, open the detail view for a particular hero.
在邮件中点击一个深链接,会直接打开一个特定英雄的详情视图。
When you’re done, users will be able to navigate the app like this:
完成时,用户就能像这样在应用中导航:

To satisfy these requirements, you'll add Angular’s router to the app.
我们将把 Angular 路由器加入应用中,以满足这些需求。 (译注:硬件领域中的路由器是用来帮你找到另一台网络设备的,而这里的路由器用于帮你找到一个组件)
For more information about the router, read the Routing and Navigation page.
更多信息,见路由和导航。
When you're done with this page, the app should look like this
完成本章之后,应用会变成这样:
To see the URL changes in the browser address bar of the live example, open it again in the Plunker editor by clicking the icon in the upper right, then pop out the preview window by clicking the blue 'X' button in the upper right corner. 要看到这个在线例子中浏览器地址栏的URL变化情况,请点击右上角的图标,在Plunker编辑器中打开它,接下来在弹出的预览窗口中点击右上角的蓝色'X'按钮就可以了。 |   |
Where you left off
延续上一步教程
Before continuing with the Tour of Heroes, verify that you have the following structure.
在继续《英雄指南》之前,我们先验证一下目录结构:
Keep the app transpiling and running
让应用代码保持转译和运行
Enter the following command in the terminal window:
打开终端/控制台窗口,运行如下命令:
This command runs the TypeScript compiler in "watch mode", recompiling automatically when the code changes. The command simultaneously launches the app in a browser and refreshes the browser when the code changes.
这个命令会在“监听”模式下运行TypeScript编译器,当代码变化时,它会自动重新编译。 同时,该命令还会在浏览器中启动该应用,并且当代码变化时刷新浏览器。
You can keep building the Tour of Heroes without pausing to recompile or refresh the browser.
在后续构建《英雄指南》过程中,应用能持续运行,而不用中断服务来编译或刷新浏览器。
Action plan
行动计划
Here's the plan:
下面是我们的计划:
Turn
AppComponentinto an application shell that only handles navigation.把
AppComponent变成应用程序的“壳”,它只处理导航Relocate the Heroes concerns within the current
AppComponentto a separateHeroesComponent.把现在由
AppComponent关注的英雄们移到一个独立的HeroesComponent中Add routing.
添加路由
Create a new
DashboardComponent.创建一个新的
DashboardComponent组件Tie the Dashboard into the navigation structure.
把仪表盘加入导航结构中
Routing is another name for navigation. The router is the mechanism for navigating from view to view.
路由是导航的另一个名字。路由器就是从一个视图导航到另一个视图的机制。
Splitting the AppComponent
拆分 AppComponent
The current app loads AppComponent and immediately displays the list of heroes.
现在的应用会加载AppComponent组件,并且立刻显示出英雄列表。
The revised app should present a shell with a choice of views (Dashboard and Heroes) and then default to one of them.
我们修改后的应用将提供一个壳,它会选择仪表盘和英雄列表视图之一,然后默认显示它。
The AppComponent should only handle navigation, so you'll
move the display of Heroes out of AppComponent and into its own HeroesComponent.
AppComponent组件应该只处理导航。
我们来把英雄列表的显示职责,从AppComponent移到HeroesComponent组件中。
HeroesComponent
AppComponent is already dedicated to Heroes.
Instead of moving the code out of AppComponent, rename it to HeroesComponent
and create a separate AppComponent shell.
AppComponent的职责已经被移交给HeroesComponent了。
与其把AppComponent中所有的东西都搬过去,不如索性把它改名为HeroesComponent,然后单独创建一个新的AppComponent壳。
Do the following:
步骤如下:
Rename the
app.component.tsfile toheroes.component.ts.把
app.component.ts文件改名为heroes.component.ts。Rename the
AppComponentclass asHeroesComponent(rename locally, only in this file).把
AppComponent类改名为HeroesComponent(注意,只在这一个文件中改名)。Rename the selector
my-appasmy-heroes.把
my-app选择器改名为my-heroes。
src/app/heroes.component.ts (showing renamings only)
Create AppComponent
创建 AppComponent
The new AppComponent is the application shell.
It will have some navigation links at the top and a display area below.
新的AppComponent将成为应用的“壳”。
它将在顶部放一些导航链接,并且把我们要导航到的页面放在下面的显示区中。
Perform these steps:
执行下列步骤:
add the supporting
importstatements.添加支持性的
import语句。Create the file
src/app/app.component.ts.创建一个名叫src/app/app.component.ts的新文件。
Define an exported
AppComponentclass.定义一个导出的
AppComponent类。Add an
@Componentdecorator above the class with amy-appselector.在类的上方添加
@Component元数据装饰器,装饰器带有my-app选择器。Move the following from
HeroesComponenttoAppComponent:将下面的项目从
HeroesComponent移到AppComponent:titleclass property.title类属性@Componenttemplate<h1>element, which contains a binding totitle.@Component模板中的<h1>标签,它包含了对title属性的绑定。Add a
<my-heroes>element to the app template just below the heading so you still see the heroes.在模板的标题下面添加
<my-heroes>标签,以便我们仍能看到英雄列表。Add
HeroesComponentto thedeclarationsarray ofAppModuleso Angular recognizes the<my-heroes>tags.添加
HeroesComponent组件到根模块的declarations数组中,以便 Angular 能认识<my-heroes>标签。Add
HeroServiceto theprovidersarray ofAppModulebecause you'll need it in every other view.添加
HeroService到AppModule的providers数组中,因为我们的每一个视图都需要它。Remove
HeroServicefrom theHeroesComponentprovidersarray since it was promoted.从
HerosComponent的providers数组中移除HeroService,因为它被提到模块了。Add the supporting
importstatements forAppComponent.为
AppComponent添加一些import语句。
The first draft looks like this:
我们的第一个草稿版就像这样:
providers中移除HeroServiceGo back to the HeroesComponent and remove the HeroService from its providers array.
We are promoting this service from the HeroesComponent to the root NgModule.
We do not want two copies of this service at two different levels of our app.
回到HeroesComponent,并从providers数组中移除HeroService。
把它从HeroesComponent提升到根NgModule中。
我们不希望在应用的两个不同层次上存在它的两个副本。
The app still runs and displays heroes.
应用仍然在运行,并显示着英雄列表。
Add routing
添加路由
Instead of displaying automatically, heroes should display after users click a button. In other words, users should be able to navigate to the list of heroes.
我们希望在用户点击按钮之后才显示英雄列表,而不是自动显示。 换句话说,我们希望用户能“导航”到英雄列表。
Use the Angular router to enable navigation.
我们要使用 Angular 路由器进行导航。
The Angular router is an external, optional Angular NgModule called RouterModule.
The router is a combination of multiple provided services (RouterModule),
multiple directives (RouterOutlet, RouterLink, RouterLinkActive),
and a configuration (Routes). You'll configure the routes first.
Angular 路由器是一个可选的外部 Angular NgModule,名叫RouterModule。
路由器包含了多种服务(RouterModule)、多种指令(RouterOutlet、RouterLink、RouterLinkActive)、
和一套配置(Routes)。我们将先配置路由。
<base href>
Open index.html and ensure there is a <base href="..."> element
(or a script that dynamically sets this element)
at the top of the <head> section.
打开index.html,确保它的<head>区顶部有一个<base href="...">元素(或动态生成该元素的脚本)。
src/index.html (base-href)
For more information, see the Set the base href section of the Routing and Navigation page.
要了解更多信息,请参见路由与导航章的设置基地址(base href)部分。
Configure routes
配置路由
Create a configuration file for the app routes.
本应用还没有路由。我们来为应用的路由新建一个配置。
Routes tell the router which views to display when a user clicks a link or pastes a URL into the browser address bar.
路由告诉路由器,当用户点击链接或者把 URL 粘贴到浏览器地址栏时,应该显示哪个视图。
Define the first route as a route to the heroes component.
我们的第一个路由是指向英雄列表组件的。
src/app/app.module.ts (heroes route)
The Routes are an array of route definitions.
这个Routes是一个路由定义的数组。
此时,我们只有一个路由定义,但别急,后面还会添加更多。
This route definition has the following parts:
路由定义包括以下部分:
Path: The router matches this route's path to the URL in the browser address bar (
heroes).Path: 路由器会用它来匹配浏览器地址栏中的地址,如
heroes。Component: The component that the router should create when navigating to this route (
HeroesComponent).Component: 导航到此路由时,路由器需要创建的组件(
HeroesComponent)。
Read more about defining routes with Routes in the Routing & Navigation page.
关于Routes定义的更多信息,见路由与导航一章。
Make the router available
让路由器可用
Import the RouterModule and add it to the AppModule imports array.
导入RouterModule并添加到AppModule的imports数组中。
src/app/app.module.ts (app routing)
The forRoot() method is called because a configured router is provided at the app's root.
The forRoot() method supplies the Router service providers and directives needed for routing, and
performs the initial navigation based on the current browser URL.
这里使用了forRoot()方法,因为我们是在应用根部提供配置好的路由器。
forRoot()方法提供了路由需要的路由服务提供商和指令,并基于当前浏览器 URL 初始化导航。
Router outlet
路由出口(Outlet)
If you paste the path, /heroes, into the browser address bar at the end of the URL,
the router should match it to the heroes route and display the HeroesComponent.
However, you have to tell the router where to display the component.
To do this, you can add a <router-outlet> element at the end of the template.
RouterOutlet is one of the directives provided by the RouterModule.
The router displays each component immediately below the <router-outlet> as users navigate through the app.
如果我们把路径/heroes粘贴到浏览器的地址栏,路由器会匹配到'Heroes'路由,并显示HeroesComponent组件。
我们必须告诉路由器它位置,所以我们把<router-outlet>标签添加到模板的底部。
RouterOutlet是由RouterModule提供的指令之一。
当我们在应用中导航时,路由器就把激活的组件显示在<router-outlet>里面。
Router links
路由器链接
Users shouldn't have to paste a route URL into the address bar.
Instead, add an anchor tag to the template that, when clicked, triggers navigation to the HeroesComponent.
我们当然不会真让用户往地址栏中粘贴路由的 URL,
而应该在模板中的什么地方添加一个锚标签。点击时,就会导航到HeroesComponent组件。
The revised template looks like this:
修改过的模板是这样的:
src/app/app.component.ts (template-v2)
Note the routerLink binding in the anchor tag.
The RouterLink directive (another of the RouterModule directives) is bound to a string
that tells the router where to navigate when the user clicks the link.
注意,锚标签中的[routerLink]绑定。
我们把RouterLink指令(ROUTER_DIRECTIVES中的另一个指令)绑定到一个字符串。
它将告诉路由器,当用户点击这个链接时,应该导航到哪里。
Since the link is not dynamic, a routing instructionis defined with a one-time binding to the route path.
Looking back at the route configuration, you can confirm that '/heroes' is the path of the route to the HeroesComponent.
由于这个链接不是动态的,我们只要用一次性绑定的方式绑定到路由的路径 (path) 就行了。
回来看路由配置表,我们清楚的看到,这个路径 —— '/heroes'就是指向HeroesComponent的那个路由的路径。
Read more about dynamic router links and the link parameters array in the Appendix: Link Parameters Array section of the Routing & Navigation page.
Refresh the browser. The browser displays the app title and heroes link, but not the heroes list.
刷新浏览器。我们只看到了应用标题和英雄链接。英雄列表到哪里去了?
The browser's address bar shows /.
The route path to HeroesComponent is /heroes, not /.
Soon you'll add a route that matches the path /.
浏览器的地址栏显示的是/。而到HeroesComponent的路由中的路径是/heroes,不是/。
我们没有任何路由能匹配当前的路径/,所以,自然没啥可显示的。
接下来,我们就修复这个问题。
Click the Heroes navigation link. The address bar updates to /heroes
and the list of heroes displays.
我们点击“Heroes(英雄列表)”导航链接,浏览器地址栏更新为/heroes,并且看到了英雄列表。我们终于导航过去了!
AppComponent now looks like this:
现在,AppComponent是这样的:
src/app/app.component.ts (v2)
The AppComponent is now attached to a router and displays routed views. For this reason, and to distinguish it from other kinds of components, this component type is called a router component.
AppComponent现在加上了路由器,并能显示路由到的视图了。 因此,为了把它从其它种类的组件中区分出来,我们称这类组件为路由器组件。
Add a dashboard
添加一个仪表盘
Routing only makes sense when multiple views exist.
To add another view, create a placeholder DashboardComponent, which users can navigate to and from.
当我们有多个视图的时候,路由才有意义。所以我们需要另一个视图。先创建一个DashboardComponent的占位符,让用户可以导航到它或从它导航出来。
src/app/dashboard.component.ts (v1)
You'll make this component more useful later.
我们先不实现它,稍后,我们再回来,给这个组件一些实际用途。
Configure the dashboard route
配置仪表盘路由
To teach app.module.ts to navigate to the dashboard,
import the dashboard component and
add the following route definition to the Routes array of definitions.
要让app.module.ts能导航到仪表盘,就要先导入仪表盘组件,然后把下列路由定义添加到Routes数组中。
src/app/app.module.ts (Dashboard route)
Also import and add DashboardComponent to the AppModule's declarations.
然后还得把DashboardComponent添加到AppModule的declarations数组中。
src/app/app.module.ts(dashboard)
Add a redirect route
添加重定向路由
Currently, the browser launches with / in the address bar.
When the app starts, it should show the dashboard and
display a /dashboard URL in the browser address bar.
浏览器启动时地址栏中的地址是/。
当应用启动时,它应该显示仪表盘,并且在浏览器的地址栏显示URL:/dashboard
To make this happen, use a redirect route. Add the following to the array of route definitions:
我们可以使用重定向路由来实现它。把下面的内容添加到路由定义数组中:
src/app/app.module.ts (redirect)
Read more about redirects in the Redirecting routes section of the Routing & Navigation page.
关于重定向的更多信息,见路由。
Add navigation to the template
添加导航到模版中
Add a dashboard navigation link to the template, just above the Heroes link.
在模板上添加一个到仪表盘的导航链接,就放在Heroes(英雄列表)链接的上方。
src/app/app.component.ts (template-v3)
The <nav> tags don't do anything yet, but they'll be useful later when you style the links.
我们在<nav>标签中放了两个链接。
它们现在还没有作用,但稍后,当我们对这些链接添加样式时,会显得比较方便。
In your browser, go to the application root (/) and reload.
The app displays the dashboard and you can navigate between the dashboard and the heroes.
刷新浏览器。应用显示出了仪表盘,并可以在仪表盘和英雄列表之间导航了。
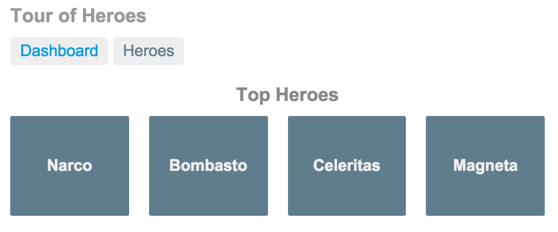
Add heroes to the dashboard
把英雄添加到仪表盘
To make the dashboard more interesting, you'll display the top four heroes at a glance.
我们想让仪表盘更有趣,比如:让用户一眼就能看到四个顶级英雄。
Replace the template metadata with a templateUrl property that points to a new
template file.
把元数据中的template属性替换为templateUrl属性,它将指向一个新的模板文件。
src/app/dashboard.component.ts (metadata)
Create that file with this content:
使用下列内容创建文件:
src/app/dashboard.component.html
*ngFor is used again to iterate over a list of heroes and display their names.
The extra <div> elements will help with styling later.
我们再次使用*ngFor来在英雄列表上迭代,并显示它们的名字。
还添加了一个额外的<div>元素,来帮助稍后的美化工作。
Sharing the HeroService
共享 HeroService
To populate the component's heroes array, you can re-use the HeroService.
要想管理该组件的heroes数组,我们可以复用HeroService。
Earlier, you removed the HeroService from the providers array of HeroesComponent
and added it to the providers array of AppModule.
That move created a singleton HeroService instance, available to all components of the app.
Angular injects HeroService and you can use it in the DashboardComponent.
在前面的章节中,我们从HeroesComponent的providers数组中移除了HeroService服务,
并把它添加到AppModule的providers数组中。
这个改动创建了一个HeroService的单例对象,应用中的所有组件都可以使用它。
Angular 会把HeroService注入到DashboardComponent,我们就能在DashboardComponent中使用它了。
Get heroes
获取英雄数据
In dashboard.component.ts, add the following import statements.
打开dashboard.component.ts文件,并添加下列import语句。
src/app/dashboard.component.ts (imports)
We need OnInit interface because we'll initialize the heroes in the ngOnInit method as we've done before.
We need the Hero and HeroService symbols in order to reference those types.
我们需要实现OnInit接口,因为我们将在ngOnInit方法中初始化英雄数组 —— 就像上次一样。
我们需要导入Hero类和HeroService类来引用它们的数据类型。
Now create the DashboardComponent class like this:
我们现在就实现DashboardComponent类,像这样:
src/app/dashboard.component.ts (class)
This kind of logic is also used in the HeroesComponent:
我们在之前的HeroesComponent中也看到过类似的逻辑:
Define a
heroesarray property.创建一个
heroes数组属性。Inject the
HeroServicein the constructor and hold it in a privateheroServicefield.在构造函数中注入
HeroService,并且把它保存在一个私有的heroService字段中。Call the service to get heroes inside the Angular
ngOnInit()lifecycle hook.在 Angular 的
ngOnInit生命周期钩子里面调用服务来获得英雄数据。
In this dashboard you specify four heroes (2nd, 3rd, 4th, and 5th) with the Array.slice method.
在仪表盘中我们用Array.slice方法提取了四个英雄(第2、3、4、5个)。
Refresh the browser to see four hero names in the new dashboard.
刷新浏览器,在这个新的仪表盘中就看到了四个英雄。
Navigating to hero details
导航到英雄详情
While the details of a selected hero displays at the bottom of the HeroesComponent,
users should be able to navigate to the HeroDetailComponent in the following additional ways:
虽然我们在HeroesComponent组件的底部显示了所选英雄的详情,
但用户还没法导航到HeroDetailComponent组件。我们可以用下列方式导航到HeroDetailComponent:
From the dashboard to a selected hero.
从Dashboard(仪表盘)导航到一个选定的英雄。
From the heroes list to a selected hero.
从Heroes(英雄列表)导航到一个选定的英雄。
From a "deep link" URL pasted into the browser address bar.
把一个指向该英雄的“深链接” URL 粘贴到浏览器的地址栏。
Routing to a hero detail
路由到一个英雄详情
You can add a route to the HeroDetailComponent in app.module.ts, where the other routes are configured.
我们将在app.module.ts中添加一个到HeroDetailComponent的路由,也就是配置其它路由的地方。
The new route is unusual in that you must tell the HeroDetailComponent which hero to show.
You didn't have to tell the HeroesComponent or the DashboardComponent anything.
这个新路由的不寻常之处在于,我们必须告诉HeroDetailComponent该显示哪个英雄。
之前,我们不需要告诉HeroesComponent组件和DashboardComponent组件任何东西。
Currently, the parent HeroesComponent sets the component's hero property to a
hero object with a binding like this:
现在,父组件HeroesComponent通过数据绑定来把一个英雄对象设置为组件的hero属性。就像这样:
But this binding won't work in any of the routing scenarios.
显然,在我们的任何一个路由场景中它都无法工作。 最后一种场景肯定不行,我们无法将一个完整的 hero 对象嵌入到 URL 中!不过我们本来也不想这样。
Parameterized route
参数化路由
You can add the hero's id to the URL. When routing to the hero whose id is 11,
you could expect to see a URL such as this:
我们可以把英雄的id添加到 URL 中。当导航到一个id为 11 的英雄时,我们期望的 URL 是这样的:
The /detail/ part of the URL is constant. The trailing numeric id changes from hero to hero.
You need to represent the variable part of the route with a parameter (or token) that stands for the hero's id.
URL中的/detail/部分是固定不变的,但结尾的数字id部分会随着英雄的不同而变化。
我们要把路由中可变的那部分表示成一个参数 (parameter) 或令牌 (token) ,代表英雄的id。
Configure a route with a parameter
配置带参数的路由
Use the following route definition.
我们将使用下列路由定义。
src/app/app.module.ts (hero detail)
The colon (:) in the path indicates that :id is a placeholder for a specific hero id
when navigating to the HeroDetailComponent.
路径中的冒号 (:) 表示:id是一个占位符,当导航到这个HeroDetailComponent组件时,它将被填入一个特定英雄的id。
Be sure to import the hero detail component before creating this route.
别忘了在创建这个路由前导入英雄详情组件。
You're finished with the app routes.
我们已经完成了本应用的路由的配置。
You didn't add a 'Hero Detail' link to the template because users
don't click a navigation link to view a particular hero;
they click a hero name, whether the name displays on the dashboard or in the heroes list.
我们没有往模板中添加一个'英雄详情',这是因为用户不会直接点击导航栏中的链接去查看一个特定的英雄。
它们只会通过在英雄列表或者仪表盘中点击来显示一个英雄。
You don't need to add the hero clicks until the HeroDetailComponent
is revised and ready to be navigated to.
要想支持“点击英雄”,就得先对HeroDetailComponent进行修改,好让我们能导航到它。
Revise the HeroDetailComponent
修改HeroDetailComponent
Here's what the HeroDetailComponent looks like now:
在重写HeroDetailComponent之前,我们先看看它现在的样子:
src/app/hero-detail.component.ts (current)
The template won't change. Hero names will display the same way. The major changes are driven by how you get hero names.
模板不用修改,我们会用原来的方式显示英雄。导致这次大修的原因是如何获得这个英雄的数据。
You'll no longer receive the hero in a parent component property binding.
The new HeroDetailComponent should take the id parameter from the params Observable
in the ActivatedRoute service and use the HeroService to fetch the hero with that id.
我们不会再从父组件的属性绑定中接收英雄数据。
新的HeroDetailComponent应该从ActivatedRoute服务的可观察对象params中取得id参数,
并通过HeroService服务获取具有这个指定id的英雄数据。
Add the following imports:
先添加下列导入语句:
src/app/hero-detail.component.ts
Inject the ActivatedRoute, HeroService, and Location services
into the constructor, saving their values in private fields:
然后注入ActivatedRoute和HeroService服务到构造函数中,将它们的值保存到私有变量中:
src/app/hero-detail.component.ts (constructor)
src/app/hero-detail.component.ts (switchMap import)
Tell the class to implement the OnInit interface.
我们告诉这个类,我们要实现OnInit接口。
src/app/hero-detail.component.ts
Inside the ngOnInit() lifecycle hook, use the params Observable to
extract the id parameter value from the ActivatedRoute service
and use the HeroService to fetch the hero with that id.
在ngOnInit()生命周期钩子中,我们从ActivatedRoute服务的可观察对象params中提取id参数,
并且使用HeroService来获取具有这个id的英雄数据。。
src/app/hero-detail.component.ts
The switchMap operator maps the id in the Observable route parameters
to a new Observable, the result of the HeroService.getHero() method.
注意switchMap运算符如何将可观察的路由参数中的 id 映射到一个新的Observable,
即HeroService.getHero()方法的结果。
If a user re-navigates to this component while a getHero request is still processing,
switchMap cancels the old request and then calls HeroService.getHero() again.
如果用户在 getHero 请求执行的过程中再次导航这个组件,switchMap 再次调用HeroService.getHero()之前,
会取消之前的请求。
The hero id is a number. Route parameters are always strings.
So the route parameter value is converted to a number with the JavaScript (+) operator.
英雄的id是数字,而路由参数的值总是字符串。
所以我们需要通过 JavaScript 的 (+) 操作符把路由参数的值转成数字。
Do you need to unsubscribe?
我需要取消订阅吗?
As described in the ActivatedRoute: the one-stop-shop for route information
section of the Routing & Navigation page,
the Router manages the observables it provides and localizes
the subscriptions. The subscriptions are cleaned up when the component is destroyed, protecting against
memory leaks, so you don't need to unsubscribe from the route params Observable.
正如以前在路由与导航章的ActivatedRoute:一站式获取路由信息部分讲过的,Router管理它提供的可观察对象,并使订阅局部化。当组件被销毁时,会清除
订阅,防止内存泄漏,所以我们不需要从路由参数Observable取消订阅。
Add HeroService.getHero()
添加 HeroService.getHero()
In the previous code snippet, HeroService doesn't have a getHero() method. To fix this issue,
open HeroService and add a getHero() method that filters the heroes list from getHeroes() by id.
在前面的代码片段中HeroService没有getHero()方法。要解决这个问题,请打开HeroService并添加一个getHero()方法,它会根据id从getHeroes()中过滤英雄列表。
src/app/hero.service.ts (getHero)
Find the way back
回到原路
Users have several ways to navigate to the HeroDetailComponent.
用户有多种方式导航到HeroDetailComponent。
To navigate somewhere else, users can click one of the two links in the AppComponent or click the browser's back button.
Now add a third option, a goBack() method that navigates backward one step in the browser's history stack
using the Location service you injected previously.
要导航到别处,用户可以点击AppComponent中的两个链接之一,也可以点击浏览器的后退按钮。
我们来添加第三个选项:一个goBack()方法,它使用之前注入的Location服务,
利用浏览器的历史堆栈,导航到上一步。
src/app/hero-detail.component.ts (goBack)
Going back too far could take users out of the app. In a real app, you can prevent this issue with the CanDeactivate guard. Read more on the CanDeactivate page.
回退太多步会跑出我们的应用。 在真实的应用中,我们需要使用CanDeactivate守卫对此进行防范。 要了解更多,参见CanDeactivate。
You'll wire this method with an event binding to a Back button that you'll add to the component template.
然后,我们通过一个事件绑定把此方法绑定到模板底部的 Back(后退)按钮上。
Migrate the template to its own file
called hero-detail.component.html:
修改模板,添加这个按钮以提醒我们还要做更多的改进, 并把模板移到独立的hero-detail.component.html文件中去。
src/app/hero-detail.component.html
Update the component metadata with a templateUrl pointing to the template file that you just created.
然后修改组件元数据的templateUrl属性,让它指向我们刚刚创建的模板文件。
src/app/hero-detail.component.ts (metadata)
Refresh the browser and see the results.
刷新浏览器,查看结果。
Select a dashboard hero
选择一个仪表盘中的英雄
When a user selects a hero in the dashboard, the app should navigate to the HeroDetailComponent to view and edit the selected hero.
当用户从仪表盘中选择了一位英雄时,本应用要导航到HeroDetailComponent以查看和编辑所选的英雄。
Although the dashboard heroes are presented as button-like blocks, they should behave like anchor tags. When hovering over a hero block, the target URL should display in the browser status bar and the user should be able to copy the link or open the hero detail view in a new tab.
虽然仪表盘英雄被显示为像按钮一样的方块,但是它们的行为应该像锚标签一样。 当鼠标移动到一个英雄方块上时,目标 URL 应该显示在浏览器的状态条上,用户应该能拷贝链接或者在新的浏览器标签页中打开英雄详情视图。
To achieve this effect, reopen dashboard.component.html and replace the repeated <div *ngFor...> tags
with <a> tags. Change the opening <a> tag to the following:
要达到这个效果,再次打开dashboard.component.html,将用来迭代的<div *ngFor...>替换为<a>,就像这样:
src/app/dashboard.component.html (repeated <a> tag)
Notice the [routerLink] binding.
As described in the Router links section of this page,
top-level navigation in the AppComponent template has router links set to fixed paths of the
destination routes, "/dashboard" and "/heroes".
注意[routerLink]绑定。正如本章的Router links部分所说,
AppComponent模板中的顶级导航有一些路由器链接被设置固定的路径,例如“/dashboard”和“/heroes”。
This time, you're binding to an expression containing a link parameters array.
The array has two elements: the path of
the destination route and a route parameter set to the value of the current hero's id.
这次,我们绑定了一个包含链接参数数组的表达式。 该数组有两个元素,目标路由和一个用来设置当前英雄的 id 值的路由参数。
The two array items align with the path and :id
token in the parameterized hero detail route definition that you added to
app.module.ts earlier:
这两个数组项与之前在app.module.ts添加的参数化的英雄详情路由定义中的 path 和 :id 对应。
src/app/app.module.ts (hero detail)
Refresh the browser and select a hero from the dashboard; the app navigates to that hero’s details.
刷新浏览器,并从仪表盘中选择一位英雄,应用就会直接导航到英雄的详情。
Refactor routes to a Routing Module
重构路由为一个路由模块
Almost 20 lines of AppModule are devoted to configuring four routes.
Most applications have many more routes and they add guard services
to protect against unwanted or unauthorized navigations. (Read more about guard services in the Route Guards
section of the Routing & Navigation page.)
Routing considerations could quickly dominate this module and obscure its primary purpose, which is to
establish key facts about the entire app for the Angular compiler.
AppModule中有将近 20 行代码是用来配置四个路由的。
绝大多数应用有更多路由,并且它们还有守卫服务来保护不希望或未授权的导航。
(要了解守卫服务的更多知识,参见路由与导航页的路由守卫)
路由的配置可能迅速占领这个模块,并掩盖其主要目的,即为 Angular 编译器设置整个应用的关键配置。
It's a good idea to refactor the routing configuration into its own class.
The current RouterModule.forRoot() produces an Angular ModuleWithProviders,
a class dedicated to routing should be a routing module.
For more information, see the Milestone #2: The Routing Module
section of the Routing & Navigation page.
我们应该重构路由配置到它自己的类。
什么样的类呢?
当前的RouterModule.forRoot()产生一个Angular ModuleWithProviders,所以这个路由类应该是一种模块类。
它应该是一个路由模块。要想了解更多,请参阅路由与导航一章的里程碑2:路由模块部分。
By convention , a routing module name contains the word "Routing" and aligns with the name of the module that declares the components navigated to.
按约定,路由模块的名字应该包含 “Routing”,并与导航到的组件所在的模块的名称看齐。
Create an app-routing.module.ts file as a sibling to app.module.ts. Give it the following contents, extracted from the AppModule class:
在app.module.ts所在目录创建app-routing.module.ts文件。将下面从AppModule类提取出来的代码拷贝进去:
src/app/app-routing.module.ts
The following points are typical of routing modules:
典型路由模块需要注意的有:
The Routing Module pulls the routes into a variable. The variable clarifies the routing module pattern in case you export the module in the future.
将路由抽出到一个变量中。如果你将来要导出这个模块,这种 "路由模块" 的模式也会更加明确。
The Routing Module adds
RouterModule.forRoot(routes)toimports.添加
RouterModule.forRoot(routes)到imports。The Routing Module adds
RouterModuletoexportsso that the components in the companion module have access to Router declarables , such asRouterLinkandRouterOutlet.把
RouterModule添加到路由模块的exports中,以便关联模块(比如AppModule)中的组件可以访问路由模块中的声明,比如RouterLink和RouterOutlet。There are no
declarations. Declarations are the responsibility of the companion module.无
declarations!声明是关联模块的任务。If you have guard services, the Routing Module adds module
providers. (There are none in this example.)如果有守卫服务,把它们添加到本模块的
providers中(本例子中没有守卫服务)。
Update AppModule
修改 AppModule
Delete the routing configuration from AppModule and import the AppRoutingModule.
Use an ES import statement and add it to the NgModule.imports list.
删除AppModule中的路由配置,并导入AppRoutingModule
(使用 ES import语句导入,并将它添加到NgModule.imports列表)。
Here is the revised AppModule, compared to its pre-refactor state:
下面是修改后的AppModule,与重构前的对比:
Select a hero in the HeroesComponent
在 HeroesComponent 中选择一位英雄
In the HeroesComponent,
the current template exhibits a "master/detail" style with the list of heroes
at the top and details of the selected hero below.
在HeroesComponent中,当前模板展示了一个主从风格的界面:上方是英雄列表,底下是所选英雄的详情。
src/app/heroes.component.ts (current template)
Delete the <h1> at the top.
删除顶部的<h1>。
Delete the last line of the template with the <hero-detail> tags.
删除模板最后带有<hero-detail>标签的那一行。
You'll no longer show the full HeroDetailComponent here.
Instead, you'll display the hero detail on its own page and route to it as you did in the dashboard.
我们不在这里展示完整的HeroDetailComponent了。
而是在独立的路由和页面中显示英雄详情,就像我们在仪表盘中所做的那样。
However, when users select a hero from the list, they won't go to the detail page. Instead, they'll see a mini detail on this page and have to click a button to navigate to the full detail page.
但是,当用户从列表中选择一个英雄时,他们不会在导航到详情页, 而是在当前页显示一个Mini版详情视图,当用户点击一个按钮时,才导航到完整的详情页面。
Add the mini detail
添加 mini 版英雄详情
Add the following HTML fragment at the bottom of the template where the <hero-detail> used to be:
在模板底部原来放<hero-detail>的地方添加下列 HTML 片段:
src/app/heroes.component.ts
After clicking a hero, users should see something like this below the hero list:
点击一个英雄,用户将会在英雄列表的下方看到这些:

Format with the uppercase pipe
使用uppercase管道格式化
The hero's name is displayed in capital letters because of the uppercase pipe
that's included in the interpolation binding, right after the pipe operator ( | ).
注意,英雄的名字全被显示成大写字母。那是uppercase管道的效果,借助它,我们能干预插值表达式绑定的过程。可以管道操作符 ( | ) 后面看到它。
Pipes are a good way to format strings, currency amounts, dates and other display data. Angular ships with several pipes and you can write your own.
管道擅长做下列工作:格式化字符串、金额、日期和其它显示数据。 Angular 自带了一些管道,我们也可以写自己的管道。
Move content out of the component file
把内容移出组件文件
You still have to update the component class to support navigation to the
HeroDetailComponent when users click the View Details button.
当用户点击查看详情按钮时,要让它能导航到HeroDetailComponent,我们还需要修改它。
The component file is big. It's difficult to find the component logic amidst the noise of HTML and CSS.
这个组件文件太大了。要想在 HTML 和 CSS 的噪音中看清组件的工作逻辑太难了。
Before making any more changes, migrate the template and styles to their own files.
在做更多修改之前,我们先把模板和样式移到它们自己的文件中去:
First, move the template contents from heroes.component.ts
into a new heroes.component.html file.
Don't copy the backticks. As for heroes.component.ts, you'll
come back to it in a minute. Next, move the
styles contents into a new heroes.component.css file.
首先,从heroes.component.ts中把模板内容移到新的heroes.component.html文件中,但不要把反引号也拷贝过去。就像heroes.component.ts一样,我们很快就能做完。接着,把样式的内容移到新的heroes.component.css文件中。
The two new files should look like this:
这两个新文件是这样的:
Now, back in the component metadata for heroes.component.ts,
delete template and styles, replacing them with
templateUrl and styleUrls respectively.
Set their properties to refer to the new files.
现在,回来编辑heroes.component.ts中的组件元数据,删除template 和 styles属性,代之以相应的templateUrl 和 styleUrls属性。让它们指向这些新文件。
src/app/heroes.component.ts (revised metadata)
The styleUrls property is an array of style file names (with paths).
You could list multiple style files from different locations if you needed them.
styleUrls属性是一个由样式文件的文件名(包括路径)组成的数组。我们还可以列出来自多个不同位置的样式文件。
Update the HeroesComponent class
更新 HeroesComponent 类
The HeroesComponent navigates to the HeroesDetailComponent in response to a button click.
The button's click event is bound to a gotoDetail() method that navigates imperatively
by telling the router where to go.
点击按钮时,HeroesComponent导航到HeroDetailComponent。
该按钮的点击事件绑定到了gotoDetail()方法,它使用命令式的导航,告诉路由器去哪儿。
This approach requires the following changes to the component class:
该方法需要对组件类做一些修改:
Import the
Routerfrom the Angular router library.从 Angular 路由器库导入
RouterInject the
Routerin the constructor, along with theHeroService.在构造函数中注入
Router(与HeroService一起)Implement
gotoDetail()by calling the routernavigate()method.实现
gotoDetail(),调用路由器的navigate()方法
src/app/heroes.component.ts (gotoDetail)
Note that you're passing a two-element link parameters array—a
path and the route parameter—to
the router navigate() method, just as you did in the [routerLink] binding
back in the DashboardComponent.
Here's the revised HeroesComponent class:
注意,我们将一个包含两个元素的链接参数数组 —
路径和路由参数 — 传递到路由的navigate(),
与之前在DashboardComponent中使用[routerLink]绑定一样。
修改完成的HeroesComponent类如下所示:
src/app/heroes.component.ts (class)
Refresh the browser and start clicking. Users can navigate around the app, from the dashboard to hero details and back, from heroes list to the mini detail to the hero details and back to the heroes again.
刷新浏览器,并开始点击。 我们能在应用中导航:从仪表盘到英雄详情再回来,从英雄列表到 mini 版英雄详情到英雄详情,再回到英雄列表。 我们可以在仪表盘和英雄列表之间跳来跳去。
You've met all of the navigational requirements that propelled this page.
我们已经满足了在本章开头设定的所有导航需求。
Style the app
美化本应用
The app is functional but it needs styling. The dashboard heroes should display in a row of rectangles. You've received around 60 lines of CSS for this purpose, including some simple media queries for responsive design.
应用在功能上已经正常了,但还需要美化。 仪表盘上的英雄应该显示在一行上的几个方块中。 我们拿到了大约60行CSS来完成这件事,包括一些简单的媒体查询代码以实现响应式设计。
As you now know, adding the CSS to the component styles metadata
would obscure the component logic.
Instead, edit the CSS in a separate *.css file.
我们不能把这 60 来行 CSS 粘贴到组件元数据的styles中,否则它会淹没组件的工作逻辑。反之,我们应该在独立的*.css文件中编辑这些CSS。
Add a dashboard.component.css file to the app folder and reference
that file in the component metadata's styleUrls array property like this:
把dashboard.component.css文件添加到app目录下,并在组件元数据的styleUrls数组属性中引用它。就像这样:
src/app/dashboard.component.ts (styleUrls)
Add stylish hero details
美化英雄详情
You've also been provided with CSS styles specifically for the HeroDetailComponent.
我们还拿到了一些HeroDetailComponent特有的 CSS 风格。
Add a hero-detail.component.css to the app
folder and refer to that file inside
the styleUrls array as you did for DashboardComponent.
Also, in hero-detail.component.ts, remove the hero property @Input decorator
and its import.
在app目录下添加hero-detail.component.css文件,
并且在styleUrls数组中引用它 —— 就像之前在DashboardComponent中做过的那样。
同时删除hero``@Input装饰器属性和它的导入语句。
Here's the content for the component CSS files.
上述组件的 CSS 文件内容如下:
Style the navigation links
美化导航链接
The provided CSS makes the navigation links in the AppComponent look more like selectable buttons.
You'll surround those links in <nav> tags.
设计师还给了我们一些 CSS,用于让AppComponent中的导航链接看起来更像可被选择的按钮。
要让它们协同工作,我们得把那些链接包含在<nav>标签中。
Add an app.component.css file to the app folder with the following content.
在app目录下添加一个app.component.css文件,内容如下:
src/app/app.component.css (navigation styles)
The routerLinkActive directive
routerLinkActive指令
The Angular router provides a routerLinkActive directive you can use to
add a class to the HTML navigation element whose route matches the active route.
All you have to do is define the style for it.
Angular路由器提供了routerLinkActive指令,我们可以用它来为匹配了活动路由的 HTML 导航元素自动添加一个 CSS 类。
我们唯一要做的就是为它定义样式。真好!
src/app/app.component.ts (active router links)
Add a styleUrls property that refers to this CSS file as follows:
首先把moduleId: module.id添加到AppComponent组件的@Component元数据中以启用相对于模块的文件URL。
然后添加styleUrls属性,使其指向这个CSS文件,代码如下:
Global application styles
应用的全局样式
When you add styles to a component, you keep everything a component needs—HTML, the CSS, the code—together in one convenient place. It's easy to package it all up and re-use the component somewhere else.
当我们把样式添加到组件中时,我们假定组件所需的一切 — HTML、CSS、程序代码 — 都在紧邻的地方。 这样,无论是把它们打包在一起还是在别的组件中复用它都会很容易。
You can also create styles at the application level outside of any component.
我们也可以在所有组件之外创建应用级样式。
The designers provided some basic styles to apply to elements across the entire app. These correspond to the full set of master styles that you installed earlier during setup. Here's an excerpt:
我们的设计师提供了一组基础样式,这些样式应用到的元素横跨整个应用。 它们与我们之前在开发环境时安装的整套样式对应。 下面是摘录:
src/styles.css (excerpt)
Create the file styles.css.
Ensure that the file contains the master styles provided here.
Also edit index.html to refer to this stylesheet.
如果在根目录下没有一个名叫styles.css的文件,就添加它。
确保它包含这里给出的主样式。
并编辑index.html来引用这个样式表。
src/index.html (link ref)
Look at the app now. The dashboard, heroes, and navigation links are styled.
看看现在的应用!我们的仪表盘、英雄列表和导航链接都漂亮多了!
Application structure and code
应用结构和代码
Review the sample source code in the
回顾一下本章
The road you’ve travelled
走过的路
Here's what you achieved in this page:
本章中我们完成了这些:
You added the Angular router to navigate among different components.
添加了 Angular 路由器在各个不同组件之间导航。
You learned how to create router links to represent navigation menu items.
学会了如何创建路由链接来表示导航栏的菜单项。
You used router link parameters to navigate to the details of the user-selected hero.
使用路由链接参数来导航到用户所选的英雄详情。
You shared the
HeroServiceamong multiple components.在多个组件之间共享了
HeroService服务。You moved HTML and CSS out of the component file and into their own files.
把 HTML 和 CSS 从组件中移出来,放到了它们自己的文件中。
You added the
uppercasepipe to format data.添加了
uppercase管道,来格式化数据。
Your app should look like this
我们的应用现在变成了这样:
The road ahead
前方的路
You have much of the foundation you need to build an app. You're still missing a key piece: remote data access.
我们有了很多用于构建应用的基石。 但我们仍然缺少很关键的一块:远程数据存取。
In the next page, you’ll replace the mock data with data retrieved from a server using http.
在下一章,我们将从硬编码模拟数据改为使用 http 服务从服务器获取数据。