We received new requirements for our Tour of Heroes application:
- Add a Dashboard view.
- Navigate between the Heroes and Dashboard views.
- Clicking on a hero in either view navigates to a detail view of the selected hero.
- Clicking a deep link in an email opens the detail view for a particular hero.
When we’re done, users will be able to navigate the app like this:

We'll add Angular’s Router to our app to satisfy these requirements.
The Routing and Navigation chapter covers the router in more detail than we will in this tutorial.
Run the
Where We Left Off
Before we continue with our Tour of Heroes, let’s verify that we have the following structure after adding our hero service and hero detail component. If not, we’ll need to go back and follow the previous chapters.
Keep the app compiling and running
Open a terminal/console window. Start the Dart compiler, watch for changes, and start our server by entering the command:
The application runs and updates automatically as we continue to build the Tour of Heroes.
Action plan
Here's our plan:
- Turn
AppComponentinto an application shell that only handles navigation - Relocate the Heroes concerns within the current
AppComponentto a separateHeroesComponent - Add routing
- Create a new
DashboardComponent - Tie the Dashboard into the navigation structure
Routing is another name for navigation. The router is the mechanism for navigating from view to view.
Splitting the AppComponent
Our current app loads AppComponent and immediately displays the list of heroes.
Our revised app should present a shell with a choice of views (Dashboard and Heroes) and then default to one of them.
The AppComponent should only handle navigation.
Let's move the display of Heroes out of AppComponent and into its own HeroesComponent.
HeroesComponent
AppComponent is already dedicated to Heroes.
Instead of moving anything out of AppComponent, we'll just rename it HeroesComponent
and create a new AppComponent shell separately.
The steps are to rename:
- app.component.ts file to heroes.component.ts
AppComponentclass toHeroesComponent- Selector
my-apptomy-heroes
lib/heroes_component.dart (showing renamings only)
Create AppComponent
The new AppComponent will be the application shell.
It will have some navigation links at the top and a display area below for the pages we navigate to.
The initial steps are:
- Create the file app/app.component.ts.
- Define an exported
AppComponentclass. - Add an
@Componentannotation above the class with amy-appselector. - Move the following from
HeroesComponenttoAppComponent:titleclass property@Componenttemplate<h1>element, which contains a binding totitle
- Add a
<my-heroes>element to the app template just below the heading so we still see the heroes. - Add
HeroesComponentto thedirectiveslist ofAppComponentso Angular recognizes the<my-heroes>tags. - Add
HeroServiceto theproviderslist ofAppComponentbecause we'll need it in every other view. - Remove
HeroServicefrom theHeroesComponentproviderslist since it has been promoted. - Add the supporting
importstatements forAppComponent.
Our first draft looks like this:
lib/app_component.dart (v1)
The app still runs and still displays heroes.
Our refactoring of AppComponent into a new AppComponent and a HeroesComponent worked!
We have done no harm.
Add Routing
We're ready to take the next step. Instead of displaying heroes automatically, we'd like to show them after the user clicks a button. In other words, we'd like to navigate to the list of heroes.
We'll need the Angular Router.
The Angular router is a combination of multiple services
(ROUTER_PROVIDERS), multiple directives (ROUTER_DIRECTIVES), and a
configuration annotation (RouteConfig). You get them all by importing
the router library:
lib/app_component.dart (router imports)
Make the router available
Not all apps need routing, which is why the Angular Component Router is in a separate, optional library module.
Like for any service, you make router services available to the application
by adding them to the providers list. Update the directives and
providers lists to include the router assets:
lib/app_component.dart (excerpt)
AppComponent no longer shows heroes, that will be the router's job,
so you can remove the HeroesComponent from the directives list.
You'll soon remove <my-heroes> from the template too.
Add the base tag
Open index.html and add <base href="/"> at the top of the <head> section.
web/index.html (base-href)
See the base href section of the Router chapter to learn why this matters.
Configure routes and add the router
The AppComponent doesn't have a router yet. You'll use the @RouteConfig
annotation to simultaneously:
- Assign a router to the component
- Configure that router with routes
Routes tell the router which views to display when a user clicks a link or pastes a URL into the browser address bar.
Let's define our first route as a route to the heroes component:
lib/app_component.dart (heroes route)
The @RouteConfig takes a list of route definitions.
We have only one route definition at the moment but rest assured, we'll add more.
This route definition has the following parts:
- path: the router matches this route's path to the URL in the browser address bar (
/heroes). - name: the official name of the route;
it must begin with a capital letter to avoid confusion with the path (
Heroes). - component: the component that the router should create when navigating to this route (
HeroesComponent).
Learn more about defining routes with @RouteConfig in the Routing chapter.
Router Outlet
If we paste the path, /heroes, into the browser address bar,
the router should match it to the 'Heroes' route and display the HeroesComponent.
But where?
We have to tell it where by adding a <router-outlet> element to the bottom of the template.
RouterOutlet is one of the directives provided by the ROUTER_DIRECTIVES.
The router displays each component immediately below the <router-outlet> as we navigate through the application.
Router Links
We don't really expect users to paste a route URL into the address bar.
We add an anchor tag to the template which, when clicked, triggers navigation to the HeroesComponent.
The revised template looks like this:
lib/app_component.dart (template-v2)
Notice the [routerLink] binding in the anchor tag.
You bind the RouterLink directive (another of the ROUTER_DIRECTIVES) to a list
that tells the router where to navigate when the user clicks the link.
You define a routing instruction with a link parameters list.
The list only has one element in our little sample, the quoted name of the route to follow.
Looking back at the route configuration, confirm that 'Heroes' is the name of the route to the HeroesComponent.
Learn about the link parameters list in the Routing chapter.
Refresh the browser. We see only the app title and heroes link. We don't see the heroes list.
The browser's address bar shows /.
The route path to HeroesComponent is /heroes, not /.
We don't have a route that matches the path /, so there is nothing to show.
That's something we'll want to fix.
We click the Heroes navigation link, the browser bar updates to /heroes,
and now we see the list of heroes. We are navigating at last!
At this stage, our AppComponent looks like this.
lib/app_component.dart (v2)
The AppComponent is now attached to a router and displaying routed views. For this reason and to distinguish it from other kinds of components, we call this type of component a Router Component.
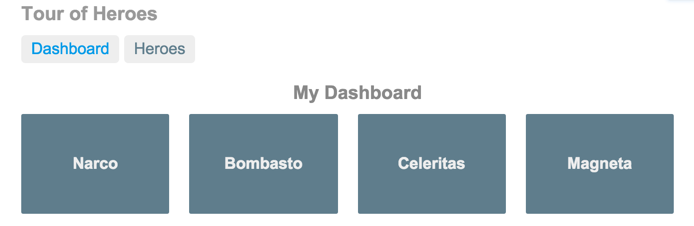
Add a Dashboard
Routing only makes sense when we have multiple views. We need another view.
Create a placeholder DashboardComponent that gives us something to navigate to and from.
lib/dashboard_component.dart (v1)
We’ll come back and make it more useful later.
Configure the dashboard route
Go back to AppComponent and teach it to navigate to the dashboard.
Import the dashboard component and
add the following route definition to the @RouteConfig list of definitions.
lib/app_component.dart (Dashboard route)
useAsDefault
We want the app to show the dashboard when it starts and
we want to see a nice URL in the browser address bar that says /dashboard.
Remember that the browser launches with / in the address bar.
You don't need a route definition for that. Instead,
add useAsDefault: true to the dashboard route definition and the
router will display the dashboard when the browser URL doesn't match an existing route.
Add navigation to the template
Finally, add a dashboard navigation link to the template, just above the Heroes link.
lib/app_component.dart (template-v3)
We nested the two links within <nav> tags.
They don't do anything yet but they'll be convenient when we style the links a little later in the chapter.
To see these changes in your browser, go to the application root (/) and reload.
The app displays the dashboard and we can navigate between the dashboard and the heroes.
Dashboard Top Heroes
Let’s spice up the dashboard by displaying the top four heroes at a glance.
Replace the template metadata with a templateUrl property that points to a new
template file.
lib/dashboard_component.dart (metadata)
The value of templateUrl can be an asset in this package or another
package. To use an asset in another package, use a full package reference,
such as 'package:some_other_package/dashboard_component.html'.
Create that file with this content:
lib/dashboard_component.html
We use *ngFor once again to iterate over a list of heroes and display their names.
We added extra <div> elements to help with styling later in this chapter.
Share the HeroService
We'd like to re-use the HeroService to populate the component's heroes list.
Recall earlier in the chapter that we removed the HeroService from the providers list of HeroesComponent
and added it to the providers list of AppComponent.
That move created a singleton HeroService instance, available to all components of the application.
Angular will inject HeroService and we'll use it here in the DashboardComponent.
Get heroes
Open dashboard.component.ts and add the requisite import statements.
lib/dashboard_component.dart (imports)
Now implement the DashboardComponent class like this:
lib/dashboard_component.dart (class)
We've seen this kind of logic before in the HeroesComponent:
- Define a
heroeslist property. - Inject the
HeroServicein the constructor and hold it in a private_heroServicefield. - Call the service to get heroes inside the Angular
ngOnInitlifecycle hook.
In this dashboard we cherry-pick four heroes (2nd, 3rd, 4th, and 5th) with the Array.slice method.
Refresh the browser and see four heroes in the new dashboard.
Navigate to Hero Details
Although we display the details of a selected hero at the bottom of the HeroesComponent,
we don't yet navigate to the HeroDetailComponent in the three ways specified in our requirements:
- from the Dashboard to a selected hero.
- from the Heroes list to a selected hero.
- from a "deep link" URL pasted into the browser address bar.
Adding a hero-detail route seems like an obvious place to start.
Routing to a hero detail
We'll add a route to the HeroDetailComponent in AppComponent where our other routes are configured.
The new route is a bit unusual in that we must tell the HeroDetailComponent which hero to show.
We didn't have to tell the HeroesComponent or the DashboardComponent anything.
At the moment the parent HeroesComponent sets the component's hero property to a
hero object with a binding like this.
That clearly won't work in any of our routing scenarios. Certainly not the last one; we can't embed an entire hero object in the URL! Nor would we want to.
Parameterized route
We can add the hero's id to the URL. When routing to the hero whose id is 11,
we could expect to see an URL such as this:
The /detail/ part of that URL is constant. The trailing numeric id part changes from hero to hero.
We need to represent that variable part of the route with a parameter (or token) that stands for the hero's id.
Configure a Route with a Parameter
Here's the route definition we'll use.
lib/app_component.dart (hero detail)
The colon (:) in the path indicates that :id is a placeholder to be filled with a specific hero id
when navigating to the HeroDetailComponent.
Remember to import the hero detail component before creating this route.
We're finished with the application routes.
We won't add a 'Hero Detail' link to the template because users
don't click a navigation link to view a particular hero.
They click a hero whether that hero is displayed on the dashboard or in the heroes list.
We'll get to those hero clicks later in the chapter.
There's no point in working on them until the HeroDetailComponent
is ready to be navigated to.
That will require an HeroDetailComponent overhaul.
Revise the HeroDetailComponent
Before we rewrite the HeroDetailComponent, let's review what it looks like now:
lib/hero_detail_component.dart (current)
The template won't change. We'll display a hero the same way. The big changes are driven by how we get the hero.
You will no longer receive the hero in a parent component property binding.
The new HeroDetailComponent should take the id parameter from the router's
RouteParams service and use the HeroService to fetch the hero with that id.
First, add the requisite imports:
Let's have the RouteParams service, the HeroService and the Location service injected
into the constructor, saving their values in private fields:
lib/hero_detail_component.dart (constructor)
We tell the class that we want to implement the OnInit interface.
Inside the ngOnInit lifecycle hook, extract the id parameter value from the RouteParams service
and use the HeroService to fetch the hero with that id.
lib/hero_detail_component.dart (ngOnInit)
Notice how you can extract the id by calling the RouteParams.get method.
The hero id is a number. Route parameters are always strings.
So we convert the route parameter value to a number with the int.parse static method.
Add HeroService.getHero
The problem with this bit of code is that HeroService doesn't have a getHero method!
We better fix that quickly before someone notices that we broke the app.
Open HeroService and add a getHero method that filters the heroes list from getHeroes by id:
lib/hero_service.dart (getHero)
Let's return to the HeroDetailComponent to clean up loose ends.
Find our way back
We can navigate to the HeroDetailComponent in several ways.
How do we navigate somewhere else when we're done?
The user could click one of the two links in the AppComponent. Or click the browser's back button.
We'll add a third option, a goBack method that navigates backward one step in the browser's history stack
using the Location service we injected previously.
lib/hero_detail_component.dart (goBack)
Going back too far could take us out of the application. That's acceptable in a demo. We'd guard against it in a real application, perhaps with the routerCanDeactivate hook.
Then we wire this method with an event binding to a Back button that we add to the bottom of the component template.
Modifying the template to add this button spurs us to take one more incremental improvement and migrate the template to its own file, called hero-detail.component.html:
lib/hero_detail_component.html
We update the component metadata with a moduleId and a templateUrl pointing to the template file that we just created.
lib/hero_detail_component.dart (metadata)
Refresh the browser and see the results.
Select a Dashboard Hero
When a user selects a hero in the dashboard, the app should navigate to the HeroDetailComponent to view and edit the selected hero.
Although the dashboard heroes are presented as button-like blocks, they should behave like anchor tags. When hovering over a hero block, the target URL should display in the browser status bar and the user should be able to copy the link or open the hero detail view in a new tab.
To achieve this effect, reopen the dashboard.component.html and replace the repeated <div *ngFor...> tags
with <a> tags. The opening <a> tag looks like this:
app/dashboard.component.html (repeated <a> tag)
Router links in the dashboard are currently not operational, as reported in issue dart-lang/angular2/issues/186.
Notice the [routerLink] binding.
Top level navigation in the AppComponent
template has router links set to fixed names of the
destination routes, "/dashboard" and "/heroes".
This time, we're binding to an expression containing a link parameters list.
The list has two elements, the name of
the destination route and a route parameter set to the value of the current hero's id.
The two list items align with the name and :id
token in the parameterized hero detail route definition we added to
AppComponent earlier in the chapter:
lib/app_component.dart (hero detail)
Refresh the browser and select a hero from the dashboard; the app should navigate directly to that hero’s details.
Select a Hero in the HeroesComponent
Earlier we added the ability to select a hero from the dashboard.
We'll do something similar in the HeroesComponent.
The HeroesComponent template exhibits a "master/detail" style with the list of heroes
at the top and details of the selected hero below.
lib/heroes_component.dart (current template)
Our goal is to move the detail to its own view and navigate to it when the user decides to edit a selected hero.
Delete the <h1> at the top (we forgot about it during the AppComponent-to-HeroesComponent conversion).
Delete the last line of the template with the <my-hero-detail> tags.
We'll no longer show the full HeroDetailComponent here.
We're going to display the hero detail on its own page and route to it as we did in the dashboard.
We'll throw in a small twist for variety. We are keeping the "master/detail" style but shrinking the detail to a "mini", read-only version. When the user selects a hero from the list, we don't go to the detail page. We show a mini-detail on this page instead and make the user click a button to navigate to the full detail page.
Add the mini-detail
Add the following HTML fragment at the bottom of the template where the <my-hero-detail> used to be:
After clicking a hero, the user should see something like this below the hero list:
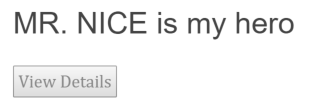
Format with the uppercase pipe
Notice that the hero's name is displayed in CAPITAL LETTERS. That's the effect of the uppercase pipe
that we slipped into the interpolation binding. Look for it right after the pipe operator ( | ).
Pipes are a good way to format strings, currency amounts, dates and other display data. Angular ships with several pipes and we can write our own.
Learn about pipes in the Pipes chapter.
Move content out of the component file
We are not done. We still have to update the component class to support navigation to the
HeroDetailComponent when the user clicks the View Details button.
This component file is really big. Most of it is either template or CSS styles. It's difficult to find the component logic amidst the noise of HTML and CSS.
Let's migrate the template and the styles to their own files before we make any more changes:
- Cut-and-paste the template contents into a new heroes.component.html file.
- Cut-and-paste the styles contents into a new heroes.component.css file.
- Set the component metadata's
templateUrlandstyleUrlsproperties to refer to both files. - . Set the
moduleIdproperty tomodule.idso thattemplateUrlandstyleUrlsare relative to the component.
The styleUrls property is a list of style file names (with paths).
We could list multiple style files from different locations if we needed them.
Because the template for HeroesComponent no longer uses HeroDetailComponent
directly — instead using the router to navigate to it — you can
drop the directives argument from @Component and remove the unused hero detail
import. The revised @Component looks like this:
lib/heroes_component.dart (revised metadata)
Update the HeroesComponent class.
The HeroesComponent navigates to the HeroesDetailComponent in response to a button click.
The button's click event is bound to a gotoDetail method that navigates imperatively
by telling the router where to go.
This approach requires some changes to the component class:
- Import the
routerfrom the Angular router library - Inject the
routerin the constructor (along with theHeroService) - Implement
gotoDetailby calling therouter.navigatemethod
lib/heroes_component.dart (gotoDetail)
Note that we're passing a two-element link parameters list
— a path and the route parameter — to
the router.navigate method just as we did in the [routerLink] binding
back in the DashboardComponent.
Here's the fully revised HeroesComponent class:
lib/heroes_component.dart (class)
Refresh the browser and start clicking. We can navigate around the app, from the dashboard to hero details and back, for heroes list to the mini-detail to the hero details and back to the heroes again. We can jump back and forth between the dashboard and the heroes.
We've met all of the navigational requirements that propelled this chapter.
Styling the App
The app is functional but pretty ugly. Our creative designer team provided some CSS files to make it look better.
A Dashboard with Style
The designers think we should display the dashboard heroes in a row of rectangles. They've given us ~60 lines of CSS for this purpose including some simple media queries for responsive design.
If we paste these ~60 lines into the component styles metadata,
they'll completely obscure the component logic.
Let's not do that. It's easier to edit CSS in a separate *.css file anyway.
Add a dashboard.component.css file to the lib folder and reference
that file in the component metadata's styleUrls list property like this:
lib/dashboard_component.dart (styleUrls)
Stylish Hero Details
The designers also gave us CSS styles specifically for the HeroDetailComponent.
Add a hero-detail.component.css to the lib
folder and refer to that file inside
the styleUrls list as we did for DashboardComponent.
Let's also remove the hero property @Input annotation
and its import
while we are at it.
Here's the content for the aforementioned component CSS files.
Style the Navigation Links
The designers gave us CSS to make the navigation links in our AppComponent look more like selectable buttons.
We cooperated by surrounding those links in <nav> tags.
Add a app.component.css file to the lib folder with the following content.
lib/app_component.css (navigation styles)
The router-link-active class
The Angular Router adds the router-link-active class to the HTML navigation element
whose route matches the active route. All you have to do is define the style for it. Sweet!
Set the AppComponent’s styleUrls property to this CSS file.
lib/app_component.dart (styleUrls)
Global application styles
When we add styles to a component, we're keeping everything a component needs — HTML, the CSS, the code — together in one convenient place. It's pretty easy to package it all up and re-use the component somewhere else.
We can also create styles at the application level outside of any component.
Our designers provided some basic styles to apply to elements across the entire app. These correspond to the full set of master styles that we installed earlier during setup. Here is an excerpt:
web/styles.css (excerpt)
Create the file styles.css, if it doesn't exist already. Ensure that it contains the master styles given here.
If necessary, also edit index.html to refer to this stylesheet.
web/index.html (link ref)
Look at the app now. Our dashboard, heroes, and navigation links are styling!
Application structure and code
Review the sample source code in the
Recap
The Road Behind
We travelled a great distance in this chapter
- We added the Angular Router to navigate among different components.
- We learned how to create router links to represent navigation menu items.
- We used router link parameters to navigate to the details of user selected hero.
- We shared the
HeroServiceamong multiple components. - We moved HTML and CSS out of the component file and into their own files.
- We added the
uppercasepipe to format data. - We refactored routes into a
Routing Modulethat we import.
The Road Ahead
We have much of the foundation we need to build an application. We're still missing a key piece: remote data access.
In the next chapter, we’ll replace our mock data with data retrieved from a server using http.