In this page, you'll make the following improvements.
在这一章中,我们将进行如下增强:
Get the hero data from a server.
从服务器获取英雄数据。
Let users add, edit, and delete hero names.
让用户添加、编辑和删除英雄名。
Save the changes to the server.
把这些更改保存到服务器。
You'll teach the app to make corresponding HTTP calls to a remote server's web API.
我们要让应用能够对远端服务器提供的Web API发起相应的HTTP调用。
When you're done with this page, the app should look like this
当我们完成这一章时,应用会变成这样:
Where you left off
延续上一步教程
In the previous page, you learned to navigate between the dashboard and the fixed heroes list, editing a selected hero along the way. That's the starting point for this page.
在前一章中,我们学会了在仪表盘和固定的英雄列表之间导航,并编辑选定的英雄。这也就是本章的起点。
Keep the app transpiling and running
保持应用的转译与运行
Enter the following command in the terminal window:
在终端窗口输入如下命令:
This command runs the TypeScript compiler in "watch mode", recompiling automatically when the code changes. The command simultaneously launches the app in a browser and refreshes the browser when the code changes.
这个命令会在“监听”模式下运行TypeScript编译器,当代码变化时,它会自动重新编译。 同时,该命令还会在浏览器中启动该应用,并且当代码变化时刷新浏览器。
You can keep building the Tour of Heroes without pausing to recompile or refresh the browser.
在后续构建《英雄指南》过程中,应用能持续运行,而不用中断服务来编译或刷新浏览器。
Providing HTTP Services
提供 HTTP 服务
The HttpModule is not a core Angular module.
HttpModule is Angular's optional approach to web access. It exists as a separate add-on module called @angular/http
and is shipped in a separate script file as part of the Angular npm package.
HttpModule并不是 Angular 的核心模块。
它是 Angular 用来进行 Web 访问的一种可选方式,并位于一个名叫 @angular/http 的独立附属模块中,并作为 Angular 的 npm 包之一而发布出来。
You're ready to import from @angular/http because systemjs.config configured SystemJS to load that library when you need it.
systemjs.config中已经配置好了 SystemJS,并在必要时加载它,因此我们已经准备好从@angular/http中导入它了。
Register for HTTP services
注册 HTTP 服务
The app will depend on the Angular http service, which itself depends on other supporting services.
The HttpModule from the @angular/http library holds providers for a complete set of HTTP services.
我们的应用将会依赖于 Angular 的http服务,它本身又依赖于其它支持类服务。
来自@angular/http库中的HttpModule保存着这些 HTTP 相关服务提供商的全集。
To allow access to these services from anywhere in the app,
add HttpModule to the imports list of the AppModule.
我们要能从本应用的任何地方访问这些服务,就要把HttpModule添加到AppModule的imports列表中。
这里同时也是我们引导应用及其根组件AppComponent的地方。
src/app/app.module.ts (v1)
Notice that you also supply HttpModule as part of the imports array in root NgModule AppModule.
注意,现在HttpModule已经是根模块AppModule的imports数组的一部分了。
Simulate the web API
模拟web API
We recommend registering app-wide services in the root
AppModule providers.
我们建议在根模块AppModule的providers数组中注册全应用级的服务。
Until you have a web server that can handle requests for hero data, the HTTP client will fetch and save data from a mock service, the in-memory web API.
在拥有一个能处理Web请求的服务器之前,我们可以先用HTTP客户端通过一个模拟(Mock)服务(内存Web API)来获取和保存数据。
Update src/app/app.module.ts with this version, which uses the mock service:
修改src/app/app.module.ts,让它使用这个模拟服务:
src/app/app.module.ts (v2)
Rather than require a real API server, this example simulates communication with the remote server by adding the
InMemoryWebApiModule
to the module imports, effectively replacing the Http client's XHR backend service with an in-memory alternative.
导入InMemoryWebApiModule并将其加入到模块的imports数组。
InMemoryWebApiModule将Http客户端默认的后端服务 —
这是一个辅助服务,负责与远程服务器对话 —
替换成了内存 Web API服务:
The forRoot() configuration method takes an InMemoryDataService class
that primes the in-memory database.
Add the file in-memory-data.service.ts in app with the following content:
forRoot()配置方法需要InMemoryDataService类实例,用来向内存数据库填充数据:
往app目录下新增一个文件in-memory-data.service.ts,填写下列内容:
src/app/in-memory-data.service.ts
This file replaces mock-heroes.ts, which is now safe to delete.
这个文件已经替换了mock-heroes.ts,可以删除mock-heroes.ts了。
The in-memory web API is only useful in the early stages of development and for demonstrations such as this Tour of Heroes. Don't worry about the details of this backend substitution; you can skip it when you have a real web API server.
内存Web API只在开发的早期阶段或写《英雄指南》这样的演示程序时才有用。有了它,你将来替换后端实现时就不用关心这些细节问题了。如果你已经有了一个真实的Web API服务器,尽管跳过它吧。
Read more about the in-memory web API in the Appendix: Tour of Heroes in-memory web api section of the HTTP Client page.
关于内存 Web API 的更多信息,见 附录:英雄指南Web API中的HTTP 客户端部分。
Heroes and HTTP
英雄与 HTTP
In the current HeroService implementation, a Promise resolved with mock heroes is returned.
在目前的HeroService的实现中,返回的是一个能解析(resolve)成模拟英雄列表的承诺(Promise)。
src/app/hero.service.ts (old getHeroes)
This was implemented in anticipation of ultimately fetching heroes with an HTTP client, which must be an asynchronous operation.
我们返回一个承诺 (Promise),它用模拟版的英雄列表进行解析。 它当时可能看起来显得有点过于复杂,不过我们预料到总有这么一天会通过 HTTP 客户端来获取英雄数据, 而且我们知道,那一定是一个异步操作。
Now convert getHeroes() to use HTTP.
现在,我们把getHeroes()换成使用 HTTP。
src/app/hero.service.ts (updated getHeroes and new class members)
Update the import statements as follows:
更新后的导入声明如下:
src/app/hero.service.ts (updated imports)
Refresh the browser. The hero data should successfully load from the mock server.
刷新浏览器后,英雄数据就会从模拟服务器被成功读取。
HTTP Promise
The Angular http.get returns an RxJS Observable.
Observables are a powerful way to manage asynchronous data flows.
You'll read about Observables later in this page.
Angular 的http.get返回一个 RxJS 的Observable对象。
Observable(可观察对象)是一个管理异步数据流的强力方式。
后面我们还会进一步学习可观察对象。
For now, you've converted the Observable to a Promise using the toPromise operator.
现在,我们先利用toPromise操作符把Observable直接转换成Promise对象,回到已经熟悉的地盘。
The Angular Observable doesn't have a toPromise operator out of the box.
不幸的是,Angular 的Observable并没有一个toPromise操作符... 没有打包在一起发布。Angular的Observable只是一个骨架实现。
There are many operators like toPromise that extend Observable with useful capabilities.
To use those capabilities, you have to add the operators themselves.
That's as easy as importing them from the RxJS library like this:
有很多像toPromise这样的操作符,用于扩展Observable,为其添加有用的能力。
如果我们希望得到那些能力,就得自己添加那些操作符。
那很容易,只要从 RxJS 库中导入它们就可以了,就像这样:
You'll add more operators, and learn why you must do so, later in this tutorial.
我们还要添加更多的操作符,并且必须这么做,要了解其中的原因,参见本章稍后的部分。
Extracting the data in the then callback
在 then 回调中提取出数据
In the Promise's then() callback , you call the json method of the HTTP Response to extract the
data within the response.
在 promise 的then()回调中,我们调用 HTTP 的Reponse对象的json方法,以提取出其中的数据。
The response JSON has a single data property, which
holds the array of heroes that the caller wants.
So you grab that array and return it as the resolved Promise value.
这个由json方法返回的对象只有一个data属性。
这个data属性保存了英雄数组,这个数组才是调用者真正想要的。
所以我们取得这个数组,并且把它作为承诺的值进行解析。
Note the shape of the data that the server returns.
This particular in-memory web API example returns an object with a data property.
Your API might return something else. Adjust the code to match your web API.
仔细看看这个由服务器返回的数据的形态。
这个内存 Web API 的范例中所做的是返回一个带有data属性的对象。
你的 API 也可以返回其它东西。请调整这些代码以匹配你的 Web API。
The caller is unaware that you fetched the heroes from the (mock) server. It receives a Promise of heroes just as it did before.
调用者并不知道这些实现机制,它仍然像以前那样接收一个包含英雄数据的承诺。 它也不知道我们已经改成了从服务器获取英雄数据。 它也不必了解把 HTTP 响应转换成英雄数据时所作的这些复杂变换。 看到美妙之处了吧,这正是将数据访问委托组一个服务的目的。
Error Handling
错误处理
At the end of getHeroes(), you catch server failures and pass them to an error handler.
在getHeroes()的最后,我们catch了服务器的失败信息,并把它们传给了错误处理器:
This is a critical step. You must anticipate HTTP failures, as they happen frequently for reasons beyond your control.
这是一个关键的步骤! 我们必须预料到 HTTP 请求会失败,因为有太多我们无法控制的原因可能导致它们频繁出现各种错误。
This demo service logs the error to the console; in real life, you would handle the error in code. For a demo, this works.
在这个范例服务中,我们把错误记录到控制台中;在真实世界中,我们应该用代码对错误进行处理。但对于演示来说,这就够了。
The code also includes an error to the caller in a rejected promise, so that the caller can display a proper error message to the user.
我们还要通过一个被拒绝 (rejected) 的承诺来把该错误用一个用户友好的格式返回给调用者, 以便调用者能把一个合适的错误信息显示给用户。
Get hero by id
通过id获取英雄
When the HeroDetailComponent asks the HeroService to fetch a hero,
the HeroService currently fetches all heroes and
filters for the one with the matching id.
That's fine for a simulation, but it's wasteful to ask a real server for all heroes when you only want one.
Most web APIs support a get-by-id request in the form api/hero/:id (such as api/hero/11).
当HeroDetailComponent向HeroService请求获取一个英雄时,HeroService会获取所有英雄,并从中过滤出与id匹配的那一个。
这对于例子来说倒是无可厚非,
不过在真实服务中,这种为了获取一个英雄而请求全部英雄的做法就有点浪费了,
许多Web API支持get-by-id请求,形如:api/hero/:id(如:api/hero/11)。
Update the HeroService.getHero() method to make a get-by-id request:
修改 HeroService.getHero() 方法来发起一个 get-by-id 请求:
src/app/hero.service.ts
This request is almost the same as getHeroes().
The hero id in the URL identifies which hero the server should update.
此方法基本上与getHeroes方法一致,通过在URL中添加英雄的id来告诉服务器应该获取那个英雄,
匹配api/hero/:id模式。
Also, the data in the response is a single hero object rather than an array.
我们还要把响应中返回的data改为一个英雄对象,而不再是对象数组。组。
Unchanged getHeroes API
getHeroes API 没变
Although you made significant internal changes to getHeroes() and getHero(),
the public signatures didn't change.
You still return a Promise from both methods.
You won't have to update any of the components that call them.
尽管我们在getHeroes()和getHero()方法的内部做了重大修改,
但是他们的公共签名却没有变。这两个方法仍然返回的是一个Promise对象,
所以并不需要修改任何调用他们的组件。
Now it's time to add the ability to create and delete heroes.
现在,我们该支持创建和删除英雄了。
Updating hero details
更新英雄详情
Try editing a hero's name in the hero detail view. As you type, the hero name is updated in the view heading. But if you click the Back button, the changes are lost.
我们已经可以在英雄详情中编辑英雄的名字了。来试试吧。在输入的时候,页头上的英雄名字也会随之更新。
不过当我们点了Back(后退)按钮时,这些修改就丢失了。
Updates weren't lost before. What changed? When the app used a list of mock heroes, updates were applied directly to the hero objects within the single, app-wide, shared list. Now that you're fetching data from a server, if you want changes to persist, you must write them back to the server.
以前是不会丢失更新的,怎么回事? 当该应用使用模拟出来的英雄列表时,修改的是一份全局共享的英雄列表,而现在改成了从服务器获取数据。 如果我们希望这些更改被持久化,我们就得把它们写回服务器。
Add the ability to save hero details
保存英雄详情
At the end of the hero detail template, add a save button with a click event
binding that invokes a new component method named save().
我们先来确保对英雄名字的编辑不会丢失。先在英雄详情模板的底部添加一个保存按钮,它绑定了一个click事件,事件绑定会调用组件中一个名叫save()的新方法:
src/app/hero-detail.component.html (save)
Add the following save() method, which persists hero name changes using the hero service
update() method and then navigates back to the previous view.
save()方法使用 hero 服务的update()方法来持久化对英雄名字的修改,然后导航回前一个视图:
src/app/hero-detail.component.ts (save)
Add a hero service update() method
hero 服务的update方法
The overall structure of the update() method is similar to that of
getHeroes(), but it uses an HTTP put() to persist server-side changes.
update()方法的大致结构与getHeroes()类似,不过我们使用 HTTP 的 put() 方法来把修改持久化到服务端:
src/app/hero.service.ts (update)
To identify which hero the server should update, the hero id is encoded in
the URL. The put() body is the JSON string encoding of the hero, obtained by
calling JSON.stringify. The body content type
(application/json) is identified in the request header.
我们通过一个编码在 URL 中的英雄 id 来告诉服务器应该更新哪个英雄。put 的 body 是该英雄的 JSON 字符串,它是通过调用JSON.stringify得到的。
并且在请求头中标记出的 body 的内容类型(application/json)。
Refresh the browser, change a hero name, save your change, and click the browser Back button. Changes should now persist.
刷新浏览器试一下,对英雄名字的修改确实已经被持久化了。
Add the ability to add heroes
添加英雄
To add a hero, the app needs the hero's name. You can use an input
element paired with an add button.
要添加一个新的英雄,我们得先知道英雄的名字。我们使用一个 input 元素和一个添加按钮来实现。
Insert the following into the heroes component HTML, just after the heading:
把下列代码插入 heroes 组件的 HTML 中,放在标题的下面:
src/app/heroes.component.html (add)
In response to a click event, call the component's click handler and then clear the input field so that it's ready for another name.
当点击事件触发时,我们调用组件的点击处理器,然后清空这个输入框,以便用来输入另一个名字。
src/app/heroes.component.ts (add)
When the given name is non-blank, the handler delegates creation of the named hero to the hero service, and then adds the new hero to the array.
当指定的名字不为空的时候,点击处理器就会委托 hero 服务来创建一个具有此名字的英雄, 并把这个新的英雄添加到我们的数组中。
Implement the create() method in the HeroService class.
然后,我们在HeroService类中实现这个create()方法。
src/app/hero.service.ts (create)
Refresh the browser and create some heroes.
刷新浏览器,并创建一些新的英雄!
Add the ability to delete a hero
支持添加英雄
Each hero in the heroes view should have a delete button.
在英雄列表视图中的每个英雄都应该有一个删除按钮。
Add the following button element to the heroes component HTML, after the hero
name in the repeated <li> element.
把这个按钮元素添加到英雄列表组件的 HTML 中,把它放在<li>标签中的英雄名的后面:
The <li> element should now look like this:
<li>元素应该变成了这样:
src/app/heroes.component.html (li-element)
In addition to calling the component's delete() method, the delete button's
click handler code stops the propagation of the click event—you
don't want the <li> click handler to be triggered because doing so would
select the hero that the user will delete.
除了调用组件的delete()方法之外,这个删除按钮的点击处理器还应该阻止点击事件向上冒泡 —
我们并不希望触发<li>的事件处理器,否则它会选中我们要删除的这位英雄。
The logic of the delete() handler is a bit trickier:
delete()处理器的逻辑略复杂:
src/app/heroes.component.ts (delete)
Of course you delegate hero deletion to the hero service, but the component is still responsible for updating the display: it removes the deleted hero from the array and resets the selected hero, if necessary.
当然,我们仍然把删除英雄的操作委托给了 hero 服务, 不过该组件仍然负责更新显示:它从数组中移除了被删除的英雄,如果删除的是正选中的英雄,还会清空选择。
To place the delete button at the far right of the hero entry, add this CSS:
我们希望删除按钮被放在英雄条目的最右边。 于是 CSS 变成了这样:
src/app/heroes.component.css (additions)
Hero service delete() method
hero 服务的delete()方法
Add the hero service's delete() method, which uses the delete() HTTP method to remove the hero from the server:
hero 服务的delete()方法使用 HTTP 的 delete() 方法来从服务器上移除该英雄:
src/app/hero.service.ts (delete)
Refresh the browser and try the new delete functionality.
刷新浏览器,并试一下这个新的删除功能。
Observables
可观察对象 (Observable)
Each Http service method returns an Observable of HTTP Response objects.
Http服务中的每个方法都返回一个 HTTP Response对象的Observable实例。
The HeroService converts that Observable into a Promise and returns the promise to the caller.
This section shows you how, when, and why to return the Observable directly.
我们的HeroService中把那个Observable对象转换成了Promise(承诺),并把这个承诺返回给了调用者。
这一节,我们将学会直接返回Observable,并且讨论何时以及为何那样做会更好。
Background
背景
An Observable is a stream of events that you can process with array-like operators.
一个可观察对象是一个事件流,我们可以用数组型操作符来处理它。
Angular core has basic support for observables. Developers augment that support with operators and extensions from the RxJS library. You'll see how shortly.
Angular 内核中提供了对可观察对象的基本支持。而我们这些开发人员可以自己从 RxJS 库中引入操作符和扩展。 我们会简短的讲解下如何做。
Recall that the HeroService chained the toPromise operator to the Observable result of http.get().
That operator converted the Observable into a Promise and you passed that promise back to the caller.
快速回忆一下HeroService,它在http.get()返回的Observable后面串联了一个toPromise操作符。
该操作符把Observable转换成了Promise,并且我们把那个承诺返回给了调用者。
Converting to a Promise is often a good choice. You typically ask http.get() to fetch a single chunk of data.
When you receive the data, you're done.
The calling component can easily consume a single result in the form of a Promise.
转换成承诺通常是更好地选择,我们通常会要求http.get()获取单块数据。只要接收到数据,就算完成。
使用承诺这种形式的结果是让调用方更容易写,并且承诺已经在 JavaScript 程序员中被广泛接受了。
But requests aren't always done only once. You may start one request, cancel it, and make a different request before the server has responded to the first request.
但是请求并非总是“一次性”的。我们可以开始一个请求, 并且取消它,在服务器对第一个请求作出回应之前,再开始另一个不同的请求 。 像这样一个请求-取消-新请求的序列用承诺是很难实现的,但接下来我们会看到,它对于可观察对象却很简单。
A request-cancel-new-request sequence is difficult to implement with Promises, but
easy with Observables.
请求-取消-新请求的序列对于Promise来说是很难实现的,但是对Observable来说则很容易。
Add the ability to search by name
支持按名搜索
You're going to add a hero search feature to the Tour of Heroes. As the user types a name into a search box, you'll make repeated HTTP requests for heroes filtered by that name.
我们要为《英雄指南》添加一个英雄搜索特性。 当用户在搜索框中输入一个名字时,我们将不断发起 HTTP 请求,以获得按名字过滤的英雄。
Start by creating HeroSearchService that sends search queries to the server's web API.
我们先创建HeroSearchService服务,它会把搜索请求发送到我们服务器上的 Web API。
src/app/hero-search.service.ts
The http.get() call in HeroSearchService is similar to the one
in the HeroService, although the URL now has a query string.
HeroSearchService中的http.get()调用和HeroService中的很相似,只是这次带了查询字符串。
More importantly, you no longer call toPromise().
Instead you return the Observable from the the http.get(),
after chaining it to another RxJS operator, map(),
to extract heroes from the response data.
更重要的是:我们不再调用toPromise方法,而是从http.get
方法中返回一个Observable对象,之后调用RxJS的map操作符
来从返回数据中提取英雄。
RxJS operator chaining makes response processing easy and readable. See the discussion below about operators.
链式RxJS操作可以让我们简单、易读的处理响应数据。详见下面关于操作符的讨论
HeroSearchComponent
Let's create a new HeroSearchComponent that calls this new HeroSearchService.
我们再创建一个新的HeroSearchComponent来调用这个新的HeroSearchService。
The component template is simple—just a text box and a list of matching search results.
组件模板很简单,就是一个输入框和一个显示匹配的搜索结果的列表。
src/app/hero-search.component.html
Also, add styles for the new component.
我们还要往这个新组件中添加样式。
src/app/hero-search.component.css
As the user types in the search box, a keyup event binding calls the component's search()
method with the new search box value.
当用户在搜索框中输入时,一个 keyup 事件绑定会调用该组件的search()方法,并传入新的搜索框的值。
As expected, the *ngFor repeats hero objects from the component's heroes property.
不出所料,*ngFor从该组件的heroes属性重复获取 hero 对象。这也没啥特别的。
But as you'll soon see, the heroes property is now an Observable of hero arrays, rather than just a hero array.
The *ngFor can't do anything with an Observable until you route it through the async pipe (AsyncPipe).
The async pipe subscribes to the Observable and produces the array of heroes to *ngFor.
但是,接下来我们看到heroes属性现在是英雄列表的Observable对象,而不再只是英雄数组。
*ngFor不能用可观察对象做任何事,除非我们在它后面跟一个async pipe (AsyncPipe)。
这个async管道会订阅到这个可观察对象,并且为*ngFor生成一个英雄数组。
Create the HeroSearchComponent class and metadata.
该创建HeroSearchComponent类及其元数据了。
src/app/hero-search.component.ts
Search terms
搜索词
Focus on the searchTerms:
仔细看下这个searchTerms:
A Subject is a producer of an observable event stream;
searchTerms produces an Observable of strings, the filter criteria for the name search.
Subject(主题)是一个可观察的事件流中的生产者。
searchTerms生成一个产生字符串的Observable,用作按名称搜索时的过滤条件。Each call to search() puts a new string into this subject's observable stream by calling next().
每当调用search()时都会调用next()来把新的字符串放进该主题的可观察流中。
Initialize the heroes property (ngOnInit)
初始化 heroes 属性(ngOnInit)
A Subject is also an Observable.
You can turn the stream
of search terms into a stream of Hero arrays and assign the result to the heroes property.
Subject也是一个Observable对象。
我们要把搜索词的流转换成Hero数组的流,并把结果赋值给heroes属性。
Passing every user keystroke directly to the HeroSearchService would create an excessive amount of HTTP requests,
taxing server resources and burning through the cellular network data plan.
如果我们直接把每一次用户按键都直接传给HeroSearchService,就会发起一场 HTTP 请求风暴。
这可不好玩。我们不希望占用服务器资源,也不想耗光蜂窝移动网络的流量。
Instead, you can chain Observable operators that reduce the request flow to the string Observable.
You'll make fewer calls to the HeroSearchService and still get timely results. Here's how:
不过,我们可以在字符串的Observable后面串联一些Observable操作符,来归并这些请求。
我们将对HeroSearchService发起更少的调用,并且仍然获得足够及时的响应。做法如下:
debounceTime(300)waits until the flow of new string events pauses for 300 milliseconds before passing along the latest string. You'll never make requests more frequently than 300ms.在传出最终字符串之前,
debounceTime(300)将会等待,直到新增字符串的事件暂停了 300 毫秒。 我们实际发起请求的间隔永远不会小于 300ms。distinctUntilChangedensures that a request is sent only if the filter text changed.distinctUntilChanged确保只在过滤条件变化时才发送请求, 这样就不会重复请求同一个搜索词了。switchMap()calls the search service for each search term that makes it throughdebounceanddistinctUntilChanged. It cancels and discards previous search observables, returning only the latest search service observable.switchMap()会为每个从debounce和distinctUntilChanged中通过的搜索词调用搜索服务。 它会取消并丢弃以前的搜索可观察对象,只保留最近的。
With the switchMap operator
(formerly known as flatMapLatest),
every qualifying key event can trigger an http() method call.
Even with a 300ms pause between requests, you could have multiple HTTP requests in flight
and they may not return in the order sent.
借助switchMap操作符
(正式名称是flatMapLatest)
每次符合条件的按键事件都会触发一次对http()方法的调用。即使在发送每个请求前都有 300 毫秒的延迟,
我们仍然可能同时拥有多个在途的 HTTP 请求,并且它们返回的顺序未必就是发送时的顺序。
switchMap() preserves the original request order while returning
only the observable from the most recent http method call.
Results from prior calls are canceled and discarded.
switchMap()保留了原始的请求顺序,并且只返回最近一次 http 调用返回的可观察对象。
这是因为以前的调用都被取消或丢弃了。
If the search text is empty, the http() method call is also short circuited
and an observable containing an empty array is returned.
如果搜索框为空,我们还可以短路掉这次http()方法调用,并且直接返回一个包含空数组的可观察对象。
Note that until the service supports that feature,canceling the HeroSearchService Observable
doesn't actually abort a pending HTTP request.
For now , unwanted resultsare discarded.
注意,取消HeroSearchService的可观察对象并不会实际中止 (abort) 一个未完成的 HTTP 请求,
除非服务支持这个特性,这个问题我们以后再讨论。
目前我们的做法只是丢弃不希望的结果。
catchintercepts a failed observable. The simple example prints the error to the console; a real life app would do better. Then to clear the search result, you return an observable containing an empty array .catch拦截失败的可观察对象。这个简单的例子中只是把错误信息打印到控制台(但实际的应用需要做更多事),然后返回一个包含空数组的可观察对象,以清空搜索结果。
Import RxJS operators
导入 RxJS 操作符
Most RxJS operators are not included in Angular's base Observable implementation.
The base implementation includes only what Angular itself requires.
大部分RxJS操作符都不包括在Angular的Observable基本实现中,基本实现只包括Angular本身所需的功能。
When you need more RxJS features, extend Observable by importing the libraries in which they are defined.
Here are all the RxJS imports that this component needs:
如果想要更多的RxJS功能,我们必须导入其所定义的库来扩展Observable对象,
以下是这个模块所需导入的所有RxJS操作符:
src/app/hero-search.component.ts (rxjs imports)
The import 'rxjs/add/...' syntax may be unfamiliar.
It's missing the usual list of symbols between the braces: {...}.
你可能并不熟悉这种import 'rxjs/add/...'语法,它缺少了花括号中的导入列表:{...}。
You don't need the operator symbols themselves.
In each case, the mere act of importing the library
loads and executes the library's script file which, in turn, adds the operator to the Observable class.
这是因为我们并不需要操作符本身,这种情况下,我们所做的其实是导入这个库,加载并运行其中的脚本,
它会把操作符添加到Observable类中。
Add the search component to the dashboard
为仪表盘添加搜索组件
Add the hero search HTML element to the bottom of the DashboardComponent template.
将表示“英雄搜索”组件的 HTML 元素添加到DashboardComponent模版的最后面。
src/app/dashboard.component.html
Finally, import HeroSearchComponent from
hero-search.component.ts
and add it to the declarations array.
最后,从hero-search.component.ts中导入HeroSearchComponent并将其添加到declarations数组中。
src/app/app.module.ts (search)
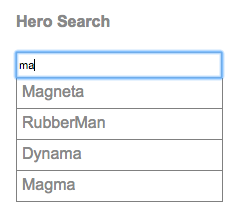
Run the app again. In the Dashboard, enter some text in the search box. If you enter characters that match any existing hero names, you'll see something like this.
再次运行该应用,跳转到仪表盘,并在英雄下方的搜索框里输入一些文本。 运行效果如下:
App structure and code
应用的结构与代码
Review the sample source code in the
回顾一下本章
Home Stretch
最后冲刺
You're at the end of your journey, and you've accomplished a lot.
旅程即将结束,不过我们已经收获颇丰。
You added the necessary dependencies to use HTTP in the app.
我们添加了在应用程序中使用 HTTP 的必备依赖。
You refactored
HeroServiceto load heroes from a web API.我们重构了
HeroService,以通过 web API 来加载英雄数据。You extended
HeroServiceto supportpost(),put(), anddelete()methods.我们扩展了
HeroService来支持post()、put()和delete()方法。You updated the components to allow adding, editing, and deleting of heroes.
我们更新了组件,以允许用户添加、编辑和删除英雄。
You configured an in-memory web API.
我们配置了一个内存 Web API。
You learned how to use Observables.
我们学会了如何使用“可观察对象”。
Here are the files you added or changed in this page.
下面是我们添加或修改之后的文件汇总。
Next step
下一步
Return to the learning path, where you can read more about the concepts and practices found in this tutorial.
返回学习路径,你可以阅读在本教程中探索到的概念和实践。