This guide looks at how Angular manipulates the DOM with structural directives and how you can write your own structural directives to do the same thing.
在本章中,我们将看看Angular如何用结构型指令操纵DOM树,以及我们该如何写自己的结构型指令来完成同样的任务。
Table of contents
目录
Try the
试试
What are structural directives?
什么是结构型指令?
Structural directives are responsible for HTML layout. They shape or reshape the DOM's structure, typically by adding, removing, or manipulating elements.
结构型指令的职责是HTML布局。 它们塑造或重塑DOM的结构,比如添加、移除或维护这些元素。
As with other directives, you apply a structural directive to a host element. The directive then does whatever it's supposed to do with that host element and its descendents.
像其它指令一样,你可以把结构型指令应用到一个宿主元素上。 然后它就可以对宿主元素及其子元素做点什么。
Structural directives are easy to recognize. An asterisk (*) precedes the directive attribute name as in this example.
结构型指令非常容易识别。 在这个例子中,星号(*)被放在指令的属性名之前。
No brackets. No parentheses. Just *ngIf set to a string.
没有方括号,没有圆括号,只是把*ngIf设置为一个字符串。
You'll learn in this guide that the asterisk (*) is a convenience notation
and the string isa microsyntax rather than the usual
template expression.
Angular desugars this notation into a marked-up <ng-template> that surrounds the
host element and its descendents.
Each structural directive does something different with that template.
在这个例子中,我们将学到星号(*)这个简写方法,而这个字符串是一个微语法,而不是通常的模板表达式。
Angular会解开这个语法糖,变成一个<ng-template>标记,包裹着宿主元素及其子元素。
每个结构型指令都可以用这个模板做点不同的事情。
Three of the common, built-in structural directives—NgIf, NgFor, and NgSwitch...—are described in the Template Syntax guide and seen in samples throughout the Angular documentation. Here's an example of them in a template:
三个常用的内置结构型指令 —— NgIf、NgFor和NgSwitch...。 我们在模板语法一章中讲过它,并且在Angular文档的例子中到处都在用它。下面是模板中的例子:
This guide won't repeat how to use them. But it does explain how they work and how to write your own structural directive.
本章不会重复讲如何使用它们,而是解释它们的工作原理以及如何写自己的结构型指令。
Throughout this guide, you'll see a directive spelled in both UpperCamelCase and lowerCamelCase.
Already you've seen NgIf and ngIf.
There's a reason. NgIf refers to the directive class;
ngIf refers to the directive's attribute name.
在本章中,我们将看到指令同时具有两种拼写形式大驼峰UpperCamelCase和小驼峰lowerCamelCase,比如我们已经看过的NgIf和ngIf。
这里的原因在于,NgIf引用的是指令的类名,而ngIf引用的是指令的属性名*。
A directive class is spelled in UpperCamelCase (NgIf).
A directive's attribute name is spelled in lowerCamelCase (ngIf).
The guide refers to the directive class when talking about its properties and what the directive does.
The guide refers to the attribute name when describing how
you apply the directive to an element in the HTML template.
指令的类名拼写成大驼峰形式(NgIf),而它的属性名则拼写成小驼峰形式(ngIf)。
本章会在谈论指令的属性和工作原理时引用指令的类名,在描述如何在HTML模板中把该指令应用到元素时,引用指令的属性名。
There are two other kinds of Angular directives, described extensively elsewhere: (1) components and (2) attribute directives.
还有另外两种Angular指令,在本开发指南的其它地方有讲解:(1) 组件 (2) 属性型指令。
A component manages a region of HTML in the manner of a native HTML element. Technically it's a directive with a template.
组件可以在原生HTML元素中管理一小片区域的HTML。从技术角度说,它就是一个带模板的指令。
An attribute directive changes the appearance or behavior
of an element, component, or another directive.
For example, the built-in NgStyle directive
changes several element styles at the same time.
属性型指令会改变某个元素、组件或其它指令的外观或行为。
比如,内置的NgStyle指令可以同时修改元素的多个样式。
You can apply many attribute directives to one host element. You can only apply one structural directive to a host element.
我们可以在一个宿主元素上应用多个属性型指令,但只能应用一个结构型指令。
NgIf case study
NgIf案例分析
NgIf is the simplest structural directive and the easiest to understand.
It takes a boolean expression and makes an entire chunk of the DOM appear or disappear.
我们重点看下ngIf。它是一个很好的结构型指令案例:它接受一个布尔值,并据此让一整块DOM树出现或消失。
The ngIf directive doesn't hide elements with CSS. It adds and removes them physically from the DOM.
Confirm that fact using browser developer tools to inspect the DOM.
ngIf指令并不是使用CSS来隐藏元素的。它会把这些元素从DOM中物理删除。
使用浏览器的开发者工具就可以确认这一点。
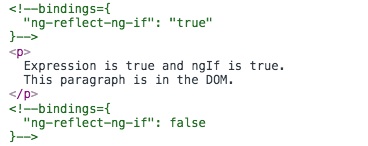
The top paragraph is in the DOM. The bottom, disused paragraph is not; in its place is a comment about "bindings" (more about that later).
可以看到第一段文字出现在了DOM中,而第二段则没有,在第二段的位置上是一个关于“绑定”的注释(稍后有更多讲解)。
When the condition is false, NgIf removes its host element from the DOM,
detaches it from DOM events (the attachments that it made),
detaches the component from Angular change detection, and destroys it.
The component and DOM nodes can be garbage-collected and free up memory.
当条件为假时,NgIf会从DOM中移除它的宿主元素,取消它监听过的那些DOM事件,从Angular变更检测中移除该组件,并销毁它。
这些组件和DOM节点可以被当做垃圾收集起来,并且释放它们占用的内存。
Why remove rather than hide?
为什么移除而不是隐藏?
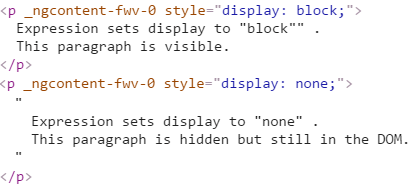
A directive could hide the unwanted paragraph instead by setting its display style to none.
指令也可以通过把它的display风格设置为none而隐藏不需要的段落。
While invisible, the element remains in the DOM.
当不可见时,这个元素仍然留在DOM中。
The difference between hiding and removing doesn't matter for a simple paragraph. It does matter when the host element is attached to a resource intensive component. Such a component's behavior continues even when hidden. The component stays attached to its DOM element. It keeps listening to events. Angular keeps checking for changes that could affect data bindings. Whatever the component was doing, it keeps doing.
对于简单的段落,隐藏和移除之间的差异影响不大,但对于资源占用较多的组件是不一样的。当我们隐藏掉一个元素时,组件的行为还在继续 —— 它仍然附加在它所属的DOM元素上, 它也仍在监听事件。Angular会继续检查哪些能影响数据绑定的变更。 组件原本要做的那些事情仍在继续。
Although invisible, the component—and all of its descendant components—tie up resources. The performance and memory burden can be substantial, responsiveness can degrade, and the user sees nothing.
虽然不可见,组件及其各级子组件仍然占用着资源,而这些资源如果分配给别人可能会更有用。 在性能和内存方面的负担相当可观,响应度会降低,而用户却可能无法从中受益。
On the positive side, showing the element again is quick. The component's previous state is preserved and ready to display. The component doesn't re-initialize—an operation that could be expensive. So hiding and showing is sometimes the right thing to do.
当然,从积极的一面看,重新显示这个元素会非常快。 组件以前的状态被保留着,并随时可以显示。 组件不用重新初始化 —— 该操作可能会比较昂贵。 这时候隐藏和显示就成了正确的选择。
But in the absence of a compelling reason to keep them around,
your preference should be to remove DOM elements that the user can't see
and recover the unused resources with a structural directive like NgIf .
但是,除非有非常强烈的理由来保留它们,否则我们更倾向于移除用户看不见的那些DOM元素,并且使用NgIf这样的结构型指令来收回用不到的资源。
These same considerations apply to every structural directive, whether built-in or custom. Before applying a structural directive, you might want to pause for a moment to consider the consequences of adding and removing elements and of creating and destroying components.
同样的考量也适用于每一个结构型指令,无论是内置的还是自定义的。 我们应该提醒自己以及我们指令的使用者,来仔细考虑添加元素、移除元素以及创建和销毁组件的后果。
The asterisk (*) prefix
星号(*)前缀
Surely you noticed the asterisk (*) prefix to the directive name and wondered why it is necessary and what it does.
你可能注意到了指令名的星号(*)前缀,并且困惑于为什么需要它以及它是做什么的。
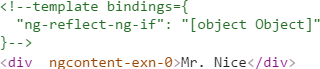
Here is *ngIf displaying the hero's name if hero exists.
这里的*ngIf会在hero存在时显示英雄的名字。
The asterisk is "syntactic sugar" for something a bit more complicated.
Internally, Angular desugars it in two stages.
First, it translates the *ngIf="..." into a template attribute, template="ngIf ...", like this.
星号是一个用来简化更复杂语法的“语法糖”。
从内部实现来说,Angular会分两个阶段解开这个语法糖。
首先,它把*ngIf="..."翻译成一个template属性 template="ngIf ...",代码如下:
Then it translates the template attribute into a <ng-template> element, wrapped around the host element, like this.
然后,它把这个template属性翻译成一个<ng-template>元素,并用它包裹宿主元素,代码如下:
The
*ngIfdirective moved to the<ng-template>element where it became a property binding,[ngIf].*ngIf指令被移到了<ng-template>元素上。在那里它变成了一个属性绑定[ngIf]。The rest of the
<div>, including its class attribute, moved inside the<ng-template>element.<div>上的其余部分,包括它的class属性在内,移到了内部的<ng-template>元素上。
None of these forms are actually rendered. Only the finished product ends up in the DOM.
上述形式永远不会真的渲染出来。 只有最终产出的结果才会出现在DOM中。
Angular consumed the <ng-template> content during its actual rendering and
replaced the <ng-template> with a diagnostic comment.
Angular会在真正渲染的时候填充<ng-template>的内容,并且把<ng-template>替换为一个供诊断用的注释。
The NgFor and NgSwitch... directives follow the same pattern.
NgFor和NgSwitch...指令也都遵循同样的模式。
Inside *ngFor
*ngFor内幕
Angular transforms the *ngFor in similar fashion from asterisk (*) syntax through
template attribute to <ng-template> element.
Angular会把*ngFor用同样的方式把星号()语法的template属性转换成<ng-template>元素*。
Here's a full-featured application of NgFor, written all three ways:
这里有一个NgFor的全特性应用,同时用了这三种写法:
This is manifestly more complicated than ngIf and rightly so.
The NgFor directive has more features, both required and optional, than the NgIf shown in this guide.
At minimum NgFor needs a looping variable (let hero) and a list (heroes).
它明显比ngIf复杂得多,确实如此。
NgFor指令比本章展示过的NgIf具有更多的必选特性和可选特性。
至少NgFor会需要一个循环变量(let hero)和一个列表(heroes)。
You enable these features in the string assigned to ngFor, which you write in Angular's microsyntax.
我们可以通过把一个字符串赋值给ngFor来启用这些特性,这个字符串使用Angular的微语法。
Everything outside the ngFor string stays with the host element
(the <div>) as it moves inside the <ng-template>.
In this example, the [ngClass]="odd" stays on the <div>.
ngFor字符串之外的每一样东西都会留在宿主元素(<div>)上,也就是说它移到了<ng-template>内部。
在这个例子中,[ngClass]="odd"留在了<div>上。
Microsyntax
微语法
The Angular microsyntax lets you configure a directive in a compact, friendly string.
The microsyntax parser translates that string into attributes on the <ng-template>:
Angular微语法能让我们通过简短的、友好的字符串来配置一个指令。
微语法解析器把这个字符串翻译成<ng-template>上的属性:
The
letkeyword declares a template input variable that you reference within the template. The input variables in this example arehero,i, andodd. The parser translateslet hero,let i, andlet oddinto variables named,let-hero,let-i, andlet-odd.let关键字声明一个模板输入变量,我们会在模板中引用它。本例子中,这个输入变量就是hero、i和odd。 解析器会把let hero、let i和let odd翻译成命名变量let-hero、let-i和let-odd。The microsyntax parser takes
ofandtrackby, title-cases them (of->Of,trackBy->TrackBy), and prefixes them with the directive's attribute name (ngFor), yielding the namesngForOfandngForTrackBy. Those are the names of twoNgForinput properties . That's how the directive learns that the list isheroesand the track-by function istrackById.微语法解析器接收
of和trackby,把它们首字母大写(of->Of,trackBy->TrackBy), 并且给它们加上指令的属性名(ngFor)前缀,最终生成的名字是ngForOf和ngForTrackBy。 还有两个NgFor的输入属性,指令据此了解到列表是heroes,而track-by函数是trackById。As the
NgFordirective loops through the list, it sets and resets properties of its own context object. These properties includeindexandoddand a special property named$implicit.NgFor指令在列表上循环,每个循环中都会设置和重置它自己的上下文对象上的属性。 这些属性包括index和odd以及一个特殊的属性名$implicit(隐式变量)。The
let-iandlet-oddvariables were defined aslet i=indexandlet odd=odd. Angular sets them to the current value of the context'sindexandoddproperties.let-i和let-odd变量是通过let i=index和let odd=odd来定义的。 Angular把它们设置为上下文对象中的index和odd属性的当前值。The context property for
let-herowasn't specified. It's intended source is implicit. Angular setslet-heroto the value of the context's$implicitproperty whichNgForhas initialized with the hero for the current iteration.上下文中的属性
let-hero没有指定过,实际上它来自一个隐式变量。 Angular会把let-hero设置为上下文对象中的$implicit属性,NgFor会用当前迭代中的英雄初始化它。The API guide describes additional
NgFordirective properties and context properties.API参考手册中描述了
NgFor指令的其它属性和上下文属性。
These microsyntax mechanisms are available to you when you write your own structural directives.
Studying the
source code for NgIf
and NgFor
is a great way to learn more.
这些微语法机制在你写自己的结构型指令时也同样有效,参考NgIf的源码
和NgFor的源码 可以学到更多。
Template input variable
模板输入变量
A template input variable is a variable whose value you can reference within a single instance of the template.
There are several such variables in this example: hero, i, and odd.
All are preceded by the keyword let.
模板输入变量是这样一种变量,你可以在单个实例的模板中引用它的值。
这个例子中有好几个模板输入变量:hero、i和odd。
它们都是用let作为前导关键字。
A template input variable is not the same as a template reference variable, neither semantically nor syntactically.
You declare a template input variable using the let keyword (let hero).
The variable's scope is limited to a single instance of the repeated template.
You can use the same variable name again in the definition of other structural directives.
You declare a template reference variable by prefixing the variable name with # (#var).
A reference variable refers to its attached element, component or directive.
It can be accessed anywhere in the entire template.
Template input and reference variable names have their own namespaces. The hero in let hero is never the same
variable as the hero declared as #hero.
One structural directive per host element
Someday you'll want to repeat a block of HTML but only when a particular condition is true.
You'll try to put both an *ngFor and an *ngIf on the same host element.
Angular won't let you. You may apply only one structural directive to an element.
The reason is simplicity. Structural directives can do complex things with the host element and its descendents.
When two directives lay claim to the same host element, which one takes precedence?
Which should go first, the NgIf or the NgFor? Can the NgIf cancel the effect of the NgFor?
If so (and it seems like it should be so), how should Angular generalize the ability to cancel for other structural directives?
There are no easy answers to these questions. Prohibiting multiple structural directives makes them moot.
There's an easy solution for this use case: put the *ngIf on a container element that wraps the *ngFor element.
One or both elements can be an ng-container so you don't have to introduce extra levels of HTML.
Inside NgSwitch directives
The Angular NgSwitch is actually a set of cooperating directives: NgSwitch, NgSwitchCase, and NgSwitchDefault.
Here's an example.
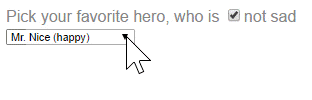
The switch value assigned to NgSwitch (hero.emotion) determines which
(if any) of the switch cases are displayed.
NgSwitch itself is not a structural directive.
It's an attribute directive that controls the behavior of the other two switch directives.
That's why you write [ngSwitch], never *ngSwitch.
NgSwitchCase and NgSwitchDefault are structural directives.
You attach them to elements using the asterisk (*) prefix notation.
An NgSwitchCase displays its host element when its value matches the switch value.
The NgSwitchDefault displays its host element when no sibling NgSwitchCase matches the switch value.
Design thought: minimize initialization effort and consider caching state in a companion service.
设计思路:要最小化初始化的成本,并考虑把状态缓存在一个伴生的服务中。
As with other structural directives, the NgSwitchCase and NgSwitchDefault
can be desugared into the template attribute form.
These same considerations apply to every structural directive, whether built-in or custom. We should ask ourselves — and the users of our directives — to think carefully about the consequences of adding and removing elements and of creating and destroying components.
同样的考量也适用于每一个结构型指令,无论是内置的还是自定义的。 我们应该提醒自己以及我们指令的使用者,来仔细考虑添加元素、移除元素以及创建和销毁组件的后果。
Let's see these dynamics at work. For fun, we'll stack the deck against
our recommendation and consider a component called heavy-loader that
pretends to load a ton of data when initialized.
让我们在实践中看看这些变化。为了娱乐,我们设想在甲板上有个叫heavy-loader(重型起重机)的组件,它会假装在初始化时装载一吨数据。
We'll display two instances of the component. We toggle the visibility of the first one with CSS.
We toggle the second into and out of the DOM with ngIf.
我们将显示该组件的两个实例。我们使用CSS切换第一个实例的可见性,用ngIf把第二个实例添加到DOM和将其移除。
That, in turn, can be desugared into the <ng-template> element form.
Prefer the asterisk (*) syntax.
The asterisk (*) syntax is more clear than the other desugared forms. Use <ng-container> when there's no single element to host the directive.
While there's rarely a good reason to apply a structural directive in template attribute or element form,
it's still important to know that Angular creates a <ng-template> and to understand how it works.
You'll refer to the <ng-template> when you write your own structural directive.
The <ng-template>
The <ng-template> is an Angular element for rendering HTML.
It is never displayed directly.
In fact, before rendering the view, Angular replaces the <ng-template> and its contents with a comment.
If there is no structural directive and you merely wrap some elements in a <ng-template>,
those elements disappear.
That's the fate of the middle "Hip!" in the phrase "Hip! Hip! Hooray!".
Angular erases the middle "Hip!", leaving the cheer a bit less enthusiastic.
借助内置的ngOnInit和ngOnDestroy生命周期钩子,我们同时记录了组件的创建或销毁过程。
下面是它的操作演示:

A structural directive puts a <ng-template> to work
as you'll see when you write your own structural directive.
Group sibling elements with <ng-container>
There's often a root element that can and should host the structural directive.
The list element (<li>) is a typical host element of an NgFor repeater.
When there isn't a host element, you can usually wrap the content in a native HTML container element,
such as a <div>, and attach the directive to that wrapper.
Introducing another container element—typically a <span> or <div>—to
group the elements under a single root is usually harmless.
Usually ... but not always.
The grouping element may break the template appearance because CSS styles neither expect nor accommodate the new layout. For example, suppose you have the following paragraph layout.
You also have a CSS style rule that happens to apply to a <span> within a <p>aragraph.
The constructed paragraph renders strangely.

The p span style, intended for use elsewhere, was inadvertently applied here.
Another problem: some HTML elements require all immediate children to be of a specific type.
For example, the <select> element requires <option> children.
You can't wrap the options in a conditional <div> or a <span>.
When you try this,
the drop down is empty.

The browser won't display an <option> within a <span>.
<ng-container> to the rescue
The Angular <ng-container> is a grouping element that doesn't interfere with styles or layout
because Angular doesn't put it in the DOM.
Here's the conditional paragraph again, this time using <ng-container>.
It renders properly.

Now conditionally exclude a select <option> with <ng-container>.
The drop down works properly.
The <ng-container> is a syntax element recognized by the Angular parser.
It's not a directive, component, class, or interface.
It's more like the curly braces in a JavaScript if-block:
Without those braces, JavaScript would only execute the first statement
when you intend to conditionally execute all of them as a single block.
The <ng-container> satisfies a similar need in Angular templates.
Write a structural directive
In this section, you write an UnlessDirective structural directive
that does the opposite of NgIf.
NgIf displays the template content when the condition is true.
UnlessDirective displays the content when the condition is false.
Creating a directive is similar to creating a component.
创建指令很像创建组件。
Import the
Directivedecorator (instead of theComponentdecorator).导入
Directive装饰器(而不再是Component)。Import the
Input,TemplateRef, andViewContainerRefsymbols; you'll need them for any structural directive .Apply the decorator to the directive class.
Set the CSS attribute selector that identifies the directive when applied to an element in a template.
Here's how you might begin:
src/app/unless.directive.ts (skeleton)
The directive's selector is typically the directive's attribute name in square brackets, [myUnless].
The brackets define a CSS
attribute selector.
The directive attribute name should be spelled in lowerCamelCase and begin with a prefix.
Don't use ng. That prefix belongs to Angular.
Pick something short that fits you or your company.
In this example, the prefix is my.
The directive class name ends in Directive per the style guide.
Angular's own directives do not.
TemplateRef and ViewContainerRef
A simple structural directive like this one creates an
embedded view
from the Angular-generated <ng-template> and inserts that view in a
view container
adjacent to the directive's original <p> host element.
You'll acquire the <ng-template> contents with a
TemplateRef
and access the view container through a
ViewContainerRef.
You inject both in the directive constructor as private variables of the class.
The myUnless property
The directive consumer expects to bind a true/false condition to [myUnless].
That means the directive needs a myUnless property, decorated with @Input
Read about @Input in the Template Syntax guide.
Angular sets the myUnless property whenever the value of the condition changes.
Because the myUnless property does work, it needs a setter.
If the condition is falsy and the view hasn't been created previously, tell the view container to create the embedded view from the template.
If the condition is truthy and the view is currently displayed, clear the container which also destroys the view.
Nobody reads the myUnless property so it doesn't need a getter.
The completed directive code looks like this:
src/app/unless.directive.ts (excerpt)
Add this directive to the declarations array of the AppModule.
Then create some HTML to try it.
When the condition is falsy, the top (A) paragraph appears and the bottom (B) paragraph disappears.
When thecondition is truthy, the top (A)paragraph is removed and the bottom (B)paragraph appears.
当condition为false时,顶部的段落就会显示出来,而底部的段落消失了。
当condition为true时,顶部的段落被移除了,而底部的段落显示了出来。

Summary
You can both try and download the source code for this guide in the
Here is the source from the src/app/ folder.
本章相关的代码如下:
You learned
- that structural directives manipulate HTML layout.
- to use
<ng-container>as a grouping element when there is no suitable host element. - that the Angular desugars asterisk (*) syntax into a
<ng-template>. - how that works for the
NgIf,NgForandNgSwitchbuilt-in directives. - about the microsyntax that expands into a
<ng-template>. - to write a custom structural directive,
UnlessDirective.