Reactive forms is an Angular technique for creating forms in a reactive style. This guide explains reactive forms as you follow the steps to build a "Hero Detail Editor" form.
响应式表单是Angular中用响应式风格创建表单的技术。 本章中,我们会在构建“英雄详情编辑器”的过程中,逐步讲解响应式表单的概念。
Contents
目录
Try the
试试
You can also run the
你还可以运行
Introduction to Reactive Forms
响应式表单简介
Angular offers two form-building technologies: reactive forms and template-driven forms.
The two technologies belong to the @angular/forms library
and share a common set of form control classes.
Angular提供了两种构建表单的技术:响应式表单和模板驱动表单。
这两项技术都属于@angular/forms库,并且共享一组公共的表单控件类。
But they diverge markedly in philosophy, programming style, and technique.
They even have their own modules: the ReactiveFormsModule and the FormsModule.
但是它们在设计哲学、编程风格和具体技术上有显著区别。
所以,它们都有自己的模块:ReactiveFormsModule 和 FormsModule。
Reactive forms
响应式表单
Angular reactive forms facilitate a reactive style of programming that favors explicit management of the data flowing between a non-UI data model (typically retrieved from a server) and a UI-oriented form model that retains the states and values of the HTML controls on screen. Reactive forms offer the ease of using reactive patterns, testing, and validation.
Angular的响应式表单能让实现响应式编程风格更容易,这种编程风格更倾向于在非UI的数据模型(通常接收自服务器)之间显式的管理数据流, 并且用一个UI导向的表单模型来保存屏幕上HTML控件的状态和值。 响应式表单可以让使用响应式编程模式、测试和校验变得更容易。
With reactive forms, you create a tree of Angular form control objects in the component class and bind them to native form control elements in the component template, using techniques described in this guide.
使用响应式表单,我们可以在组件中创建表单控件的对象树,并使用本章中传授的技巧把它们绑定到组件模板中的原生表单控件元素上。
You create and manipulate form control objects directly in the component class. As the component class has immediate access to both the data model and the form control structure, you can push data model values into the form controls and pull user-changed values back out. The component can observe changes in form control state and react to those changes.
我们可以在组件类中直接创建和维护表单控件对象。由于组件类可以同时访问数据模型和表单控件结构, 因此我们可以把表单模型值的变化推送到表单控件中,并把变化后的值拉取回来。 组件可以监听表单控件状态的变化,并对此做出响应。
One advantage of working with form control objects directly is that value and validity updates are always synchronous and under your control. You won't encounter the timing issues that sometimes plague a template-driven form and reactive forms can be easier to unit test.
直接使用表单控件对象的优点之一是值和有效性状态的更新总是同步的,并且在你的控制之下。 我们不会遇到时序问题,这个问题有时在模板驱动表单中会成为灾难。而且响应式表单更容易进行单元测试。
In keeping with the reactive paradigm, the component preserves the immutability of the data model, treating it as a pure source of original values. Rather than update the data model directly, the component extracts user changes and forwards them to an external component or service, which does something with them (such as saving them) and returns a new data model to the component that reflects the updated model state.
在响应式编程范式中,组件会负责维护数据模型的不可变性,把模型当做纯粹的原始数据源。 组件不会直接更新数据模型,而是把用户的修改提取出来,把它们转发给外部的组件或服务,外部程序才会使用这些进行处理(比如保存它们), 并且给组件返回一个新的数据模型,以反映模型状态的变化。
Using reactive form directives does not require you to follow all reactive priniciples, but it does facilitate the reactive programming approach should you choose to use it.
使用响应式表单的指令,并不要求你遵循所有的响应式编程原则,但它能让你更容易使用响应式编程方法,从而更愿意使用它。
Template-driven forms
模板驱动表单
Template-driven forms, introduced in the Template guide, take a completely different approach.
在模板一章我们介绍过的模板驱动表单,是一种完全不同的方式。
You place HTML form controls (such as <input> and <select>) in the component template and
bind them to data model properties in the component, using directives
like ngModel.
我们把HTML表单控件(比如<input>和<select>)放进组件模板中,并用ngModel等指令把它们绑定到组件中数据模型的属性上。
You don't create Angular form control objects. Angular directives
create them for you, using the information in your data bindings.
You don't push and pull data values. Angular handles that for you with ngModel.
Angular updates the mutable data model with user changes as they happen.
我们不用自己创建Angular表单控件对象。Angular指令会使用数据绑定中的信息创建它们。
我们不用自己推送和拉取数据。Angular使用ngModel来替你管理它们。
当用户做出修改时,Angular会据此更新可变的数据模型。
For this reason, the ngModel directive is not part of the ReactiveFormsModule.
因此,ngModel并不是ReactiveFormsModule模块的一部分。
While this means less code in the component class, template-driven forms are asynchronous which may complicate development in more advanced scenarios.
虽然这意味着组件中的代码更少,但是模板驱动表单是异步工作的,这可能在更高级的场景中让开发复杂化。
Async vs. sync
异步 vs. 同步
Reactive forms are synchronous. Template-driven forms are asynchronous. It's a difference that matters.
响应式表单是同步的。模板驱动表单是异步的。这个不同点很重要。
In reactive forms, you create the entire form control tree in code. You can immediately update a value or drill down through the descendents of the parent form because all controls are always available.
使用响应式表单,我们会在代码中创建整个表单控件树。 我们可以立即更新一个值或者深入到表单中的任意节点,因为所有的控件都始终是可用的。
Template-driven forms delegate creation of their form controls to directives. To avoid "changed after checked" errors, these directives take more than one cycle to build the entire control tree. That means you must wait a tick before manipulating any of the controls from within the component class.
模板驱动表单会委托指令来创建它们的表单控件。 为了消除“检查完后又变化了”的错误,这些指令需要消耗一个以上的变更检测周期来构建整个控件树。 这意味着在从组件类中操纵任何控件之前,我们都必须先等待一个节拍。
For example, if you inject the form control with a @ViewChild(NgForm) query and examine it in the
ngAfterViewInit lifecycle hook,
you'll discover that it has no children.
You must wait a tick, using setTimeout, before you can
extract a value from a control, test its validity, or set it to a new value.
比如,如果我们用@ViewChild(NgForm)查询来注入表单控件,并在生命周期钩子ngAfterViewInit中检查它,就会发现它没有子控件。
我们必须使用setTimeout等待一个节拍才能从控件中提取值、测试有效性,或把它设置为新值。
The asynchrony of template-driven forms also complicates unit testing.
You must wrap your test block in async() or fakeAsync() to
avoid looking for values in the form that aren't there yet.
With reactive forms, everything is available when you expect it to be.
模板驱动表单的异步性让单元测试也变得复杂化了。
我们必须把测试代码包裹在async()或fakeAsync()中来解决要查阅的值尚不存在的情况。
使用响应式表单,在所期望的时机一切都是可用的。
Which is better, reactive or template-driven?
哪一个更好?响应式还是模板驱动?
Neither is "better". They're two different architectural paradigms, with their own strengths and weaknesses. Choose the approach that works best for you. You may decide to use both in the same application.
没有哪个“更好”。 它们是两种架构范式,各有优缺点。 请自行选择更合适的方法,甚至可以在同一个应用中同时使用它们。
The balance of this reactive forms guide explores the reactive paradigm and concentrates exclusively on reactive forms techniques. For information on template-driven forms, see the Forms guide.
在这章响应式表单中,我们只专注于响应式范式以及响应式表单技术的详情。
In the next section, you'll set up your project for the reactive form demo. Then you'll learn about the Angular form classes and how to use them in a reactive form.
在下一节,我们将先准备一个响应式表单范例的项目,然后就可以开始学习Angular表单类,并在响应式表单中使用它们了。
Setup
准备工作
Follow the steps in the Setup guide
for creating a new project folder (perhaps called reactive-forms)
based on the QuickStart seed.
遵循准备工作一章中的步骤基于快速起步种子工程创建一个新的项目目录(比如叫reactive-forms)。
Create a data model
创建数据模型
The focus of this guide is a reactive forms component that edits a hero.
You'll need a hero class and some hero data.
Create a new data-model.ts file in the app directory and copy the content below into it.
本章的焦点是响应式表单组件以及编辑一个英雄。
我们需要一个Hero类和一些英雄数据。
在app目录下创建一个data-model.ts文件,并粘贴进下列内容:
src/app/data-model.ts
The file exports two classes and two constants. The Address
and Hero classes define the application data model.
The heroes and states constants supply the test data.
这个文件导出两个类和两个常量。Address和Hero类定义应用的数据模型。
heroes和states常量提供测试数据。
Create a reactive forms component
创建响应式表单组件
Make a new file called
hero-detail.component.ts in the app directory and import these symbols:
在app目录下创建一个名叫hero-detail.component.ts的新文件,并且导入下列符号:
src/app/hero-detail.component.ts
Now enter the @Component decorator that specifies the HeroDetailComponent metadata:
然后输入这个@Component来为HeroDetailComponent指定元数据:
src/app/hero-detail.component.ts (excerpt)
Next, create an exported HeroDetailComponent class with a FormControl.
FormControl is a directive that allows you to create and manage
a FormControl instance directly.
接下来,创建并导出一个带FormControl的HeroDetailComponent类。
FormControl是一个指令,它允许我们直接创建并管理一个FormControl实例。
src/app/hero-detail.component.ts (excerpt)
Here you are creating a FormControl called name.
It will be bound in the template to an HTML input box for the hero name.
这里我们创建了一个名叫name的FormControl。
它将会绑定到模板中的一个input框,表示英雄的名字。
A FormControl constructor accepts three, optional arguments:
the initial data value, an array of validators, and an array of async validators.
FormControl构造函数接收三个可选参数:
初始值、验证器数组和异步验证器数组。
This simple control doesn't have data or validators. In real apps, most form controls have both.
最简单的控件并不需要数据或验证器,但是在实际应用中,大部分表单控件都会同时具备它们。
This guide touches only briefly on Validators. For an in-depth look at them,
read the Form Validation cookbook.
本章中只会接触Validators中的一点点,要想更深入的了解它们,请阅读烹饪宝典中的表单验证一章。
Create the template
创建模板
Now create the component's template, src/app/hero-detail.component.html, with the following markup.
现在,在创建组件的模板文件src/app/hero-detail.component.html,内容如下:
src/app/hero-detail.component.html
To let Angular know that this is the input that you want to
associate to the name FormControl in the class,
you need [formControl]="name" in the template on the <input>.
要让Angular知道我们希望把这个输入框关联到类中的FormControl型属性name,我们需要在模板中的<input>上加一句[formControl]="name"。
Disregard the form-control CSS class. It belongs to the
Bootstrap CSS library,
not Angular.
It styles the form but in no way impacts the logic of the form.
请忽略CSS类form-control,它属于Bootstrap CSS library而不是Angular。
它会为表单添加样式,但是对表单的逻辑毫无影响。
Import the ReactiveFormsModule
导入ReactiveFormsModule
The HeroDetailComponent template uses formControlName
directive from the ReactiveFormsModule.
HeroDetailComponent的模板中使用了来自ReactiveFormsModule的formControlName。
In this sample, you declare the HeroDetailComponent in the AppModule.
Therefore, do the following three things in app.module.ts:
在这个例子中,我们在AppModule中声明了HeroDetailComponent。因此现在app.module.ts中做了三件事:
Use a JavaScript
importstatement to access theReactiveFormsModuleand theHeroDetailComponent.使用JavaScript的
import语句访问ReactiveFormsModule和HeroDetailComponent。Add
ReactiveFormsModuleto theAppModule'simportslist.把
ReactiveFormsModule添加到AppModule的imports列表中。Add
HeroDetailComponentto the declarations array.把
HeroDetailComponent添加到声明数组中。
src/app/app.module.ts (excerpt)
Display the HeroDetailComponent
显示HeroDetailComponent
Revise the AppComponent template so it displays the HeroDetailComponent.
修改AppComponent的模板,以便显示HeroDetailComponent。
src/app/app.component.ts
Essential form classes
基础的表单类
It may be helpful to read a brief description of the core form classes.
阅读一下这些核心表单类的简短描述也许会有用。
AbstractControl is the abstract base class for the three concrete form control classes:
FormControl,FormGroup, andFormArray. It provides their common behaviors and properties, some of which are observable.AbstractControl是三个具体表单类的抽象基类。 并为它们提供了一些共同的行为和属性,其中有些是可观察对象(Observable)。FormControl tracks the value and validity status of an individual form control. It corresponds to an HTML form control such as an input box or selector.
FormControl 用于跟踪一个单独的表单控件的值和有效性状态。它对应于一个HTML表单控件,比如输入框和下拉框。
FormGroup tracks the value and validity state of a group of
AbstractControlinstances. The group's properties include its child controls. The top-level form in your component is aFormGroup.FormGroup用于 跟踪一组
AbstractControl的实例的值和有效性状态。 该组的属性中包含了它的子控件。 组件中的顶级表单就是一个FormGroup。FormArray tracks the value and validity state of a numerically indexed array of
AbstractControlinstances.FormArray用于跟踪
AbstractControl实例组成的有序数组的值和有效性状态。
You'll learn more about these classes as you work through this guide.
随着本章的深入,我们将学到关于这三个类的更多知识。
Style the app
为应用添加样式
You used bootstrap CSS classes in the template HTML of both the AppComponent and the HeroDetailComponent.
Add the bootstrap CSS stylesheet to the head of index.html:
我们在AppComponent和HeroDetailComponent的模板中使用Bootstrap中的CSS类。请把bootstrap的CSS样式表文件添加到index.html的head区。
index.html
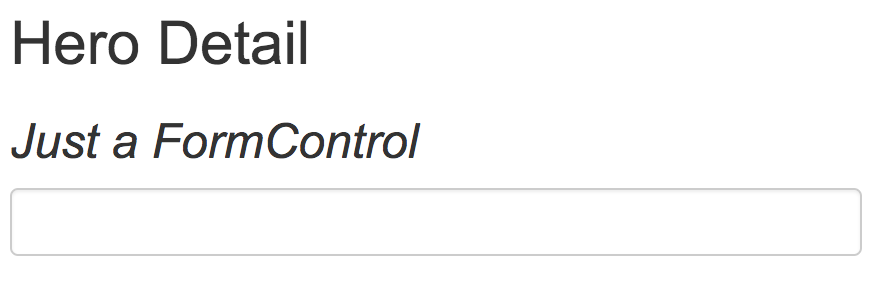
Now that everything is wired up, the browser should display something like this:
这些做好之后,浏览器中应该显示成这样:
Add a FormGroup
添加FormGroup
Usually, if you have multiple FormControls, you'll want to register
them within a parent FormGroup.
This is simple to do. To add a FormGroup, add it to the imports section
of hero-detail.component.ts:
通常,如果有多个FormControl,我们会希望把它们注册进一个父FormGroup中。这很容易。只要把它加入hero-detail.component.ts的import区就可以了。
src/app/hero-detail.component.ts
In the class, wrap the FormControl in a FormGroup called heroForm as follows:
在这个类中,把FormControl包裹进了一个名叫heroForm的FormGroup中,代码如下:
src/app/hero-detail.component.ts
Now that you've made changes in the class, they need to be reflected in the
template. Update hero-detail.component.html by replacing it with the following.
现在我们改完了这个类,该把它映射到模板中了。把hero-detail.component.html改成这样:
src/app/hero-detail.component.html
Notice that now the single input is in a form element. The novalidate
attribute in the <form> element prevents the browser
from attempting native HTML validations.
注意,现在单行输入框位于一个form元素中。<form>元素上的novalidate属性会阻止浏览器使用原生HTML中的表单验证器。
formGroup is a reactive form directive that takes an existing
FormGroup instance and associates it with an HTML element.
In this case, it associates the FormGroup you saved as
heroForm with the form element.
formGroup是一个响应式表单的指令,它拿到一个现有FormGroup实例,并把它关联到一个HTML元素上。
这种情况下,它关联到的是form元素上的FormGroup实例heroForm。
Because the class now has a FormGroup, you must update the template
syntax for associating the input with the corresponding
FormControl in the component class.
Without a parent FormGroup,
[formControl]="name" worked earlier because that directive
can stand alone, that is, it works without being in a FormGroup.
With a parent FormGroup, the name input needs the syntax
formControlName=name in order to be associated
with the correct FormControl
in the class. This syntax tells Angular to look for the parent
FormGroup, in this case heroForm, and then inside that group
to look for a FormControl called name.
由于现在有了一个FormGroup,因此我们必须修改模板语法来把输入框关联到组件类中对应的FormControl上。
以前没有父FormGroup的时候,[formControl]="name"也能正常工作,因为该指令可以独立工作,也就是说,不在FormGroup中时它也能用。
有了FormGroup,name输入框就需要再添加一个语法formControlName=name,以便让它关联到类中正确的FormControl上。
这个语法告诉Angular,查阅父FormGroup(这里是heroForm),然后在这个FormGroup中查阅一个名叫name的FormControl。
Disregard the form-group CSS class. It belongs to the
Bootstrap CSS library,
not Angular.
Like the form-control class, it styles the form
but in no way impacts its logic.
请无视CSS类form-group,它属于Bootstrap CSS library而不是Angular。
就像form-control类一样,它只是为表单添加样式,而对表单逻辑毫无影响。
The form looks great. But does it work? When the user enters a name, where does the value go?
表单看起来很棒,但是它能用吗? 当用户输入名字时,它的值去了哪里?
Taking a look at the form model
表单模型概览
The value goes into the form model that backs the group's FormControls.
To see the form model, add the following line after the
closing form tag in the hero-detail.component.html:
这个值进入了幕后表单模型中的FormControl构成的表单组。
要想知道表单模型是什么样的,请在hero-detail.component.html的form标签紧后面添加如下代码:
src/app/hero-detail.component.html
The heroForm.value returns the form model.
Piping it through the JsonPipe renders the model as JSON in the browser:
heroForm.value会返回表单模型。
用JsonPipe管道把这个模型以JSON格式渲染到浏览器中。
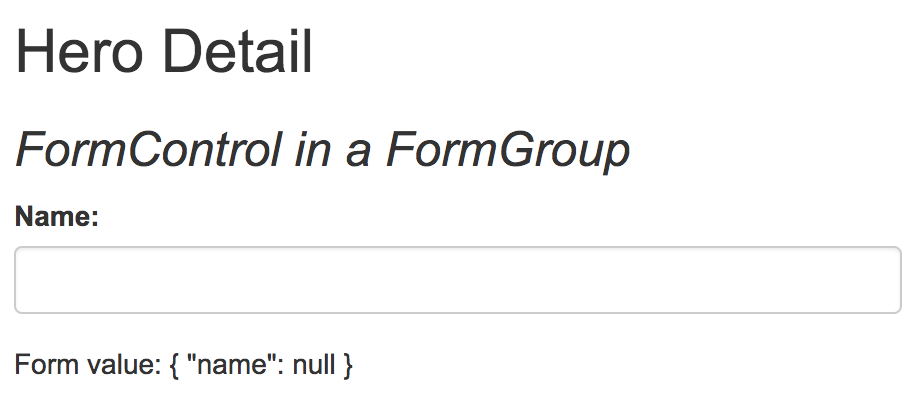
The initial name property value is the empty string.
Type into the name input box and watch the keystokes appear in the JSON.
最初的name属性是个空字符串,在name输入框中输入之后,可以看到这些按键出现在了JSON中。
Great! You have the basics of a form.
真棒!我们有了一个基本版表单。
In real life apps, forms get big fast.
FormBuilder makes form development and maintenance easier.
在真实的应用中,表单很快就会变大。
FormBuilder能让表单开发和维护变得更简单。
Introduction to FormBuilder
FormBuilder简介
The FormBuilder class helps reduce repetition and
clutter by handling details of control creation for you.
FormBuilder类能通过处理控件创建的细节问题来帮我们减少重复劳动。
To use FormBuilder, you need to import it into hero-detail.component.ts:
要使用FormBuilder,我们就要先把它导入到hero-detail.component.ts中:
src/app/hero-detail.component.ts (excerpt)
Use it now to refactor the HeroDetailComponent into something that's a little easier to read and write,
by following this plan:
现在,我们遵循下列步骤用FormBuilder来把HeroDetailComponent重构得更加容易读写。
Explicitly declare the type of the
heroFormproperty to beFormGroup; you'll initialize it later.明确把
heroForm属性的类型声明为FormGroup,稍后我们会初始化它。Inject a
FormBuilderinto the constructor.把
FormBuilder注入到构造函数中。Add a new method that uses the
FormBuilderto define theheroForm; call itcreateForm.添加一个名叫
createForm的新方法,它会用FormBuilder来定义heroForm。Call
createFormin the constructor.在构造函数中调用
createForm。
The revised HeroDetailComponent looks like this:
修改过的HeroDetailComponent代码如下:
src/app/hero-detail.component.ts (excerpt)
FormBuilder.group is a factory method that creates a FormGroup.
FormBuilder.group takes an object whose keys and values are FormControl names and their definitions.
In this example, the name control is defined by its initial data value, an empty string.
FormBuilder.group是一个用来创建FormGroup的工厂方法,它接受一个对象,对象的键和值分别是FormControl的名字和它的定义。
在这个例子中,name控件的初始值是空字符串。
Defining a group of controls in a single object makes for a compact, readable style.
It beats writing an equivalent series of new FormControl(...) statements.
把一组控件定义在一个单一对象中,可以更加紧凑、易读。
完成相同功能时,这种形式优于一系列new FormControl(...)语句。
Validators.required
Though this guide doesn't go deeply into validations, here is one example that
demonstrates the simplicity of using Validators.required in reactive forms.
虽然本章不会深入讲解验证机制,但还是有一个例子来示范如何简单的在响应式表单中使用Validators.required。
First, import the Validators symbol.
首先,导入Validators符号。
src/app/hero-detail.component.ts (excerpt)
To make the name FormControl required, replace the name
property in the FormGroup with an array.
The first item is the initial value for name;
the second is the required validator, Validators.required.
要想让name这个FormControl是必须的,请把FormGroup中的name属性改为一个数组。第一个条目是name的初始值,第二个是required验证器:Validators.required。
src/app/hero-detail.component.ts (excerpt)
Reactive validators are simple, composable functions. Configuring validation is harder in template-driven forms where you must wrap validators in a directive.
响应式验证器是一些简单、可组合的函数。 在模板驱动表单中配置验证器有些困难,因为我们必须把验证器包装进指令中。
Update the diagnostic message at the bottom of the template to display the form's validity status.
修改模板底部的诊断信息,以显示表单的有效性状态。
src/app/hero-detail.component.html (excerpt)
The browser displays the following:
浏览器会显示下列内容:
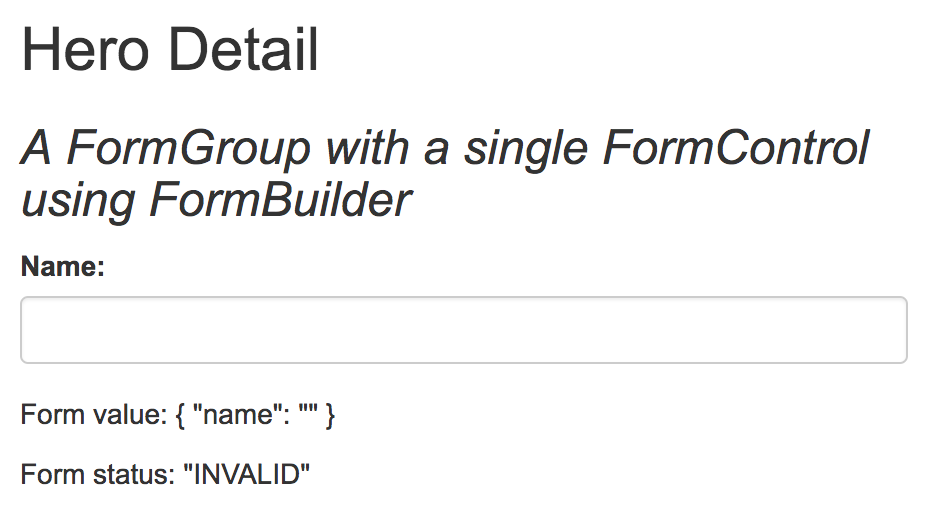
Validators.required is working. The status is INVALID because the input box has no value.
Type into the input box to see the status change from INVALID to VALID.
Validators.required生效了,但状态还是INVALID,因为输入框中还没有值。
在输入框中输入,就会看到这个状态从INVALID变成了VALID。
In a real app, you'd replace the diagnosic message with a user-friendly experience.
在真实的应用中,我们要把这些诊断信息替换成用户友好的信息。
Using Validators.required is optional for the rest of the guide.
It remains in each of the following examples with the same configuration.
在本章的其余部分,Validators.required是可有可无的,但在每个与此范例配置相同的范例中都会保留它。
For more on validating Angular forms, see the Form Validation guide.
要了解Angular表单验证器的更多知识,参见表单验证器一章。
More FormControls
更多的表单控件(FormControl)
A hero has more than a name. A hero has an address, a super power and sometimes a sidekick too.
每个英雄可以有多个名字,还有一个住址、一项超能力,有时还会有一个副手。
The address has a state property. The user will select a state with a <select> box and you'll populate
the <option> elements with states. So import states from data-model.ts.
住址中有一个所在州属性,用户将会从<select>框中选择一个州,我们会用<option>元素渲染各个州。我们从data-model.ts中导入states(州列表)。
src/app/hero-detail.component.ts (excerpt)
Declare the states property and add some address FormControls to the heroForm as follows.
声明states属性并往heroForm中添加一些表示住址的FormControl,代码如下:
src/app/hero-detail.component.ts (excerpt)
Then add corresponding markup in hero-detail.component.html
within the form element.
然后在hero-detail.component.html文件中把对应的脚本添加到form元素中。
src/app/hero-detail.component.html
Reminder: Ignore the many mentions of form-group,
form-control, center-block, and checkbox in this markup.
Those are bootstrap CSS classes that Angular itself ignores.
Pay attention to the formGroupName and formControlName attributes.
They are the Angular directives that bind the HTML controls to the
Angular FormGroup and FormControl properties in the component class.
注意:不用管这些脚本中提到的form-group、form-control、center-block和checkbox等。
它们是来自Bootstrap的CSS类,Angular本身不会管它们。
注意formGroupName和formControlName属性。
他们是Angular指令,用于把相应的HTML控件绑定到组件中的FormGroup和FormControl类型的属性上。
The revised template includes more text inputs, a select box for the state, radio buttons for the power,
and a checkbox for the sidekick.
修改过的模板包含更多文本输入框,一个state选择框,power(超能力)的单选按钮和一个sidekick检查框。
You must bind the option's value property with [value]="state".
If you do not bind the value, the select shows the first option from the data model.
我们要用[value]="state"来绑定选项的value属性。
如果不绑定这个值,这个选择框就会显示来自数据模型中的第一个选项。
The component class defines control properties without regard for their representation in the template.
You define the state, power, and sidekick controls the same way you defined the name control.
You tie these controls to the template HTML elements in the same way,
specifiying the FormControl name with the formControlName directive.
组件类定义了控件属性而不用管它们在模板中的表现形式。
我们可以像定义name控件一样定义state、power和sidekick控件,并用formControlName指令来指定FormControl的名字。
See the API reference for more information about radio buttons, selects, and checkboxes.
参见API参考手册中的radio buttons、 selects和 checkboxes
Nested FormGroups
多级FormGroup
This form is getting big and unwieldy. You can group some of the related FormControls
into a nested FormGroup. The street, city, state, and zip are properties
that would make a good address FormGroup.
Nesting groups and controls in this way allows you to
mirror the hierarchical structure of the data model
and helps track validation and state for related sets of controls.
这个表单变得越来越大、越来越笨重。我们可以把一些相关的FormControl组织到多级FormGroup中。
street、city、state和zip属性就可以作为一个名叫address的FormGroup。
用这种方式,多级表单组和控件可以让我们轻松地映射多层结构的数据模型,以便帮助我们跟踪这组相关控件的有效性和状态。
You used the FormBuilder to create one FormGroup in this component called heroForm.
Let that be the parent FormGroup.
Use FormBuilder again to create a child FormGroup that encapsulates the address controls;
assign the result to a new address property of the parent FormGroup.
我们用FormBuilder在这个名叫heroForm的组件中创建一个FormGroup,并把它用作父FormGroup。
再次使用FormBuilder创建一个子级FormGroup,其中包括这些住址控件。把结果赋值给父FormGroup中新的address属性。
src/app/hero-detail.component.ts (excerpt)
You’ve changed the structure of the form controls in the component class; you must make corresponding adjustments to the component template.
我们已经修改了组件类中表单控件的结构,还必须对组件模板进行相应的调整。
In hero-detail.component.html, wrap the address-related FormControls in a div.
Add a formGroupName directive to the div and bind it to "address".
That's the property of the address child FormGroup within the parent FormGroup called heroForm.
在hero-detail.component.html中,把与住址有关的FormControl包裹进一个div中。
往这个div上添加一个formGroupName指令,并且把它绑定到"address"上。
这个address属性是一个FormGroup,它的父FormGroup就是heroForm。
To make this change visually obvious, slip in an <h4> header near the top with the text, Secret Lair.
The new address HTML looks like this:
要让这个变化更加明显,在文本的顶部加入一个<h4>头:Secret Lair。
新的住址组的HTML如下:
src/app/hero-detail.component.html (excerpt)
After these changes, the JSON output in the browser shows the revised form model
with the nested address FormGroup:
做完这些之后,浏览器中的JSON输出就变成了带有多级FormGroup的住址。

Great! You’ve made a group and you can see that the template and the form model are talking to one another.
真棒!我们制作了一个控件组,并且可以看到模板和表单模型已经能彼此通讯了。
Inspect FormControl Properties
查看FormControl的属性
At the moment, you're dumping the entire form model onto the page.
Sometimes you're interested only in the state of one particular FormControl.
此刻,我们把整个表单模型展示在了页面里。
但有时我们可能只关心一个特定FormControl的状态。
You can inspect an individual FormControl within a form by extracting it with the .get() method.
You can do this within the component class or display it on the
page by adding the following to the template,
immediately after the {{form.value | json}} interpolation as follows:
我们可以使用.get()方法来提取表单中一个单独FormControl的状态。
我们可以在组件类中这么做,或者通过往模板中添加下列代码来把它显示在页面中,就添加在{{form.value | json}}插值表达式的紧后面:
src/app/hero-detail.component.html
To get the state of a FormControl that’s inside a FormGroup, use dot notation to path to the control.
要点取得FormGroup中的FormControl的状态,使用点语法来指定到控件的路径。
src/app/hero-detail.component.html
You can use this technique to display any property of a FormControl
such as one of the following:
我们可以使用此技术来显示FromControl的任意属性,代码如下:
| Property 属性 | Description 说明 |
|---|---|
myControl.value | the value of a
|
myControl.status | the validity of a
|
myControl.pristine |
如果用户尚未改变过这个控件的值,则为 |
myControl.untouched |
如果用户尚未进入这个HTML控件,也没有触发过它的 |
Learn about other FormControl properties in the
AbstractControl API reference.
要了解FormControl的更多属性,参见API参考手册的AbstractControl部分。
One common reason for inspecting FormControl properties is to
make sure the user entered valid values.
Read more about validating Angular forms in the
Form Validation guide.
检查FormControl属性的另一个原因是确保用户输入了有效的值。
要了解更多关于Angular表单验证的知识,参见表单验证一章。
The data model and the form model
数据模型与表单模型
At the moment, the form is displaying empty values.
The HeroDetailComponent should display values of a hero,
possibly a hero retrieved from a remote server.
此刻,表单显示的是空值。
HeroDetailComponent应该显示一个英雄的值,这个值可能接收自远端服务器。
In this app, the HeroDetailComponent gets its hero from a parent HeroListComponent
在这个应用中,HeroDetailComponent从它的父组件HeroListComponent中取得一个英雄。
The hero from the server is the data model.
The FormControl structure is the form model.
来自服务器的hero就是数据模型,而FormControl的结构就是表单模型。
The component must copy the hero values in the data model into the form model. There are two important implications:
组件必须把数据模型中的英雄值复制到表单模型中。这里隐含着两个非常重要的点。
The developer must understand how the properties of the data model map to the properties of the form model.
开发人员必须理解数据模型是如何映射到表单模型中的属性的。
User changes flow from the DOM elements to the form model, not to the data model. The form controls never update the data model.
用户修改时的数据流是从DOM元素流向表单模型的,而不是数据模型。表单控件永远不会修改数据模型。
The form and data model structures need not match exactly. You often present a subset of the data model on a particular screen. But it makes things easier if the shape of the form model is close to the shape of the data model.
表单模型和数据模型的结构并不需要精确匹配。在一个特定的屏幕上,我们通常只会展现数据模型的一个子集。 但是表单模型的形态越接近数据模型,事情就会越简单。
In this HeroDetailComponent, the two models are quite close.
在HeroDetailComponent中,这两个模型是非常接近的。
Recall the definition of Hero in data-model.ts:
回忆一下data-model.ts中的Hero定义:
src/app/data-model.ts (classes)
Here, again, is the component's FormGroup definition.
这里又是组件的FormGroup定义。
src/app/hero-detail.component.ts (excerpt)
There are two significant differences between these models:
在这些模型中有两点显著的差异:
The
Herohas anid. The form model does not because you generally don't show primary keys to users.Hero有一个id。表单模型中则没有,因为我们通常不会把主键展示给用户。The
Herohas an array of addresses. This form model presents only one address, a choice revisited below.Hero有一个住址数组。这个表单模型只表示了一个住址,稍后的修改则可以表示多个。
Nonetheless, the two models are pretty close in shape and you'll see in a moment how this alignment facilitates copying the data model properties
to the form model with the patchValue and setValue methods.
虽然如此,这两个模型的形态仍然是非常接近的,我们很快就会看到如何用patchValue和setValue方法来把数据模型拷贝到表单模型中。
Take a moment to refactor the address FormGroup definition for brevity and clarity as follows:
花一点时间来重构一下address这个FormGroup定义,来让它更简洁清晰,代码如下:
Also be sure to update the import from data-model so you can reference the Hero and Address classes:
为了确保从data-model中导入,我们可以引用Hero和Address类:
Populate the form model with setValue and patchValue
使用setValue和patchValue来操纵表单模型
Previously you created a control and initialized its value at the same time.
You can also initialize or reset the values later with the
setValue and patchValue methods.
以前,我们创建了控件,并同时初始化它的值。
我们也可以稍后用setValue和patchValue来初始化或重置这些值。
setValue
With setValue, you assign every form control value at once
by passing in a data object whose properties exactly match the form model behind the FormGroup.
借助setValue,我们可以立即设置每个表单控件的值,只要把与表单模型的属性精确匹配的数据模型传进去就可以了。
src/app/hero-detail.component.ts (excerpt)
The setValue method checks the data object thoroughly before assigning any form control values.
setValue方法会在赋值给任何表单控件之前先检查数据对象的值。
It will not accept a data object that doesn't match the FormGroup structure or is
missing values for any control in the group. This way, it can return helpful
error messages if you have a typo or if you've nested controls incorrectly.
patchValue will fail silently.
它不会接受一个与FormGroup结构不同或缺少表单组中任何一个控件的数据对象。
这种方式下,如果我们有什么拼写错误或控件嵌套的不正确,它就能返回一些有用的错误信息。
patchValue会默默地失败。
On the other hand,setValue will catch
the error and report it clearly.
而setValue会捕获错误,并清晰的报告它。
Notice that you can almost use the entire hero as the argument to setValue
because its shape is similar to the component's FormGroup structure.
注意,你几乎可以把这个hero用作setValue的参数,因为它的形态与组件的FormGroup结构是非常像的。
You can only show the hero's first address and you must account for the possibility that the hero has no addresses at all.
This explains the conditional setting of the address property in the data object argument:
我们现在只能显示英雄的第一个住址,不过我们还必须考虑hero完全没有住址的可能性。
下面的例子解释了如何在数据对象参数中对address属性进行有条件的设置:
patchValue
With patchValue, you can assign values to specific controls in a FormGroup
by supplying an object of key/value pairs for just the controls of interest.
借助patchValue,我们可以通过提供一个只包含要更新的控件的键值对象来把值赋给FormGroup中的指定控件。
This example sets only the form's name control.
这个例子只会设置表单的name控件。
src/app/hero-detail.component.ts (excerpt)
With patchValue you have more flexibility to cope with wildly divergent data and form models.
But unlike setValue, patchValue cannot check for missing control
values and does not throw helpful errors.
借助patchValue,我们可以更灵活地解决数据模型和表单模型之间的差异。
但是和setValue不同,patchValue不会检查缺失的控件值,并且不会抛出有用的错误信息。
When to set form model values (ngOnChanges)
什么时候设置表单的模型值(ngOnChanges)
Now you know how to set the form model values. But when do you set them? The answer depends upon when the component gets the data model values.
现在,我们已经知道了如何设置表单模型的值,但是什么时候设置它门呢? 答案取决于组件何时得到数据模型的值。
The HeroDetailComponent in this reactive forms sample is nested within a master/detail HeroListComponent (discussed below).
The HeroListComponent displays hero names to the user.
When the user clicks on a hero, the list component passes the selected hero into the HeroDetailComponent
by binding to its hero input property.
这个响应式表单范例中的HeroDetailComponent组件嵌套在一个主/从结构的HeroListComponent(稍后讨论)中。
HeroListComponent组件把英雄的名字显示给用户。
当用户点击一个英雄时,列表组件把所选的英雄通过输入属性hero传给HeroDetailComponent。
hero-list.component.html (simplified)
In this approach, the value of hero in the HeroDetailComponent changes
every time the user selects a new hero.
You should call setValue in the ngOnChanges
hook, which Angular calls whenever the input hero property changes
as the following steps demonstrate.
这种方式下,每当用户选择一个新英雄时,HeroDetailComponent中的hero值就会发生变化。
我们可以在ngOnChanges钩子中调用setValue,就像例子中所演示的那样,
每当输入属性hero发生变化时,Angular就会调用它。
First, import the OnChanges and Input symbols in hero-detail.component.ts.
首先,在hero-detail.component.ts中导入OnChanges和Input符号。
src/app/hero-detail.component.ts (core imports)
Add the hero input property.
添加输入属性hero。
Add the ngOnChanges method to the class as follows:
向该类中添加ngOnChanges方法,代码如下:
src/app/hero-detail.component.ts (ngOnchanges)
reset the form flags
重置表单的标识。
You should reset the form when the hero changes so that
control values from the previous hero are cleared and
status flags are restored to the pristine state.
You could call reset at the top of ngOnChanges like this.
我们应该在更换英雄的时候重置表单,以便来自前一个英雄的控件值被清除,并且其状态被恢复为pristine(原始)状态。
我们可以在ngOnChanges的顶部调用reset,就像这样:
The reset method has an optional state value so you can reset the flags and the control values at the same.
Internally, reset passes the argument to setValue.
A little refactoring and ngOnChanges becomes this:
reset方法有一个可选的state值,让我们能在重置状态的同时顺便设置控件的值。
在内部实现上,reset会把该参数传给了setValue。
略微重构之后,ngOnChanges会变成这样:
src/app/hero-detail.component.ts (ngOnchanges - revised)
Create the HeroListComponent and HeroService
创建HeroListComponent和HeroService
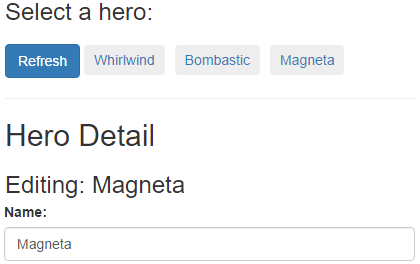
The HeroDetailComponent is a nested sub-component of the HeroListComponent in a master/detail view.
Together they look a bit like this:
HeroDetalComponent是一个嵌套在HeroListComponent的主从视图中的子组件。如果把它们放在一起就是这样的:
The HeroListComponent uses an injected HeroService to retrieve heroes from the server
and then presents those heroes to the user as a series of buttons.
The HeroService emulates an HTTP service.
It returns an Observable of heroes that resolves after a short delay,
both to simulate network latency and to indicate visually
the necessarily asynchronous nature of the application.
HeroListComponent使用一个注入进来的HeroService来从服务器获取英雄列表,然后用一系列按钮把这些英雄展示给用户。
HeroService模拟了HTTP服务。
它返回一个英雄组成的Observable对象,并会在短暂的延迟之后被解析出来,这是为了模拟网络延迟,并展示应用在自然延迟下的异步效果。
When the user clicks on a hero,
the component sets its selectedHero property which
is bound to the hero input property of the HeroDetailComponent.
The HeroDetailComponent detects the changed hero and re-sets its form
with that hero's data values.
当用户点击一个英雄时,组件设置它的selectedHero属性,它绑定到HeroDetailComponent的输入属性hero上。
HeroDetailComponent检测到英雄的变化,并使用当前英雄的值重置此表单。
A "Refresh" button clears the hero list and the current selected hero before refetching the heroes.
"刷新"按钮清除英雄列表和当前选中的英雄,然后重新获取英雄列表。
The remaining HeroListComponent and HeroService implementation details are not relevant to understanding reactive forms.
The techniques involved are covered elsewhere in the documentation, including the Tour of Heroes
here and here.
HeroListComponent和HeroService的其余部分的实现细节与响应式表单无关。
那些技术涵盖于本文档中的其它部分,包括《英雄指南》中的这里和这里。
If you're coding along with the steps in this reactive forms tutorial,
create the pertinent files based on the
source code displayed below.
Notice that hero-list.component.ts imports Observable and finally while hero.service.ts imports Observable, of,
and delay from rxjs.
Then return here to learn about form array properties.
如果你正在随着本教程写代码,可以基于下面显示的代码来创建相应的文件。
注意,hero-list.component.ts从rxjs中导入了Observable和finally,而hero.service.ts导入了Observable、of和delay。
接下来我们回到正轨,继续学习表单数组属性。
Use FormArray to present an array of FormGroups
使用FormArray来表示FormGroup数组
So far, you've seen FormControls and FormGroups.
A FormGroup is a named object whose property values are FormControls and other FormGroups.
以前,我们见过了FormControl和FormGroup。
FormGroup是一个命名对象,它的属性值是FormControl和其它的FormGroup。
Sometimes you need to present an arbitrary number of controls or groups. For example, a hero may have zero, one, or any number of addresses.
有时我们得表示任意数量的控件或控件组。 比如,一个英雄可能拥有0、1或任意数量的住址。
The Hero.addresses property is an array of Address instances.
An address FormGroup can display one Address.
An Angular FormArray can display an array of address FormGroups.
Hero.addresses属性就是一个Address实例的数组。
一个住址的FormGroup可以显示一个Address对象。
而FormArray可以显示一个住址FormGroup的数组。
To get access to the FormArray class, import it into hero-detail.component.ts:
要访问FormArray类,请先把它导入hero-detail.component.ts中:
src/app/hero-detail.component.ts (excerpt)
To work with a FormArray you do the following:
要想使用FormArray,我们要这么做:
Define the items (
FormControlsorFormGroups) in the array.在数组中定义条目(
FormControl或FormGroup)。Initialize the array with items created from data in the data model.
把这个数组初始化微一组从数据模型中的数据创建的条目。
Add and remove items as the user requires.
根据用户的需求添加或移除这些条目。
In this guide, you define a FormArray for Hero.addresses and
let the user add or modify addresses (removing addresses is your homework).
在本章中,我们为Hero.addresses定义了一个FormArray,并且让用户添加或修改这些住址(移除住址功能请课后自行实现)。
You’ll need to redefine the form model in the HeroDetailComponent constructor,
which currently only displays the first hero address in an address FormGroup.
我们需要在HeroDetailComponent的构造函数中重新定义表单模型,它现在只用FormGroup显示第一个英雄住址。
From address to secret lairs
从住址到秘密小屋(Secret Lair)
From the user's point of view, heroes don't have addresses.
Addresses are for mere mortals. Heroes have secret lairs!
Replace the address FormGroup definition with a secretLairs FormArray definition:
从用户的视角来看,英雄们没有住址。
只有我们凡人才有住址,英雄们拥有的是秘密小屋!
把FormGroup型的住址替换为FormArray型的secretLairs定义:
Changing the form control name from address to secretLairs drives home an important point:
the form model doesn't have to match the data model.
把表单的控件名从address改为secretLairs让我们遇到了一个重要问题:表单模型与数据模型不再匹配了。
Obviously there has to be a relationship between the two. But it can be anything that makes sense within the application domain.
显然,必须在两者之间建立关联。但它在应用领域中的意义不限于此,它可以用于任何东西。
Presentation requirements often differ from data requirements. The reactive forms approach both emphasizes and facilitates this distinction.
展现的需求经常会与数据的需求不同。 响应式表单的方法既强调这种差异,也能为这种差异提供了便利。
Initialize the "secretLairs" FormArray
初始化FormArray型的secretLairs
The default form displays a nameless hero with no addresses.
默认的表单显示一个无地址的无名英雄。
You need a method to populate (or repopulate) the secretLairs with actual hero addresses whenever
the parent HeroListComponent sets the HeroListComponent.hero input property to a new Hero.
我们需要一个方法来用实际英雄的地址填充(或重新填充)secretLairs,
而不用管父组件HeroListComponent何时把输入属性HeroListComponent.hero设置为一个新的Hero。
The following setAddresses method replaces the secretLairs FormArray with a new FormArray,
initialized by an array of hero address FormGroups.
下面的setAddresses方法把secretLairs数组替换为一个新的FormArray,使用一组表示英雄地址的FormGroup来进行初始化。
Notice that you replace the previous FormArray with the FormGroup.setControl method, not with setValue.
You're replacing a control, not the value of a control.
注意,我们使用FormGroup.setControl方法,而不是setValue方法来设置前一个FormArray。
我们所要替换的是控件,而不是控件的值。
Notice also that the secretLairs FormArray contains FormGroups, not Addresses.
还要注意,secretLairs数组中包含的是**FormGroup,而不是Address。
Get the FormArray
获取FormArray
The HeroDetailComponent should be able to display, add, and remove items from the secretLairs FormArray.
HeroDetailComponent应该能从secretLairs中显示、添加和删除条目。
Use the FormGroup.get method to acquire a reference to that FormArray.
Wrap the expression in a secretLairs convenience property for clarity and re-use.
使用FormGroup.get方法来获取到FormArray的引用。
把这个表达式包装进一个名叫secretLairs的便捷属性中来让它更清晰,并供复用。
src/app/hero-detail.component.ts (secretLayers property)
Display the FormArray
显示FormArray
The current HTML template displays a single address FormGroup.
Revise it to display zero, one, or more of the hero's address FormGroups.
当前HTML模板显示单个的地址FormGroup。
我们要把它修改成能显示0、1或更多个表示英雄地址的FormGroup。
This is mostly a matter of wrapping the previous template HTML for an address in a <div> and
repeating that <div> with *ngFor.
要改的部分主要是把以前表示地址的HTML模板包裹进一个<div>中,并且使用*ngFor来重复渲染这个<div>。
The trick lies in knowing how to write the *ngFor. There are three key points:
诀窍在于要知道如何编写*ngFor。主要有三点:
Add another wrapping
<div>, around the<div>with*ngFor, and set itsformArrayNamedirective to"secretLairs". This step establishes the secretLairsFormArrayas the context for form controls in the inner, repeated HTML template.在
*ngFor的<div>之外套上另一个包装<div>,并且把它的formArrayName指令设为"secretLairs"。 这一步为内部的表单控件建立了一个FormArray型的secretLairs作为上下文,以便重复渲染HTML模板。The source of the repeated items is the
FormArray.controls, not theFormArrayitself. Each control is an addressFormGroup, exactly what the previous (now repeated) template HTML expected.这些重复条目的数据源是
FormArray.controls而不是FormArray本身。 每个控件都是一个FormGroup型的地址对象,与以前的模板HTML所期望的格式完全一样。Each repeated
FormGroupneeds a uniqueformGroupNamewhich must be the index of theFormGroupin theFormArray. You'll re-use that index to compose a unique label for each address.每个被重复渲染的
FormGroup都需要一个独一无二的formGroupName,它必须是FormGroup在这个FormArray中的索引。 我们将复用这个索引,以便为每个地址组合出一个独一无二的标签。
Here's the skeleton for the secret lairs section of the HTML template:
下面是HTML模板中秘密小屋部分的代码骨架:
src/app/hero-detail.component.html (*ngFor)
Here's the complete template for the secret lairs section:
这里是秘密小屋部分的完整模板:
src/app/hero-detail.component.html (excerpt)
Add a new lair to the FormArray
把新的小屋添加到FormArray中
Add an addLair method that gets the secretLairs FormArray and appends a new address FormGroup to it.
添加一个addLair方法,它获取secretLairs数组,并把新的表示地址的FormGroup添加到其中。
src/app/hero-detail.component.ts (addLair method)
Place a button on the form so the user can add a new secret lair and wire it to the component's addLair method.
把一个按钮放在表单中,以便用户可以添加新的秘密小屋,并把它传给组件的addLair方法。
src/app/hero-detail.component.html (addLair button)
Be sure to add the type="button" attribute.
In fact, you should always specify a button's type.
Without an explict type, the button type defaults to "submit".
When you later add a form submit action, every "submit" button triggers the submit action which
might do something like save the current changes.
You do not want to save changes when the user clicks the Add a Secret Lair button.
务必确保添加了type="button"属性。
事实上,我们应该总是指定按钮的type。
如果不明确指定类型,按钮的默认类型就是“submit”(提交)。
当我们稍后添加了表单提交的动作时,每个“submit”按钮都是触发一次提交操作,而它将可能会做一些处理,比如保存当前的修改。
我们显然不会希望每当用户点击“Add a Secret Lair”按钮时就保存一次。
Try it!
试试看!
Back in the browser, select the hero named "Magneta". "Magneta" doesn't have an address, as you can see in the diagnostic JSON at the bottom of the form.
回到浏览器中,选择名叫“Magneta”的英雄。 "Magneta"没有地址,我们会在表单底部的诊断用JSON中看到这一点。

Click the "Add a Secret Lair" button. A new address section appears. Well done!
点击“Add a Secret Lair”按钮,一个新的地址区就出现了,干得好!
Remove a lair
移除一个小屋
This example can add addresses but it can't remove them.
For extra credit, write a removeLair method and wire it to a button on the repeating address HTML.
这个例子可以添加地址,但是还不能移除它们。
作为练习,你可以自己写一个removeLair方法,并且把它关联到地址HTML模板的一个按钮上。
Observe control changes
监视控件的变化
Angular calls ngOnChanges when the user picks a hero in the parent HeroListComponent.
Picking a hero changes the HeroDetailComponent.hero input property.
每当用户在父组件HeroListComponent中选取了一个英雄,Angular就会调用一次ngOnChanges。
选取英雄会修改输入属性HeroDetailComponent.hero。
Angular does not call ngOnChanges when the user modifies the hero's name or secret lairs.
Fortunately, you can learn about such changes by subscribing to one of the form control properties
that raises a change event.
当用户修改英雄的名字或秘密小屋时,Angular并不会调用ngOnChanges。
幸运的是,我们可以通过订阅表单控件的属性之一来了解这些变化,此属性会发出变更通知。
These are properties, such as valueChanges, that return an RxJS Observable.
You don't need to know much about RxJS Observable to monitor form control values.
有一些属性,比如valueChanges,可以返回一个RxJS的Observable对象。
要监听控件值的变化,我们并不需要对RxJS的Observable了解更多。
Add the following method to log changes to the value of the name FormControl.
添加下列方法,以监听姓名这个FormControl中值的变化。
src/app/hero-detail.component.ts (logNameChange)
Call it in the constructor, after creating the form.
在构造函数中调用它,就在创建表单的代码之后:
The logNameChange method pushes name-change values into a nameChangeLog array.
Display that array at the bottom of the component template with this *ngFor binding:
logNameChange方法会把一条改名记录追加到nameChangeLog数组中。
用*ngFor绑定在组件模板的底部显示这个数组:
src/app/hero-detail.component.html (Name change log)
Return to the browser, select a hero (e.g, "Magneta"), and start typing in the name input box. You should see a new name in the log after each keystroke.
返回浏览器,选择一个英雄(比如“Magneta”),并开始在姓名输入框中键入。 我们会看到,每次按键都会记录一个新名字。
When to use it
什么时候用它
An interpolation binding is the easier way to display a name change. Subscribing to an observable form control property is handy for triggering application logic within the component class.
插值表达式绑定时显示姓名变化比较简单的方式。 在组件类中订阅表单控件属性变化的可观察对象以触发应用逻辑则是比较难的方式。
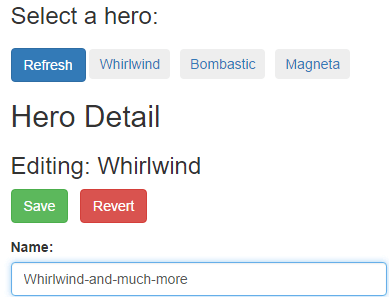
Save form data
保存表单数据
The HeroDetailComponent captures user input but it doesn't do anything with it.
In a real app, you'd probably save those hero changes.
In a real app, you'd also be able to revert unsaved changes and resume editing.
After you implement both features in this section, the form will look like this:
HeroDetailComponent捕获了用户输入,但没有用它做任何事。
在真实的应用中,我们可能要保存这些英雄的变化。
在真实的应用中,我们还要能丢弃未保存的变更,然后继续编辑。
在实现完本节的这些特性之后,表单是这样的:
Save
保存
In this sample application, when the user submits the form,
the HeroDetailComponent will pass an instance of the hero data model
to a save method on the injected HeroService.
在这个范例应用中,当用户提交表单时,HeroDetailComponent会把英雄实例的数据模型传给所注入进来的HeroService的一个方法来进行保存。
src/app/hero-detail.component.ts (onSubmit)
This original hero had the pre-save values. The user's changes are still in the form model.
So you create a new hero from a combination of original hero values (the hero.id)
and deep copies of the changed form model values, using the prepareSaveHero helper.
原始的hero中有一些保存之前的值,用户的修改仍然是在表单模型中。
所以我们要根据原始英雄(根据hero.id找到它)的值组合出一个新的hero对象,并用prepareSaveHero助手来深层复制变化后的模型值。
src/app/hero-detail.component.ts (prepareSaveHero)
Address deep copy
地址的深层复制
Had you assigned the formModel.secretLairs to saveHero.addresses (see line commented out),
the addresses in saveHero.addresses array would be the same objects
as the lairs in the formModel.secretLairs.
A user's subsequent changes to a lair street would mutate an address street in the saveHero.
我们已经把formModel.secretLairs赋值给了saveHero.addresses(参见注释掉的部分),
saveHero.addresses数组中的地址和formModel.secretLairs中的会是同一个对象。
用户随后对小屋所在街道的修改将会改变saveHero中的街道地址。
The prepareSaveHero method makes copies of the form model's secretLairs objects so that can't happen.
但prepareSaveHero方法会制作表单模型中的secretLairs对象的复本,因此实际上并没有修改原有对象。
Revert (cancel changes)
丢弃(撤销修改)
The user cancels changes and reverts the form to the original state by pressing the Revert button.
用户可以撤销修改,并通过点击Revert按钮来把表单恢复到原始状态。
Reverting is easy. Simply re-execute the ngOnChanges method that built the form model from the original, unchanged hero data model.
丢弃很容易。只要重新执行ngOnChanges方法就可以拆而,它会重新从原始的、未修改过的hero数据模型来构建出表单模型。
src/app/hero-detail.component.ts (revert)
Buttons
按钮
Add the "Save" and "Revert" buttons near the top of the component's template:
把“Save”和“Revert”按钮添加到组件模板的顶部:
src/app/hero-detail.component.html (Save and Revert buttons)
The buttons are disabled until the user "dirties" the form by changing a value in any of its form controls (heroForm.dirty).
这些按钮默认是禁用的,直到用户通过修改任何一个表单控件的值“弄脏”了表单中的数据(即heroForm.dirty)。
Clicking a button of type "submit" triggers the ngSubmit event which calls the component's onSubmit method.
Clicking the revert button triggers a call to the component's revert method.
Users now can save or revert changes.
点击一个类型为"submit"的按钮会触发ngSubmit事件,而它会调用组件的onSubmit方法。
点击“Revert”按钮则会调用组件的revert方法。
现在,用户可以保存或放弃修改了。
This is the final step in the demo.
Try the
这是本演示的最后一步。
去试试
Conclusion
总结
This page covered:
本章包括:
How to create a reactive form component and its corresponding template.
如何创建一个响应式表单控件及其对应的模板。
How to use
FormBuilderto simplify coding a reactive form.如何使用
FormBuilder来简化响应式表单的编码工作。Grouping
FormControls.分组
FormControl。Inspecting
FormControlproperties.审查
FormControl的属性。Setting data with
patchValueandsetValue.使用
patchValue和setValue设置数据。Adding groups dynamically with
FormArray.使用
FormArray动态添加控件组。Observing changes to the value of a
FormControl.监听
FormControl中值的变化。Saving form changes.
保存表单中的更改。
The key files of the final version are as follows:
最终版中的核心文件如下:
You can download the complete source for all steps in this guide
from the
你可以到