Angular is the name for the Angular of today and tomorrow. AngularJS is the name for all v1.x versions of Angular.
Angular这个名字专指现在和未来的Angular版本,而AngularJS专指Angular的所有v1.x版本。
AngularJS apps are great. Always consider the business case before moving to Angular. An important part of that case is the time and effort to get there. This guide describes the built-in tools for efficiently migrating AngularJS projects over to the Angular platform, a piece at a time.
有很多大型AngularJS应用。 在决定迁移到Angular之前,首先要深入思考业务案例。 在这些案例中,最重要的部分之一是时间和需要付出的努力。 本章描述用于把AngularJS应用高效迁移到Angular平台的内置工具,每次讲一点点。
Some applications will be easier to upgrade than others, and there are ways in which we can make it easier for ourselves. It is possible to prepare and align AngularJS applications with Angular even before beginning the upgrade process. These preparation steps are all about making the code more decoupled, more maintainable, and up to speed with modern development tools. That means the preparation work will not only make the eventual upgrade easier, but will also generally improve our AngularJS applications.
有些应用可能比其它的升级起来简单,还有一些方法能让把这项工作变得更简单。 即使在正式开始升级过程之前,我们可以准备AngularJS的程序,让它向Angular看齐。 这些准备步骤几乎都是关于如何让代码更加松耦合、更有可维护性,以及用现代开发工具提高速度的。 这意味着,这种准备工作不仅能让最终的升级变得更简单,而且还能提升AngularJS程序的质量。
One of the keys to a successful upgrade is to do it incrementally,
by running the two frameworks side by side in the same application, and
porting AngularJS components to Angular one by one. This makes it possible
to upgrade even large and complex applications without disrupting other
business, because the work can be done collaboratively and spread over
a period of time. The upgrade module in Angular has been designed to
make incremental upgrading seamless.
成功升级的关键之一是增量式的实现它,通过在同一个应用中一起运行这两个框架,并且逐个把AngularJS的组件迁移到Angular中。
这意味着可以在不必打断其它业务的前提下,升级更大、更复杂的应用程序,因为这项工作可以多人协作完成,在一段时间内逐渐铺开。
Angular upgrade模块的设计目标就是让你渐进、无缝的完成升级。
Upgrading with The Upgrade Module
Transcluding Angular Content into AngularJS Component Directives
Preparation
准备工作
There are many ways to structure AngularJS applications. When we begin to upgrade these applications to Angular, some will turn out to be much more easy to work with than others. There are a few key techniques and patterns that we can apply to future proof our apps even before we begin the migration.
AngularJS应用程序的组织方式有很多种。当我们想把它们升级到Angular的时候, 有些做起来会比其它的更容易些。即使在我们开始升级之前,也有一些关键的技术和模式可以让我们将来升级时更轻松。
Follow the Angular Style Guide
遵循Angular风格指南
The AngularJS Style Guide collects patterns and practices that have been proven to result in cleaner and more maintainable AngularJS applications. It contains a wealth of information about how to write and organize Angular code - and equally importantly - how not to write and organize Angular code.
Angular风格指南收集了一些已证明能写出干净且可维护的AngularJS程序的模式与实践。 它包含了很多关于如何书写和组织Angular代码的有价值信息,同样重要的是,不应该采用的书写和组织Angular代码的方式。
Angular is a reimagined version of the best parts of AngularJS. In that sense, its goals are the same as the Angular Style Guide's: To preserve the good parts of AngularJS, and to avoid the bad parts. There's a lot more to Angular than just that of course, but this does mean that following the style guide helps make your AngularJS app more closely aligned with Angular.
Angular是一个基于AngularJS中最好的部分构思出来的版本。在这种意义上,它的目标和Angular风格指南是一样的: 保留AngularJS中好的部分,去掉坏的部分。当然,Angular还做了更多。 说这些的意思是:遵循这个风格指南可以让你写出更接近Angular程序的AngularJS程序。
There are a few rules in particular that will make it much easier to do
an incremental upgrade using the Angular upgrade module:
有一些特别的规则可以让使用Angular的upgrade模块进行增量升级变得更简单:
The Rule of 1 states that there should be one component per file. This not only makes components easy to navigate and find, but will also allow us to migrate them between languages and frameworks one at a time. In this example application, each controller, component, service, and filter is in its own source file.
单一规则 规定每个文件应该只放一个组件。这不仅让组件更容易浏览和查找,而且还将允许我们逐个迁移它们的语言和框架。 在这个范例程序中,每个控制器、工厂和过滤器都在它自己的源文件中。
The Folders-by-Feature Structure and Modularity rules define similar principles on a higher level of abstraction: Different parts of the application should reside in different directories and Angular modules.
按特性分目录的结构和模块化规则在较高的抽象层定义了一些相似的原则:应用程序中的不同部分应该被分到不同的目录和Angular模块中。
When an application is laid out feature per feature in this way, it can also be migrated one feature at a time. For applications that don't already look like this, applying the rules in the Angular style guide is a highly recommended preparation step. And this is not just for the sake of the upgrade - it is just solid advice in general!
如果应用程序能用这种方式把每个特性分到一个独立目录中,它也就能每次迁移一个特性。 对于那些还没有这么做的程序,强烈建议把应用这条规则作为准备步骤。而且这也不仅仅对升级有价值, 它还是一个通用的规则,可以让你的程序更“坚实”。
Using a Module Loader
使用模块加载器
When we break application code down into one component per file, we often end up with a project structure with a large number of relatively small files. This is a much neater way to organize things than a small number of large files, but it doesn't work that well if you have to load all those files to the HTML page with <script> tags. Especially when you also have to maintain those tags in the correct order. That's why it's a good idea to start using a module loader.
当我们把应用代码分解成每个文件中放一个组件之后,我们通常会得到一个由大量相对较小的文件组成的项目结构。
这比组织成少量大文件要整洁得多,但如果你不得不通过<script>标签在HTML页面中加载所有这些文件,那就不好玩了。
尤其是当你不得不按正确的顺序维护这些标签时更是如此。
这就是为什么开始使用模块加载器是一个好主意了。
Using a module loader such as SystemJS,
Webpack, or Browserify
allows us to use the built-in module systems of the TypeScript or ES2015 languages in our apps.
We can use the import and export features that explicitly specify what code can
and will be shared between different parts of the application. For ES5 applications
we can use CommonJS style require and module.exports features. In both cases,
the module loader will then take care of loading all the code the application needs
in the correct order.
使用模块加载器,比如SystemJS、
Webpack或Browserify,
可以让我们在程序中使用TypeScript或ES2015语言内置的模块系统。
我们可以使用import和export特性来明确指定哪些代码应该以及将会被在程序的不同部分之间共享。
对于ES5程序来说,我们可以改用CommonJS风格的require和module.exports特性代替。
无是论哪种情况,模块加载器都会按正确的顺序加载程序中用到的所有代码。
When we then take our applications into production, module loaders also make it easier to package them all up into production bundles with batteries included.
当我们的应用程序投入生产环境时,模块加载器也会让把所有这些文件打成完整的产品包变得更容易。
Migrating to TypeScript
迁移到TypeScript
If part of our Angular upgrade plan is to also take TypeScript into use, it makes sense to bring in the TypeScript compiler even before the upgrade itself begins. This means there's one less thing to learn and think about during the actual upgrade. It also means we can start using TypeScript features in our AngularJS code.
Angular升级计划的一部分是引入TypeScript,即使在开始升级之前,引入TypeScript编译器也是有意义的。 这意味着等真正升级的时候需要学习和思考的东西更少。 它还意味着我们可以在AngularJS代码中开始使用TypeScript的特性。
Since TypeScript is a superset of ECMAScript 2015, which in turn is a superset
of ECMAScript 5, "switching" to TypeScript doesn't necessarily require anything
more than installing the TypeScript compiler and switching renaming files from
*.js to *.ts. But just doing that is not hugely useful or exciting, of course.
Additional steps like the following can give us much more bang for the buck:
因为TypeScript是ECMAScript 2015的一个超集,而ES2015又是ECMAScript 5的一个超集。
这意味着除了安装一个TypeScript编译器,并把文件名都从*.js改成*.ts之外,其实什么都不用做。
当然,如果仅仅这样做也没什么大用,也没什么令人兴奋之处。
下面这些额外步骤可以让我们精神抖擞起来:
For applications that use a module loader, TypeScript imports and exports (which are really ECMAScript 2015 imports and exports) can be used to organize code into modules.
对那些使用了模块加载器的程序,TypeScript的导入和导出(这实际上是ECMAScript 2015导入和导出)可以把代码组织到模块中。
Type annotations can be gradually added to existing functions and variables to pin down their types and get benefits like build-time error checking, great autocompletion support and inline documentation.
类型注解可以逐步添加到已存在的函数和变量上,以固定它们的类型,并获得其优点:比如编译期错误检查、更好的支持自动完成,以及内联式文档等。
JavaScript features new to ES2015, like arrow functions,
lets andconsts, default function parameters, and destructuring assignments can also be gradually added to make the code more expressive.那些ES2015中新增的特性,比如箭头函数、
let、const、默认函数参数、解构赋值等也能逐渐添加进来,让代码更有表现力。Services and controllers can be turned into classes. That way they'll be a step closer to becoming Angular service and component classes, which will make our life easier once we do the upgrade.
服务和控制器可以转成类。这样我们就能一步步接近Angular的服务和组件类了,这样等到我们开始升级时,也会更简单。
Using Component Directives
使用组件型指令
In Angular, components are the main primitive from which user interfaces are built. We define the different parts of our UIs as components, and then compose the UI by using components in our templates.
在Angular中,组件是用来构建用户界面的主要元素。我们把UI中的不同部分定义成组件,然后通过在模板中使用这些组件最终合成为UI。
You can also do this in AngularJS, using component directives. These are
directives that define their own templates, controllers, and input/output bindings -
the same things that Angular components define. Applications built with
component directives are much easier to migrate to Angular than applications
built with lower-level features like ng-controller, ng-include, and scope
inheritance.
我们在AngularJS中也能这么做。那就是一种定义了自己的模板、控制器和输入/输出绑定的指令 —— 跟Angular中对组件的定义是一样的。
要迁移到Angular,通过组件型指令构建的应用程序会比直接用ng-controller、ng-include和作用域继承等底层特性构建的要容易得多。
To be Angular compatible, an AngularJS component directive should configure these attributes:
要与Angular兼容,AngularJS的组件型指令应该配置下列属性:
restrict: 'E'. Components are usually used as elements.restrict: 'E'。组件通常会以元素的方式使用。scope: {}- an isolate scope. In Angular, components are always isolated from their surroundings, and we should do this in AngularJS too.scope: {}- 一个独立作用域。在Angular中,组件永远是从它们的环境中被隔离出来的,在AngularJS中,我们也应该这么做。bindToController: {}. Component inputs and outputs should be bound to the controller instead of using the$scope.bindToController: {}。组件的输入和输出应该绑定到控制器,而不是$scope。controllerandcontrollerAs. Components have their own controllers.controller和controllerAs。组件有它们自己的控制器。templateortemplateUrl. Components have their own templates.template或templateUrl。组件有它们自己的模板。
Component directives may also use the following attributes:
组件型指令还可能使用下列属性:
transclude: true, if the component needs to transclude content from elsewhere.transclude: true:如果组件需要从其它地方透传内容,就设置它。require, if the component needs to communicate with some parent component's controller.require:如果组件需要和父组件的控制器通讯,就设置它。
Component directives may not use the following attributes:
组件型指令不能使用下列属性:
compile. This will not be supported in Angular.compile。它在Angular中将不再被支持。replace: true. Angular never replaces a component element with the component template. This attribute is also deprecated in AngularJS.replace: true。Angular永远不会用组件模板替换一个组件元素。这个特性在AngularJS中也同样不建议使用了。priorityandterminal. While AngularJS components may use these, they are not used in Angular and it is better not to write code that relies on them.priority和terminal。虽然AngularJS的组件可能使用这些,但它们在Angular中已经没用了,并且最好不要再写依赖它们的代码。
An AngularJS component directive that is fully aligned with the Angular architecture may look something like this:
AngularJS中一个完全向Angular架构对齐过的组件型指令是这样的:
AngularJS 1.5 introduces the component API that makes it easier to define directives like these. It is a good idea to use this API for component directives for several reasons:
AngularJS.5引入了组件API,它让像这样定义指令变得更简单了。 为组件型指令使用这个API是一个好主意,因为:
It requires less boilerplate code.
它需要更少的样板代码。
It enforces the use of component best practices like
controllerAs.它强制使用组件的最佳实践,比如
controllerAs。It has good default values for directive attributes like
scopeandrestrict.对于指令中像
scope和restrict这样的属性,它有良好的默认值。
The component directive example from above looks like this when expressed using the component API:
如果使用这个组件API进行快捷定义,那么上面看到的组件型指令就变成了这样:
Controller lifecycle hook methods $onInit(), $onDestroy(), and $onChanges()
are another convenient feature that AngularJS 1.5 introduces. They all have nearly
exact equivalents in Angular, so organizing component lifecycle
logic around them will ease the eventual Angular upgrade process.
控制器的生命周期钩子$onInit()、$onDestroy()和$onChanges()是AngularJS.5引入的另一些便利特性。
它们都很接近于Angular中的等价物,所以,围绕它们组织组件生命周期的逻辑会更容易升级。
Upgrading with The Upgrade Module
使用升级适配器进行升级
The upgrade module in Angular is a very useful tool for upgrading
anything but the smallest of applications. With it we can mix and match
AngularJS and Angular components in the same application and have them interoperate
seamlessly. That means we don't have to do the upgrade work all at once,
since there's a natural coexistence between the two frameworks during the
transition period.
不管要升级什么,Angular中的upgrade模块都会是一个非常有用的工具 —— 除非是小到没功能的应用。
借助它,我们可以在同一个应用程序中混用并匹配AngularJS和2的组件,并让它们实现无缝的互操作。
这意味着我们不用必须一次性做完所有升级工作,因为在整个演进过程中,这两个框架可以很自然的和睦相处。
How The Upgrade Module Works
升级模块如何工作
The primary tool provided by the upgrade module is called the UpgradeModule.
This is a service that can bootstrap and manage hybrid applications that support
both Angular and AngularJS code.
upgrade模块提供的主要工具叫做UpgradeModule。这是一个服务,它可以引导并管理同时支持Angular和AngularJS的混合式应用程序。
When we use UpgradeModule, what we're really doing is running both versions
of Angular at the same time. All Angular code is running in the Angular
framework, and AngularJS code in the AngularJS framework. Both of these are the
actual, fully featured versions of the frameworks. There is no emulation going on,
so we can expect to have all the features and natural behavior of both frameworks.
当使用UpgradeModule时,我们实际做的是同时运行两个版本的Angular。所有Angular的代码运行在Angular框架中,
而AngularJS的代码运行在AngularJS框架中。所有这些都是真实的、全功能的框架版本。
没有进行任何仿真,所以我们可以期待同时存在这两个框架的所有特性和天生的行为。
What happens on top of this is that components and services managed by one framework can interoperate with those from the other framework. This happens in three main areas: Dependency injection, the DOM, and change detection.
所有这些事情的背后,本质上是一个框架中管理的组件和服务能和来自另一个中的进行互操作。 这发生在三个主要的领域:依赖注入、DOM和变更检测。
Dependency Injection
依赖注入
Dependency injection is front and center in both AngularJS and Angular, but there are some key differences between the two frameworks in how it actually works.
无论是在AngularJS中还是在Angular中,依赖注入都处于前沿和中心的位置,但在两个框架的工作原理上,却存在着一些关键的不同之处。
| AngularJS | Angular |
|---|---|
Dependency injection tokens are always strings 依赖注入的令牌(Token)永远是字符串(译注:指服务名称)。 | Tokens can have different types. They are often classes. They may also be strings. 令牌可能有不同的类型。 通常是类,也可能是字符串。 |
There is exactly one injector. Even in multi-module applications, everything is poured into one big namespace. 只有一个注入器。即使在多模块的应用程序中,每样东西也都被装入一个巨大的命名空间中。 | There is a tree hierarchy of injectors, with a root injector and an additional injector for each component. 有一组树状多层注入器,有一个根注入器,每个组件也另外有一个注入器。 |
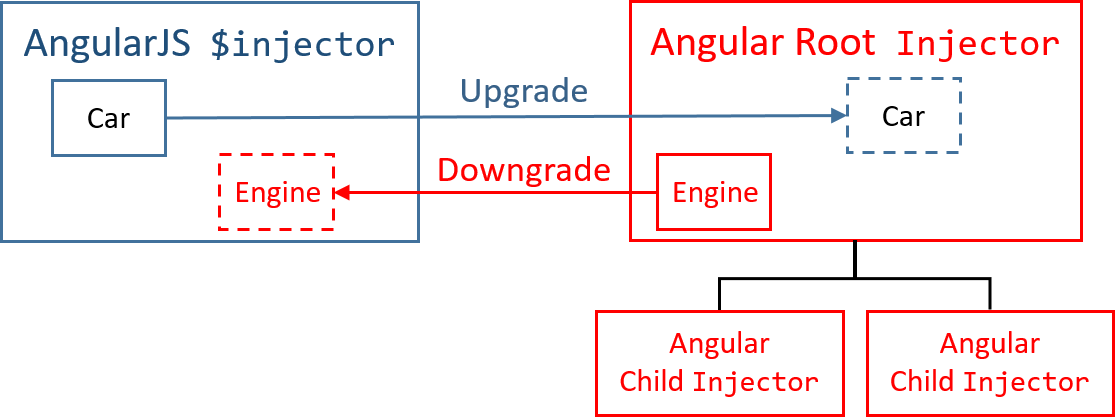
Even accounting for these differences we can still have dependency injection
interoperability. The UpgradeModule resolves the differences and makes
everything work seamlessly:
就算有这么多不同点,也并不妨碍我们在依赖注入时进行互操作。UpgradeModule解决了这些差异,并让它们无缝的对接:
You can make AngularJS services available for injection to Angular code by upgrading them. The same singleton instance of each service is shared between the frameworks. In Angular these services will always be in the root injector and available to all components.
通过升级它们,我们就能让那些在AngularJS中能被注入的服务在Angular的代码中可用。 在框架之间共享的是服务的同一个单例对象。在Angular中,这些外来服务总是被放在根注入器中,并可用于所有组件。 它们总是具有字符串令牌 —— 跟它们在AngularJS中的令牌相同。
You can also make Angular services available for injection to AngularJS code by downgrading them. Only services from the Angular root injector can be downgraded. Again, the same singleton instances are shared between the frameworks. When we register a downgrade, we explicitly specify a string token that we want to use in AngularJS.
通过降级它们,我们也能让那些在Angular中能被注入的服务在AngularJS的代码中可用。 只有那些来自Angular根注入器的服务才能被降级。同样的,在框架之间共享的是同一个单例对象。 当我们注册一个要降级的服务时,要明确指定一个打算在AngularJS中使用的字符串令牌。
Components and the DOM
组件与DOM
What we'll find in the DOM of a hybrid application are components and
directives from both AngularJS and Angular. These components
communicate with each other by using the input and output bindings
of their respective frameworks, which the UpgradeModule bridges
together. They may also communicate through shared injected dependencies,
as described above.
在混合式应用中,我们能同时发现那些来自AngularJS和Angular中组件和指令的DOM。
这些组件通过它们各自框架中的输入和输出绑定来互相通讯,它们由UpgradeModule桥接在一起。
它们也能通过共享被注入的依赖彼此通讯,就像前面所说的那样。
There are two key things to understand about what happens in the DOM of a hybrid application:
要弄明白在一个混合式应用的DOM中发生了什么,有两点很关键:
Every element in the DOM is owned by exactly one of the two frameworks. The other framework ignores it. If an element is owned by AngularJS, Angular treats it as if it didn't exist, and vice versa.
DOM中的每个元素都只能被两个框架之一拥有。另一个框架会忽略它。 如果一个元素被AngularJS拥有,Angular就会当它不存在。反之亦然。
The root of the application is always an AngularJS template.
应用的根节点总是来自AngularJS中的模板。
So a hybrid application begins life as an AngularJS application, and it is AngularJS that processes its root template. Angular then steps into the picture when an Angular component is used somewhere in the application templates. That component's view will then be managed by Angular, and it may use any number of Angular components and directives.
所以,混合式应用总是像AngularJS程序那样启动,处理根模板的也是AngularJS. 然后,当这个应用的模板中使用到了Angular的组件时,Angular才开始参与。 这个组件的视图由Angular进行管理,而且它还可以使用一系列的Angular组件和指令。
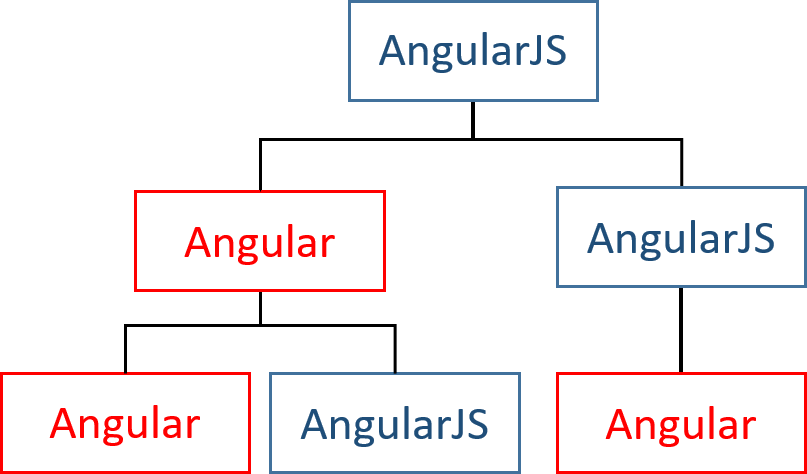
Beyond that, we may interleave the two frameworks as much as we need to. We always cross the boundary between the two frameworks by one of two ways:
更进一步说,我们可以按照需要,任意穿插使用这两个框架。 使用下面的两种方式之一,我们可以自由穿梭于这两个框架的边界:
By using a component from the other framework: An AngularJS template using an Angular component, or an Angular template using an AngularJS component.
通过使用来自另一个框架的组件:AngularJS的模板中用到了Angular的组件,或者Angular的模板中使用了AngularJS的组件。
By transcluding or projecting content from the other framework. The
UpgradeModulebridges the related concepts of AngularJS transclusion and Angular content projection together.通过透传(transclude)或投影(project)来自另一个框架的内容。
UpgradeModule牵线搭桥,把AngularJS的透传概念和Angular的内容投影概念关联起来。
Whenever we use a component that belongs to the other framework, a switch between framework boundaries occurs. However, that switch only happens to the children of the component element. Consider a situation where we use an Angular component from AngularJS like this:
当我们使用一个属于另一个框架的组件时,就会发生一个跨框架边界的切换。不过,这种切换只发生在该组件元素的子节点上。 考虑一个场景,我们从AngularJS中使用一个Angular组件,就像这样:
The DOM element <a-component> will remain to be an AngularJS managed
element, because it's defined in an AngularJS template. That also
means you can apply additional AngularJS directives to it, but not
Angular directives. It is only in the template of the <a-component>
where Angular steps in. This same rule also applies when you
use AngularJS component directives from Angular.
此时,<a-component>这个DOM元素仍然由AngularJS管理,因为它是在AngularJS的模板中定义的。
这也意味着你可以往它上面添加别的AngularJS指令,却不能添加Angular的指令。
只有在<a-component>组件的模板中才是Angular的天下。同样的规则也适用于在Angular中使用AngularJS组件型指令的情况。
Change Detection
变更检测
Change detection in AngularJS is all about scope.$apply(). After every
event that occurs, scope.$apply() gets called. This is done either
automatically by the framework, or in some cases manually by our own
code. It is the point in time when change detection occurs and data
bindings get updated.
AngularJS中的变更检测全是关于scope.$apply()的。在每个事件发生之后,scope.$apply()就会被调用。
这或者由框架自动调用,或者在某些情况下由我们自己的代码手动调用。它是发生变更检测以及更新数据绑定的时间点。
In Angular things are different. While change detection still
occurs after every event, no one needs to call scope.$apply() for
that to happen. This is because all Angular code runs inside something
called the Angular zone. Angular always
knows when the code finishes, so it also knows when it should kick off
change detection. The code itself doesn't have to call scope.$apply()
or anything like it.
在Angular中,事情有点不一样。虽然变更检测仍然会在每一个事件之后发生,却不再需要每次调用scope.$apply()了。
这是因为所有Angular代码都运行在一个叫做Angular zone的地方。
Angular总是知道什么时候代码执行完了,也就知道了它什么时候应该触发变更检测。代码本身并不需要调用scope.$apply()或其它类似的东西。
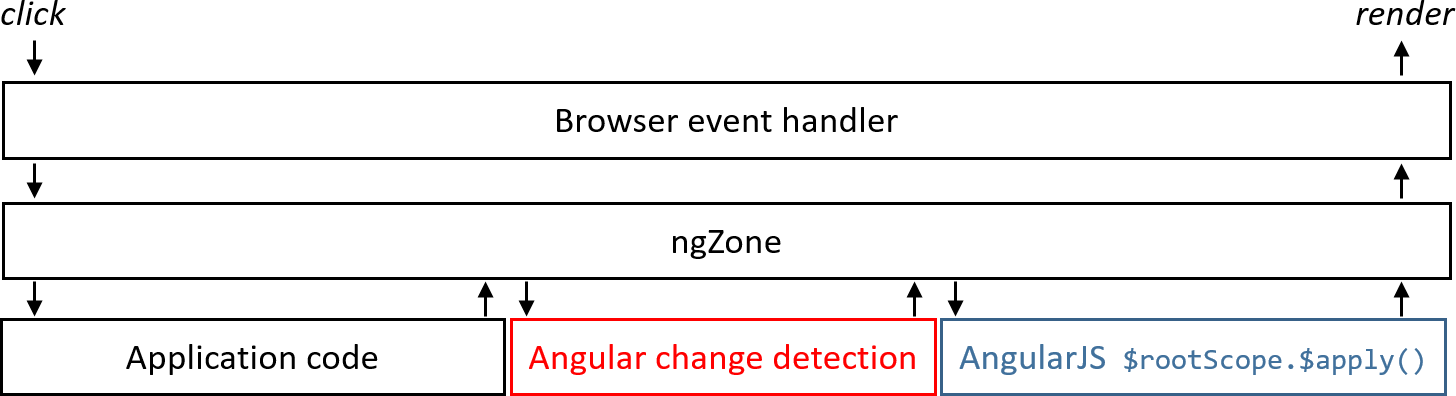
In the case of hybrid applications, the UpgradeModule bridges the
AngularJS and Angular approaches. Here's what happens:
在这种混合式应用的案例中,UpgradeModule在AngularJS的方法和Angular的方法之间建立了桥梁。发生了什么呢?
Everything that happens in the application runs inside the Angular zone. This is true whether the event originated in AngularJS or Angular code. The zone triggers Angular change detection after every event.
应用中发生的每件事都运行在Angular的zone里。 无论事件发生在AngularJS还是Angular的代码中,都是如此。
The
UpgradeModulewill invoke the AngularJS$rootScope.$apply()after every turn of the Angular zone. This also triggers AngularJS change detection after every event.UpgradeModule将在每一次离开Angular zone时调用AngularJS的$rootScope.$apply()。这样也就同样会在每个事件之后触发AngularJS的变更检测。
What this means in practice is that we do not need to call $apply() in
our code, regardless of whether it is in AngularJS on Angular. The
UpgradeModule does it for us. We can still call $apply() so there
is no need to remove such calls from existing code. Those calls just don't
have any effect in a hybrid application.
在实践中,这意味着我们不用在自己的代码中调用$apply(),而不用管这段代码是在AngularJS还是Angular中。
UpgradeModule都替我们做了。我们仍然可以调用$apply(),也就是说我们不必从现有代码中移除此调用。
但是在混合式应用中,那些调用没有任何效果。
When we downgrade an Angular component and then use it from AngularJS, the component's inputs will be watched using AngularJS change detection. When those inputs change, the corresponding properties in the component are set. We can also hook into the changes by implementing the OnChanges interface in the component, just like we could if it hadn't been downgraded.
当我们降级一个Angular组件,然后把它用于AngularJS中时,组件的输入属性就会被AngularJS的变更检测体系监视起来。 当那些输入属性发生变化时,组件中相应的属性就会被设置。我们也能通过实现OnChanges 接口来挂钩到这些更改,就像它未被降级时一样。
Correspondingly, when we upgrade an AngularJS component and use it from Angular,
all the bindings defined for the component directive's scope (or bindToController)
will be hooked into Angular change detection. They will be treated
as regular Angular inputs and set onto the scope (or controller) when
they change.
相应的,当我们把AngularJS的组件升级给Angular使用时,在这个组件型指令的scope(或bindToController)中定义的所有绑定,
都将被挂钩到Angular的变更检测体系中。它们将和标准的Angular输入属性被同等对待,并当它们发生变化时设置回scope(或控制器)上。
Using UpgradeModule with Angular NgModules
通过Angular的NgModule来使用UpgradeModule
Both AngularJS and Angular have their own concept of modules to help organize an application into cohesive blocks of functionality.
AngularJS还是Angular都有自己的模块概念,来帮你我们把应用组织成一些紧密相关的功能块。
Their details are quite different in architecture and implementation.
In AngularJS, you add Angular assets to the angular.module property.
In Angular, you create one or more classes adorned with an NgModule decorator
that describes Angular assets in metadata. The differences blossom from there.
它们在架构和实现的细节上有着显著的不同。
在AngularJS中,我们会把AngularJS的资源添加到angular.module属性上。
在Angular中,我们会创建一个或多个带有NgModule装饰器的类,这些装饰器用来在元数据中描述Angular资源。差异主要来自这里。
In a hybrid application we run both versions of Angular at the same time.
That means that we need at least one module each from both AngularJS and Angular .
We will import UpgradeModule inside our Angular module, and then use it for
bootstrapping our AngularJS module. Let's see how.
在混合式应用中,我们同时运行了两个版本的Angular。
这意味着我们至少需要AngularJS和Angular各提供一个模块。
当我们使用AngularJS的模块进行引导时,就得把Anuglar 2的模块传给UpgradeModule。我们来看看怎么做。
Learn more about Angular modules at the NgModule guide.
要了解Angular模块的更多信息,请参阅Angular模块页。
Bootstrapping hybrid applications
引导AngularJS+2的混合式应用程序
The first step to upgrading an application using the UpgradeModule is
always to bootstrap it as a hybrid that supports both AngularJS and
Angular, but still is an AngularJS app at top level.
使用UpgradeModule升级应用的第一步总是把它引导成一个同时支持AngularJS和Angular的混合式应用。
Pure AngularJS applications can be bootstrapped in two ways: By using an ng-app
directive somewhere on the HTML page, or by calling
angular.bootstrap
from JavaScript. In Angular, only the second method is possible - there is
no ng-app in Angular. This is also the case for hybrid applications.
Therefore, it is a good preliminary step to switch AngularJS applications to use the
JavaScript bootstrap method even before switching them to hybrid mode.
纯粹的AngularJS应用可以用两种方式引导:在HTML页面中的某处使用ng-app指令,或者从JavaScript中调用
angular.bootstrap。
在Angular中,只有第二种方法是可行的,因为它没有ng-app指令。在混合式应用中也同样只能用第二种方法。
所以,在将AngularJS应用切换到混合模式之前,把它改为用JavaScript引导的方式是一个不错的起点。
Say we have an ng-app driven bootstrap such as this one:
比如说我们有个由ng-app驱动的引导过程,就像这个:
We can remove the ng-app and ng-strict-di directives from the HTML
and instead switch to calling angular.bootstrap from JavaScript, which
will result in the same thing:
我们可以从HTML中移除ng-app和ng-strict-di指令,改为从JavaScript中调用angular.bootstrap,它能达到同样效果:
Now introduce Angular to the project. Inspired by instructions in the Setup, you can selectively copy in material from the QuickStart github repository.
现在,把Angular引入项目中。根据搭建本地开发环境中的指导,你可以有选择的从“快速起步”的Github仓库中拷贝素材进来。
Next, create an app.module.ts file and add the following NgModule class:
接下来,创建一个app.module.ts文件,并添加下列NgModule类:
This bare minimum NgModule imports BrowserModule, the module every Angular browser-based app must have.
这个最小化的NgModule导入了BrowserModule,该模块是每个基于浏览器的Angular应用都必须具备的。
It also imports UpgradeModule from @angular/upgrade/static, and adds an override to prevent
Angular from bootstrapping itself in the form of the ngDoBootstrap empty class method.
它还从@angular/upgrade/static导入了UpgradeModule,并添加了一个ngDoBootstrap空的覆盖方法,防止
Angular启动它自身。
Now we bootstrap AppModule using platformBrowserDynamic's bootstrapModule method.
Then we use dependency injection to get a hold of the UpgradeModule instance in AppModule,
and use it to bootstrap our AngularJS app.
The upgrade.bootstrap method takes the exact same arguments as angular.bootstrap:
现在我们使用platformBrowserDynamic的bootstrapModule方法启动AppModule。
接着我们使用依赖注入来获取AppModule中的一个UpgradeModule实例,
并使用它来启动我们的AngularJS应用。
upgrade.bootstrap方法接受与angular.bootstrap相同的参数。
We also need to install the @angular/upgrade package via npm install @angular/upgrade --save
and add a mapping for the @angular/upgrade/static package:
我们还需要通过npm install @angular/upgrade --save命令安装@angular/upgrade包,并且为@angular/upgrade/static包添加一个映射关系:
systemjs.config.js (map)
Congratulations! You're running a hybrid application! The existing AngularJS code works as before and you're ready to run Angular code.
恭喜!我们就要开始运行AngularJS+2的混合式应用程序了!所有现存的AngularJS代码会像以前一样正常工作,但是我们现在也同样可以运行Angular代码了。
Using Angular Components from AngularJS Code
在AngularJS的代码中使用Angular的组件

Once we're running a hybrid app, we can start the gradual process of upgrading code. One of the more common patterns for doing that is to use an Angular component in an AngularJS context. This could be a completely new component or one that was previously AngularJS but has been rewritten for Angular.
一旦我们开始运行混合式应用,我们就可以开始逐渐升级代码了。做这件事的一种更常见的模式就是在AngularJS的上下文中使用Angular的组件。 该组件可能是全新的,也可能是把原本AngularJS的组件用Angular重写而成的。
Say we have a simple Angular component that shows information about a hero:
假设我们有一个简单的用来显示英雄信息的Angular组件:
hero-detail.component.ts
If we want to use this component from AngularJS, we need to downgrade it
using the downgradeComponent() method. What we get when we do that is an AngularJS
directive, which we can then register into our AngularJS module:
如果我们想在AngularJS中使用这个组件,我们就得用downgradeComponent()方法把它降级。
如果我们这么做,就会得到一个AngularJS的指令,我们可以把它注册到AngularJS的模块中:
Because HeroDetailComponent is an Angular component, we must also add it to the declarations in the AppModule.
由于HeroDetailComponent是一个Angular组件,所以我们必须同时把它加入AppModule的declarations字段中。
And because this component is being used from the AngularJS module, and is an entry point into
our Angular application, we also need to add it to the entryComponents for our
Angular module.
并且由于这个组件在AngularJS模块中使用,也是我们Angular应用的一个入口点,我们还需要
将它加入到Angular模块的entryComponents列表中。
All Angular components, directives and pipes must be declared in an NgModule.
所有Angular组件、指令和管道都必须声明在NgModule中。
The net result is an AngularJS directive called heroDetail, that we can
use like any other directive in our AngularJS templates.
这里我们得到的是一个叫做heroDetail的AngularJS指令,我们可以像用其它指令一样把它用在AngularJS模板中。
Note that this AngularJS is an element directive (restrict: 'E') called heroDetail.
An AngularJS element directive is matched based on its name.
The selector metadata of the downgraded Angular component is ignored.
注意,它在AngularJS中是一个名叫heroDetail的元素型指令(restrict: 'E')。
AngularJS的元素型指令是基于它的名字匹配的。
Angular组件中的selector元数据,在降级后的版本中会被忽略。
Most components are not quite this simple, of course. Many of them have inputs and outputs that connect them to the outside world. An Angular hero detail component with inputs and outputs might look like this:
当然,大多数组件都不像这个这么简单。它们中很多都有输入属性和输出属性,来把它们连接到外部世界。 Angular的英雄详情组件带有像这样的输入属性与输出属性:
hero-detail.component.ts
These inputs and outputs can be supplied from the AngularJS template, and the
downgradeComponent() method takes care of bridging them overvia the inputs
and outputs arrays:
这些输入属性和输出属性的值来自于AngularJS的模板,而downgradeComponent()方法负责桥接它们:
Note that even though we are in an AngularJS template, we're using Angular attribute syntax to bind the inputs and outputs. This is a requirement for downgraded components. The expressions themselves are still regular AngularJS expressions.
注意,虽然我们正在AngularJS的模板中,但却在使用Angular的属性(Attribute)语法来绑定到输入属性与输出属性。 这是降级的组件本身要求的。而表达式本身仍然是标准的AngularJS表达式。
There's one notable exception to the rule of using Angular attribute syntax for downgraded components. It has to do with input or output names that consist of multiple words. In Angular we would bind these attributes using camelCase:
为降级过的组件使用Angular的属性(Attribute)语法规则时有一个值得注意的例外。 它适用于由多个单词组成的输入或输出属性。在Angular中,我们要使用小驼峰命名法绑定这些属性:
But when using them from AngularJS templates, we need to use kebab-case:
但是从AngularJS的模板中使用它们时,我们得使用中线命名法:
The $event variable can be used in outputs to gain access to the
object that was emitted. In this case it will be the Hero object, because
that is what was passed to this.deleted.emit().
$event变量能被用在输出属性里,以访问这个事件所发出的对象。这个案例中它是Hero对象,因为this.deleted.emit()函数曾把它传了出来。
Since this is an AngularJS template, we can still use other AngularJS
directives on the element, even though it has Angular binding attributes on it.
For example, we can easily make multiple copies of the component using ng-repeat:
由于这是一个AngularJS模板,虽然它已经有了Angular中绑定的属性(Attribute),我们仍可以在这个元素上使用其它AngularJS指令。
例如,我们可以用ng-repeat简单的制作该组件的多份拷贝:
Using AngularJS Component Directives from Angular Code
从Angular代码中使用AngularJS组件型指令

So, we can write an Angular component and then use it from AngularJS
code. This is very useful when we start our migration from lower-level
components and work our way up. But in some cases it is more convenient
to do things in the opposite order: To start with higher-level components
and work our way down. This too can be done using the UpgradeModule.
We can upgrade AngularJS component directives and then use them from
Angular.
现在,我们已经能在Angular中写一个组件,并把它用于AngularJS代码中了。
当我们从低级组件开始移植,并往上走时,这非常有用。但在另外一些情况下,从相反的方向进行移植会更加方便:
从高级组件开始,然后往下走。这也同样能用UpgradeModule完成。
我们可以升级AngularJS组件型指令,然后从Angular中用它们。
Not all kinds of AngularJS directives can be upgraded. The directive really has to be a component directive, with the characteristics described in the preparation guide above. Our safest bet for ensuring compatibility is using the component API introduced in AngularJS 1.5.
不是所有种类的AngularJS指令都能升级。该指令必须是一个严格的组件型指令,具有上面的准备指南中描述的那些特征。 确保兼容性的最安全的方式是AngularJS.5中引入的组件API。
A simple example of an upgradable component is one that just has a template and a controller:
可升级组件的简单例子是只有一个模板和一个控制器的指令:
hero-detail.component.ts
We can upgrade this component to Angular using the UpgradeComponent class.
By creating a new Angular directive that extends UpgradeComponent and doing a super call
inside it's constructor, we have a fully upgrade AngularJS component to be used inside Angular .
All that is left is to add it to AppModule's declarations array.
我们可以使用UpgradeComponent方法来把这个组件升级到Angular。
具体方法是创建一个Angular指令,继承UpgradeComponent,在其构造函数中进行super调用,
这样我们就得到一个完全升级的AngularJS组件,并且可以Angular中使用。
剩下是工作就是把它加入到AppModule的declarations数组。
hero-detail.component.ts
hero-detail.component.ts
Upgraded components are Angular directives, instead of components, because Angular is unaware that AngularJS will create elements under it. As far as Angular knows, the upgraded component is just a directive - a tag - and Angular doesn't have to concern itself with it's children.
升级后的组件是Angular的指令,而不是组件,因为Angular不知道AngularJS将在它下面创建元素。 Angular所知道的是升级后的组件只是一个指令(一个标签),Angular不需要关心组件本身及其子元素。
An upgraded component may also have inputs and outputs, as defined by the scope/controller bindings of the original AngularJS component directive. When we use the component from an Angular template, we provide the inputs and outputs using Angular template syntax, with the following rules:
升级后的组件也可能有输入属性和输出属性,它们是在原AngularJS组件型指令的scope/controller绑定中定义的。 当我们从Angular模板中使用该组件时,我们要使用Angular模板语法来提供这些输入属性和输出属性,但要遵循下列规则:
Binding definition 绑定定义 | Template syntax 模板语法 | |
|---|---|---|
Attribute binding 属性(Attribute)绑定 |
|
|
Expression binding 表达式绑定 |
|
|
One-way binding 单向绑定 |
|
|
Two-way binding 双向绑定 |
| As a two-way binding: 用作输入: |
As an example, say we have a hero detail AngularJS component directive with one input and one output:
举个例子,假设我们在AngularJS中有一个表示“英雄详情”的组件型指令,它带有一个输入属性和一个输出属性:
hero-detail.component.ts
We can upgrade this component to Angular, annotate inputs and outputs in the upgrade directive,and then provide the input and output using Angular template syntax:
我们可以把这个组件升级到Angular,然后使用Angular的模板语法提供这个输入属性和输出属性:
hero-detail.component.ts
container.component.ts
Projecting AngularJS Content into Angular Components
把AngularJS的内容投影到Angular组件中

When we are using a downgraded Angular component from an AngularJS
template, the need may arise to transclude some content into it. This
is also possible. While there is no such thing as transclusion in Angular,
there is a very similar concept called content projection. The UpgradeModule
is able to make these two features interoperate.
如果我们在AngularJS模板中使用降级后的Angular组件时,可能会需要把模板中的一些内容投影进那个组件。
这也是可能的,虽然在Angular中并没有透传(transclude)这样的东西,但它有一个非常相似的概念,叫做内容投影。
UpgradeModule也能让这两个特性实现互操作。
Angular components that support content projection make use of an <ng-content>
tag within them. Here's an example of such a component:
Angular的组件通过使用<ng-content>标签来支持内容投影。下面是这类组件的一个例子:
hero-detail.component.ts
When using the component from AngularJS, we can supply contents for it. Just
like they would be transcluded in AngularJS, they get projected to the location
of the <ng-content> tag in Angular:
当从AngularJS中使用该组件时,我们可以为它提供内容。正如它们将在AngularJS中被透传一样,
它们也在Angular中被投影到了<ng-content>标签所在的位置:
When AngularJS content gets projected inside an Angular component, it still remains in "AngularJS land" and is managed by the AngularJS framework.
当AngularJS的内容被投影到Angular组件中时,它仍然留在“AngularJS王国”中,并被AngularJS框架管理着。
Transcluding Angular Content into AngularJS Component Directives
把Angular的内容透传进AngularJS的组件型指令

Just like we can project AngularJS content into Angular components, we can transclude Angular content into AngularJS components, whenever we are using upgraded versions from them.
就像我们能把AngularJS的内容投影进Angular组件一样,我们也能把Angular的内容透传进AngularJS的组件, 但不管怎样,我们都要使用它们升级过的版本。
When an AngularJS component directive supports transclusion, it may use
the ng-transclude directive in its template to mark the transclusion
point:
如果一个AngularJS组件型指令支持透传,它就会在自己的模板中使用ng-transclude指令标记出透传到的位置:
hero-detail.component.ts
The directive also needs to have the transclude: true option enabled.
It is on by default for component directives defined with the
1.5 component API.
该指令还需要启用一个transclude: true选项。当用AngularJS.5中的组件API定义组件型指令时,该选项默认是开启的。
If we upgrade this component and use it from Angular, we can populate the component tag with contents that will then get transcluded:
如果我们升级这个组件,并把它用在Angular中,我们就能把准备透传的内容放进这个组件的标签中。
container.component.ts
Making AngularJS Dependencies Injectable to Angular
让AngularJS中的依赖可被注入到Angular
When running a hybrid app, we may bump into situations where we need to have
some AngularJS dependencies to be injected to Angular code. This may be
because we have some business logic still in AngularJS services, or because
we need some of AngularJS's built-in services like $location or $timeout.
当运行一个混合式应用时,我们可能会遇到这种情况:我们需要把某些AngularJS的依赖注入到Angular代码中。
这可能是因为某些业务逻辑仍然在AngularJS服务中,或者需要某些AngularJS的内置服务,比如$location或$timeout。
In these situations, it is possible to upgrade an AngularJS provider to
Angular. This makes it possible to then inject it somewhere in Angular
code. For example, we might have a service called HeroesService in AngularJS:
在这些情况下,把一个AngularJS提供商升级到Angular也是有可能的。这就让它将来有可能被注入到Angular代码中的某些地方。
比如,我们可能在AngularJS中有一个名叫HeroesService的服务:
heroes.service.ts
We can upgrade the service using a Angular Factory provider
that requests the service from the AngularJS $injector.
我们可以Angular的工厂提供商(factory provider)升级该服务,
它从AngularJS的$injector请求服务。Angular依赖的名称由你确定:
We recommend declaring the Factory Provider in a separate ajs-upgraded-providers.ts file
so that they are all together, making it easier to reference them, create new ones and
delete them once the upgrade is over.
我们建议在一个独立的ajs-upgraded-providers.ts中声明这个工厂提供商,以便把它们都放在一起,这样便于引用、创建新的以及在升级完毕时删除它们。
It's also recommended to export the heroesServiceFactory function so that Ahead-of-Time
compilation can pick it up.
我们还建议导出heroesServiceFactory函数,以便AOT编译器可以拿到它们。
ajs-upgraded-providers.ts
app.module.ts
We can then inject it in Angular using it's class as a type annotation:
然后我们可以一个字符串型令牌,把它注入到Angular中:
hero-detail.component.ts
In this example we upgraded a service class, which has the added benefit that we can use a TypeScript type annotation when we inject it. While it doesn't affect how the dependency is handled, it enables the benefits of static type checking. This is not required though, and any AngularJS service, factory, or provider can be upgraded.
在这个例子中,我们升级了服务类。当我们注入它时,我们可以使用TypeScript类型注解来获得这些额外的好处。 它没有影响该依赖的处理过程,同时还得到了启用静态类型检查的好处。 任何AngularJS中的服务、工厂和提供商都能被升级 —— 尽管这不是必须的。
Making Angular Dependencies Injectable to AngularJS
让Angular的依赖能被注入到AngularJS中
In addition to upgrading AngularJS dependencies, we can also downgrade Angular dependencies, so that we can use them from AngularJS. This can be useful when we start migrating services to Angular or creating new services in Angular while we still have components written in AngularJS.
除了能升级AngularJS依赖之外,我们还能降级Angular的依赖,以便我们能在AngularJS中使用它们。 当我们已经开始把服务移植到Angular或在Angular中创建新服务,但同时还有一些用AngularJS写成的组件时,这会非常有用。
For example, we might have an Angular service called Heroes:
例如,我们可能有一个Angular的Heroes服务:
heroes.ts
Again, as with Angular components, register the provider with the NgModule by adding it to the module's providers list.
仿照Angular组件,我们通过把该提供商加入NgModule的providers列表中来注册它。
app.module.ts
Now wrap the Angular Heroes in an AngularJS factory function using downgradeInjectable().
and plug the factory into an AngularJS module.
The name of the AngularJS dependency is up to you:
现在,我们使用upgradeAdapter.downgradeNg2Provider()来把Angular的Heroes包装成AngularJS的工厂函数,并把这个工厂注册进AngularJS的模块中。
依赖在AngularJS中的名字你可以自己定:
app.module.ts
After this, the service is injectable anywhere in our AngularJS code:
此后,该服务就能被注入到AngularJS代码中的任何地方了:
hero-detail.component.ts
Using Ahead-of-time compilation with hybrid apps
在混合式应用中使用AOT编译
We can take advantage of Ahead-of-time (AoT) compilation on hybrid apps just like on any other
Angular application.
The setup for an hybrid app is mostly the same as described in
the Ahead-of-time Compilation chapter
save for differences in index.html and main-aot.ts
我们也可以其它Angular应用一样在混合式应用中发挥AOT编译的优势。
对混合式应用的设置过程和预编译章节中所讲的几乎完全一样,不同点在于index.html和main-aot.ts中。
Our index.html will likely have script tags loading AngularJS files, so the index.html we
use for AoT must also load those files.
An easy way to copy them is by adding each to the copy-dist-files.js file.
我们的index.html仍然需要script标签来加载AngularJS的文件,因此我们使用AOT编译的index.html也需要加载那些文件。
复制它们的简单方案是把它们全都添加到copy-dist-files.js文件中。
We also need to use UpgradeModule to bootstrap a hybrid app after bootstrapping the
Module Factory:
我们还要使用UpgradeModule在启动了模块工厂之后引导一个混合式应用:
app/main-aot.ts
And that's all we need to get the full benefit of AoT for Angular apps!
这就是我们为获取Angular应用的AOT优势所要做的一切。
The AoT metadata collector will not detect lifecycle hook methods on a parent class' prototype,
so in order for upgraded components to work we needs to implement the lifecycle hooks
on the upgraded component class and forward them to the UpgradeComponent parent.
AOT元数据收集器不能检测到父类原型中的生命周期钩子方法,因此为了让升级后的组件正常工作,我们要在升级后的组件类中实现生命周期钩子,
并且把它们转发给UpgradeComponent的父类。
Dividing routes between Angular and AngularJS
在Angular和AngularJS之间划分路由
Another important part of upgrading is upgrading routes. We could upgrade our whole app while still using the AngularJS router and then migrate all the routes in one fell swoop. But it would be much better to migrate routes one by one as they become upgraded.
升级中的另一个重要部分是升级路由。 我们固然可以升级整个应用但仍然使用AngularJS的路由器,然后一举把所有路由迁移过去。 但更好地方式是在升级每个路由时逐个把它们迁移过去。
The first step to have a dual router setup is to add an Angular root component containing
one outlet for each router.
AngularJS will use ng-view, and Angular will use router-outlet.
When one is using it's router, the other outlet will be empty.
让两个版本的路由器并存的第一步就是为每个路由器添加一个包含单一出口的根组件。
AngularJS将会使用ng-view,而Angular将会使用router-outlet。
当使用其中的一个路由器时,另一个路由出口就是空白的。
app.component.ts
We want to use this component in the body of our index.html instead of an AngularJS component:
我们要在index.html的body中使用该组件来代替AngularJS的组件。
app.component.ts (body)
Next we declare both AngularJS and Angular routes as normal:
接下来,我们用标准方式同时声明AngularJS和Angular的路由:
app.module.ts (AngularJS route)
hero.module.ts (Angular route)
In our app.module.ts we need to add AppComponent to the declarations and boostrap array.
在app.module.ts中,我们需要把AppComponent添加到declarations和bootstrap数组中。
Next we configure the router itself. We want to use hash navigation in Angular because that's what we're also using in AngularJS.
接下来,我们配置路由器本身。 我们要在Angular中使用hash navigation,因为我们也要在AngularJS中使用这种方式。
Lastly, and most importantly, we want to use a custom UrlHandlingStrategy that will tell
the Angular router which routes it should render - and only those.
最后,最重要的是,我们要使用一个自定义的UrlHandlingStrategy,它会告诉Angular路由器应该渲染(且只渲染)哪个路由。
app.module.ts (router config)
That's it! Now we're running both routers at the same time.
就这样!现在我们可以同时运行这两个路由器了。
PhoneCat Upgrade Tutorial
PhoneCat升级教程
In this section and we will look at a complete example of
preparing and upgrading an application using the upgrade module. The app
we're going to work on is Angular PhoneCat
from the original AngularJS tutorial,
which is where many of us began our Angular adventures. Now we'll see how to
bring that application to the brave new world of Angular.
在本节和下节中,我们将看一个完整的例子,它使用upgrade模块准备和升级了一个应用程序。
该应用就是来自原AngularJS教程中的Angular PhoneCat。
那是我们很多人当初开始Angular探险之旅的起点。
现在,我们来看看如何把该应用带入Angular的美丽新世界。
During the process we'll learn how to apply the steps outlined in the preparation guide in practice: We'll align the application with Angular and also take TypeScript into use.
这期间,我们将学到如何在实践中应用准备指南中列出的那些重点步骤: 我们先让该应用向Angular看齐,然后为它引入SystemJS模块加载器和TypeScript。
To follow along with the tutorial, clone the angular-phonecat repository and apply the steps as we go.
要跟随本教程,请先把angular-phonecat仓库克隆到本地,并跟我们一起应用这些步骤。
In terms of project structure, this is where our work begins:
在项目结构方面,我们工作的起点是这样的:
This is actually a pretty good starting point. The code uses the AngularJS 1.5 component API and the organization follows the AngularJS Style Guide, which is an important preparation step before a successful upgrade.
这确实是一个很好地起点。特别是,该结构遵循了AngularJS 风格指南, 要想成功升级,这是一个很重要的准备步骤。
Each component, service, and filter is in its own source file, as per the Rule of 1.
每个组件、服务和过滤器都在它自己的源文件中 —— 就像单一规则所要求的。
The
core,phone-detail, andphone-listmodules are each in their own subdirectory. Those subdirectories contain the JavaScript code as well as the HTML templates that go with each particular feature. This is in line with the Folders-by-Feature Structure and Modularity rules.core、phone-detail和phone-list模块都在它们自己的子目录中。那些子目录除了包含HTML模板之外,还包含JavaScript代码,它们共同完成一个特性。 这是按特性分目录的结构 和模块化规则所要求的。Unit tests are located side-by-side with application code where they are easily found, as described in the rules for Organizing Tests.
单元测试都和应用代码在一起,它们很容易找到。就像规则 组织测试文件中要求的那样。
Switching to TypeScript
切换到TypeScript
Since we're going to be writing our Angular code in TypeScript, it makes sense to bring in the TypeScript compiler even before we begin upgrading.
因为我们将使用TypeScript编写Angular的代码,所以在开始升级之前,我们把TypeScript的编译器设置好是很合理的。
We will also start to gradually phase out the Bower package manager in favor of NPM. We'll install all new dependencies using NPM, and will eventually be able to remove Bower from the project.
我们还将开始逐步淘汰Bower包管理器,换成我们更喜欢的NPM。后面我们将使用NPM来安装新的依赖包,并最终从项目中移除Bower。
Let's begin by installing TypeScript to the project.
让我们先把TypeScript包安装到项目中。
Let's also add run scripts for the tsc TypeScript compiler to package.json:
我们还要把用来运行TypeScript编译器tsc和typings工具的脚本添加到package.json中:
package.json
We can now install type definitions for the existing libraries that we're using but that don't come with prepackaged types: AngularJS and the Jasmine unit test framework.
现在我们可以使用typings工具来安装AngularJS和Jasmine单元测试框架的类型定义文件。
We should also configure the TypeScript compiler so that it can understand our
project. We'll add a tsconfig.json file to the project directory, just like we do
in the documentation setup. It instructs the TypeScript compiler how
to interpret our source files.
我们还应该配置TypeScript编译器,以便它能理解我们的项目结构。我们要往项目目录下添加一个tsconfig.json文件,
就像在搭建本地开发环境中做过的那样。它将告诉TypeScript编译器,该如何编译我们的源文件。
tsconfig.json
We are telling the TypeScript compiler to turn our TypeScript files to ES5 code bundled into CommonJS modules.
我们告诉TypeScript编译器,把TypeScript文件转换成ES5代码,并打包进CommonJS模块中。
We can now launch the TypeScript compiler from the command line. It will watch
our .ts source files and compile them to JavaScript on the fly. Those compiled
.js files are then loaded into the browser by SystemJS. This is a process we'll
want to have continuously running in the background as we go along.
我们现在可以从命令行启动TypeScript编译器。它将监控.ts源码文件,并随时把它们编译成JavaScript。
然后这些编译出的.js文件被SystemJS加载到浏览器中。当我们继续往前走的时候,这个过程将在后台持续运行。
The next thing we'll do is convert our JavaScript files to TypeScript. Since
TypeScript is a superset of ECMAScript 2015, which in turn is a superset
of ECMAScript 5, we can simply switch the file extensions from .js to .ts
and everything will work just like it did before. As the TypeScript compiler
runs, it emits the corresponding .js file for every .ts file and the
compiled JavaScript is what actually gets executed. If you start
the project HTTP server with npm start, you should see the fully functional
application in your browser.
我们要做的下一件事是把JavaScript文件转换成TypeScript文件。
由于TypeScript是ECMAScript 2015的一个超集,而ES2015又是ECMAScript 5的超集,所以我们可以简单的把文件的扩展名从.js换成.ts,
它们还是会像以前一样工作。由于TypeScript编译器仍在运行,它会为每一个.ts文件生成对应的.js文件,而真正运行的是编译后的.js文件。
如果你用npm start开启了本项目的HTTP服务器,你会在浏览器中看到一个功能完好的应用。
Now that we have TypeScript though, we can start benefiting from some of its features. There's a lot of value the language can provide to AngularJS applications.
有了TypeScript,我们就可以从它的一些特性中获益了。此语言可以为AngularJS应用提供很多价值。
For one thing, TypeScript is a superset of ES2015. Any app that has previously
been written in ES5 - like the PhoneCat example has - can with TypeScript
start incorporating all of the JavaScript features that are new to ES2015.
These include things like lets and consts, arrow functions, default function
parameters, and destructuring assignments.
首先,TypeScript是一个ES2015的超集。任何以前用ES5写的程序(就像PhoneCat范例)都可以开始通过TypeScript
纳入那些添加到ES2015中的新特性。
这包括let、const、箭头函数、函数默认参数以及解构(destructure)赋值。
Another thing we can do is start adding type safety to our code. This has actually partially already happened because of the AngularJS typings we installed. TypeScript are checking that we are calling AngularJS APIs correctly when we do things like register components to Angular modules.
我们能做的另一件事就是把类型安全添加到代码中。这实际上已经部分完成了,因为我们已经安装了AngularJS的类型定义。 当我们正确调用AngularJS的API时,TypeScript会帮我们检查它 —— 比如往Angular模块中注册组件。
But we can also start adding type annotations for our own code to get even more out of TypeScript's type system. For instance, we can annotate the checkmark filter so that it explicitly expects booleans as arguments. This makes it clearer what the filter is supposed to do.
我们还能开始把类型注解添加到自己的代码中,来从TypeScript的类型系统中获得更多帮助。
比如,我们可以给checkmark过滤器加上注解,表明它期待一个boolean类型的参数。
这可以更清楚的表明此过滤器打算做什么
app/core/checkmark/checkmark.filter.ts
In the Phone service we can explicitly annotate the $resource service dependency
as an angular.resource.IResourceService - a type defined by the AngularJS typings.
在Phone服务中,我们可以明确的把$resource服务声明为angular.resource.IResourceService,一个AngularJS类型定义提供的类型。
app/core/phone/phone.service.ts
We can apply the same trick to the application's route configuration file in app.config.ts,
where we are using the location and route services. By annotating them accordingly TypeScript
can verify we're calling their APIs with the correct kinds of arguments.
我们可以在应用的路由配置中使用同样的技巧,那里我们用到了location和route服务。 一旦给它们提供了类型信息,TypeScript就能检查我们是否在用类型的正确参数来调用它们了。
app/app.config.ts
The AngularJS 1.x type definitions we installed are not officially maintained by the Angular team, but are quite comprehensive. It is possible to make an AngularJS 1.x application fully type-annotated with the help of these definitions.
我们用typings工具安装的这个AngularJS.x类型定义文件 并不是由Angular开发组维护的,但它也已经足够全面了。借助这些类型定义的帮助,它可以为AngularJS.x程序加上全面的类型注解。
If this is something we wanted to do, it would be a good idea to enable
the noImplicitAny configuration option in tsconfig.json. This would
cause the TypeScript compiler to display a warning when there's any code that
does not yet have type annotations. We could use it as a guide to inform
us about how close we are to having a fully annotated project.
如果我们想这么做,那么在tsconfig.json中启用noImplicitAny配置项就是一个好主意。
这样,如果遇到什么还没有类型注解的代码,TypeScript编译器就会显示一个警告。
我们可以用它作为指南,告诉我们现在与一个完全类型化的项目距离还有多远。
Another TypeScript feature we can make use of is classes. In particular, we can turn our component controllers into classes. That way they'll be a step closer to becoming Angular component classes, which will make our life easier once we do the upgrade.
我们能用的另一个TypeScript特性是类。具体来讲,我们可以把控制器转换成类。 这种方式下,我们离成为Angular组件类就又近了一步,它会令我们的升级之路变得更简单。
AngularJS expects controllers to be constructor functions. That's exactly what ES2015/TypeScript classes are under the hood, so that means we can just plug in a class as a component controller and AngularJS will happily use it.
AngularJS期望控制器是一个构造函数。这实际上就是ES2015/TypeScript中的类, 这也就意味着只要我们把一个类注册为组件控制器,AngularJS就会愉快的使用它。
Here's what our new class for the phone list component controller looks like:
新的“电话列表(phone list)”组件控制器类是这样的:
app/phone-list/phone-list.component.ts
What was previously done in the controller function is now done in the class
constructor function. The dependency injection annotations are attached
to the class using a static property $inject. At runtime this becomes the
PhoneListController.$inject property.
以前在控制器函数中实现的一切,现在都改由类的构造函数来实现了。类型注入注解通过静态属性$inject
被附加到了类上。在运行时,它们变成了PhoneListController.$inject。
The class additionally declares three members: The array of phones, the name of the current sort key, and the search query. These are all things we have already been attaching to the controller but that weren't explicitly declared anywhere. The last one of these isn't actually used in the TypeScript code since it's only referred to in the template, but for the sake of clarity we want to define all the members our controller will have.
该类还声明了另外三个成员:电话列表、当前排序键的名字和搜索条件。 这些东西我们以前就加到了控制器上,只是从来没有在任何地方显式定义过它们。最后一个成员从未真正在TypeScript代码中用过, 因为它只是在模板中被引用过。但为了清晰起见,我们还是应该定义出此控制器应有的所有成员。
In the Phone detail controller we'll have two members: One for the phone that the user is looking at and another for the URL of the currently displayed image:
在电话详情控制器中,我们有两个成员:一个是用户正在查看的电话,另一个是正在显示的图像:
app/phone-detail/phone-detail.component.ts
This makes our controller code look a lot more like Angular already. We're all set to actually introduce Angular into the project.
这已经让我们的控制器代码看起来更像Angular了。我们的准备工作做好了,可以引进Angular到项目中了。
If we had any AngularJS services in the project, those would also be
a good candidate for converting to classes, since like controllers,
they're also constructor functions. But we only have the Phone factory
in this project, and that's a bit special since it's an ngResource
factory. So we won't be doing anything to it in the preparation stage.
We'll instead turn it directly into an Angular service.
如果项目中有任何AngularJS的服务,它们也是转换成类的优秀候选人,像控制器一样,它们也是构造函数。
但是在本项目中,我们只有一个Phone工厂,这有点特别,因为它是一个ngResource工厂。
所以我们不会在准备阶段中处理它,而是在下一节中直接把它转换成Angular服务。
Installing Angular
安装Angular
Having completed our preparation work, let's get going with the Angular upgrade of PhoneCat. We'll do this incrementally with the help of the upgrade module that comes with Angular. By the time we're done, we'll be able to remove AngularJS from the project completely, but the key is to do this piece by piece without breaking the application.
我们已经完成了准备工作,接下来就开始把PhoneCat升级到Angular。 我们将在Angular升级模块的帮助下增量式的完成此项工作。 等我们完成的那一刻,就能把AngularJS从项目中完全移除了,但其中的关键是在不破坏此程序的前提下一小块一小块的完成它。
The project also contains some animations, which we are not yet upgrading in this version of the guide. This will change in a later release.
该项目还包含一些动画,在此指南的当前版本我们先不升级它,等到后面的发行版再改。
Let's install Angular into the project, along with the SystemJS module loader. Take a look at the results of the Setup instructions and get the following configurations from there:
我们来使用SystemJS模块加载器把Angular安装到项目中。 看看搭建本地开发环境中的指南,并从那里获得如下配置:
Add Angular and the other new dependencies to
package.json把Angular和其它新依赖添加到
package.json中The SystemJS configuration file
systemjs.config.jsto the project root directory.把SystemJS的配置文件
systemjs.config.js添加到项目的根目录。
Once these are done, run:
这些完成之后,就运行:
We can soon load Angular dependencies into the application via index.html,
but first we need to do some directory path adjustments. This is because we're going
to need to load files from node_modules and the project root, whereas so far
in this project everything has been loaded from the /app directory.
我们可以通过index.html来把Angular的依赖快速加载到应用中,
但首先,我们得做一些目录结构调整。这是因为我们正准备从node_modules中加载文件,然而目前项目中的每一个文件都是从/app目录下加载的。
Move the app/index.html file to the project root directory. Then change the
development server root path in package.json to also point to the project root
instead of app:
把app/index.html移入项目的根目录,然后把package.json中的开发服务器根目录也指向项目的根目录,而不再是app目录:
package.json (start script)
Now we're able to serve everything from the project root to the web browser. But we do not
want to have to change all the image and data paths used in the application code to match
our development setup. For that reason, we'll add a <base> tag to index.html, which will
cause relative URLs to be resolved back to the /app directory:
现在,我们能把项目根目录下的每一样东西发给浏览器了。但我们不想为了适应开发环境中的设置,被迫修改应用代码中用到的所有图片和数据的路径。因此,我们往index.html中添加一个<base>标签,它将导致各种相对路径被解析回/app目录:
index.html
Now we can load Angular via SystemJS. We'll add the Angular polyfills and the
SystemJS config to the end of the <head> section, and then we'll use System.import
to load the actual application:
现在我们可以通过SystemJS加载Angular了。我们将把Angular的填充库(polyfills)
和SystemJS的配置加到<head>区的末尾,然后,我们就用System.import来加载实际的应用:
index.html
We also need to make a couple of adjustments
to the systemjs.config.js file installed during setup.
我们还需要对环境设置期间安装的systemjs.config.js文件做一些调整。
We want to point the browser to the project root when loading things through SystemJS,
instead of using the <base> URL.
我们要在通过SystemJS加载期间为浏览器指出项目的根在哪里,而不再使用<base> URL。
We also need to install the upgrade package via npm install @angular/upgrade --save
and add a mapping for the @angular/upgrade/static package.
我们还要通过npm install @angular/upgrade --save来安装upgrade包,并为@angular/upgrade/static包添加一个映射。
systemjs.config.js
Creating the AppModule
创建AppModule
Now create the root NgModule class called AppModule.
There is already a file named app.module.ts that holds the AngularJS module.
Rename it to app.module.ajs.ts and update the corresponding script name in the index.html as well.
The file contents remain:
现在,创建一个名叫AppModule的根NgModule类。
我们已经有了一个名叫app.module.ts的文件,其中存放着AngularJS的模块。
把它改名为app.module.ng1.ts,同时也要在index.html中更新对应的脚本名。
文件的内容保留:
app.module.ajs.ts
Now create a new app.module.ts with the minimum NgModule class:
然后创建一个新的app.module.ts文件,其中是一个最小化的NgModule类:
app.module.ts
Bootstrapping a hybrid PhoneCat
引导PhoneCat的1+2混合式应用
What we'll do next is bootstrap the application as a hybrid application that supports both AngularJS and Angular components. Once we've done that we can start converting the individual pieces to Angular.
接下来,我们把该应用程序引导改装为一个同时支持AngularJS和Angular的混合式应用。 然后,就能开始把这些不可分割的小块转换到Angular了。
To bootstrap a hybrid application,
we first need to import UpgradeModule in our AppModule, and override it's bootstrap method:
要引导一个混合式应用程序,
我们首先需要在AppModule中导入`UpgradeModule,并覆盖它的启动方法:
app/app.module.ts
Our application is currently bootstrapped using the AngularJS ng-app directive
attached to the <html> element of the host page. This will no longer work with
Angular. We should switch to a JavaScript-driven bootstrap instead.
我们的应用现在是使用宿主页面中附加到<html>元素上的ng-app指令引导的。
但在Angular中,它不再工作了。我们得切换成JavaScript驱动的引导方式。
So, remove the ng-app attribute from index.html, and instead bootstrap via src/main.ts.
This file has been configured as the application entrypoint in systemjs.config.js,
so it is already being loaded by the browser.
所以,从index.html中移除ng-app属性,并把这些加载main.ts中。
在systemjs.config.js中已经将此文件配置为应用的入口,所以它已被浏览器所加载。
The arguments used here are the root element of the application (which is
the same element we had ng-app on earlier), and the AngularJS 1.x modules
that we want to load. Since we're bootstrapping the app through
an UpgradeModule, we're actually now running the app as a hybrid app.
这里使用的参数是应用的根元素(也就是以前我们放ng-app的元素),和我们准备加载的AngularJS.x模块。
由于我们是通过UpgradeAdapter引导应用的,所以实际在运行的应用实际上是一个混合体。
This means we are now running both AngularJS and Angular at the same time. That's pretty exciting! We're not running any actual Angular components yet though, so let's do that next.
我们现在同时运行着AngularJS和Angular。漂亮!不过我们还没有运行什么实际的Angular组件,接下来我们就做这件事。
Why declare angular as angular.IAngularStatic?
为何要声明angular为angular.IAngularStatic?
@types/angular is declared as a UMD module, and due to the way
UMD typings
work, once you have an ES6 import statement in a file all UMD typed modules must also be
imported via import statements instead of being globally available.
@types/angular声明为UMD模块,根据UMD类型
的工作方式,一旦你在文件中有一条ES6的import语句,所有的UMD类型化的模型必须都通过import语句导入,
而是不是全局可用。
AngularJS is currently loaded by a script tag in index.html, which means that the whole app
has access to it as a global and uses the same instance of the angular variable.
If we used import * as angular from 'angular' instead we would also need to overhaul how we
load every file in our AngularJS app to use ES6 modules in order to ensure AngularJS was being
loaded correctly.
AngularJS是日前是通过index.html中的script标签加载,这意味着整个应用是作为一个全局变量进行访问的,
使用同一个angular变量的实例。
但如果我们使用import * as angular from 'angular',我还需要彻底修改AngularJS应用中加载每个文件的方式,
确保AngularJS应用被正确加载。
This is a considerable effort and it often isn't worth it, especially since we are in the
process of moving our our to Angular already.
Instead we declare angular as angular.IAngularStatic to indicate it is a global variable
and still have full typing support.
这需要相当多的努力,通常也不值得去做,特别是我们的应用正在朝着Angular前进。
但如果我们声明angular为angular.IAngularStatic,指明它是一个全局变量,
仍然可以获得全面的类型支持。
Upgrading the Phone service
升级Phone服务
The first piece we'll port over to Angular is the Phone service, which
resides in app/core/phone/phone.service.ts and makes it possible for components
to load phone information from the server. Right now it's implemented with
ngResource and we're using it for two things:
我们要移植到Angular的第一块是Phone工厂(位于app/js/core/phones.factory.ts),
并且让它能帮助控制器从服务器上加载电话信息。目前,它是用ngResource实现的,我们用它做两件事:
For loading the list of all phones into the phone list component
把所有电话的列表加载到电话列表组件中。
For loading the details of a single phone into the phone detail component.
把一台电话的详情加载到电话详情组件中。
We can replace this implementation with an Angular service class, while keeping our controllers in AngularJS land.
我们可以用Angular的服务类来替换这个实现,而把控制器继续留在AngularJS的地盘上。
In the new version, we import the Angular HTTP module and call its Http service instead of ngResource.
在这个新版本中,我们导入了Angular的HTTP模块,并且用它的Http服务替换掉NgResource。
Re-open the app.module.ts file, import and add HttpModule to the imports array of the AppModule:
再次打开app.module.ts文件,导入并把HttpModule添加到AppModule的imports数组中:
app.module.ts
Now we're ready to upgrade the Phone service itself. We replace the ngResource-based
service in phone.service.ts with a TypeScript class decorated as @Injectable:
现在,我们已经准备好了升级Phones服务本身。我们将为phone.service.ts文件中基于ngResource的服务加上@Injectable装饰器:
app/core/phone/phone.service.ts (skeleton)
The @Injectable decorator will attach some dependency injection metadata
to the class, letting Angular know about its dependencies. As described
by our Dependency Injection Guide,
this is a marker decorator we need to use for classes that have no other
Angular decorators but still need to have their dependencies injected.
@Injectable装饰器将把一些依赖注入相关的元数据附加到该类上,让Angular知道它的依赖信息。
就像在依赖注入指南中描述过的那样,
这是一个标记装饰器,我们要把它用在那些没有其它Angular装饰器,并且自己有依赖注入的类上。
In its constructor the class expects to get the Http service. It will
be injected to it and it is stored as a private field. The service is then
used in the two instance methods, one of which loads the list of all phones,
and the other the details of a particular phone:
在它的构造函数中,该类期待一个Http服务。Http服务将被注入进来并存入一个私有字段。
然后该服务在两个实例方法中被使用到,一个加载所有电话的列表,另一个加载一台指定电话的详情:
The methods now return Observables of type PhoneData and PhoneData[]. This is
a type we don't have yet, so let's add a simple interface for it:
该方法现在返回一个Phone类型或Phone[]类型的可观察对象(Observable)。
这是一个我们从未用过的类型,因此我们得为它新增一个简单的接口:
app/core/phone/phone.service.ts (interface)
@angular/upgrade/static has a downgradeInjectable method for the purpose of making
Angular services available to AngularJS code. Use it to plug in the Phone service:
@angular/upgrade/static有一个downgradeInjectable方法,可以使Angular服务在AngularJS的代码中可用。
使用它来插入Phone服务:
app/core/phone/phone.service.ts (downgrade)
Here's the full, final code for the service:
最终,该类的全部代码如下:
app/core/phone/phone.service.ts
Notice that we're importing the map operator of the RxJS Observable separately.
We need to do this for all RxJS operators that we want to use, since Angular
does not load all of them by default.
注意,我们单独导入了RxJS Observable中的map操作符。
我们需要对想用的所有RxJS操作符这么做,因为Angular默认不会加载所有RxJS操作符。
The new Phone service has the same features as the original, ngResource-based service.
Because it's an Angular service, we register it with the NgModule providers:
这个新的Phone服务具有和老的基于ngResource的服务相同的特性。
因为它是Angular服务,我们通过NgModule的providers数组来注册它:
app.module.ts
Now that we are loading phone.service.ts through an import that is resolved
by SystemJS, we should remove the <script> tag for the service from index.html.
This is something we'll do to all our components as we upgrade them. Simultaneously
with the AngularJS to Angular upgrade we're also migrating our code from scripts to modules.
现在,我们正在用SystemJS加载phone.service.ts,我们应该从index.html中移除该服务的<script>标签。
这也是我们在升级所有组件时将会做的事。在从AngularJS向2升级的同时,我们也把代码从脚本移植为模块。
At this point we can switch our two components to use the new service
instead of the old one. We $inject it as the downgraded phone factory,
but it's really an instance of the Phone class and we can annotate its type
accordingly:
这时,我们可以把两个控制器从使用老的服务切换成使用新的。我们像降级过的phones工厂一样$inject它,
但它实际上是一个Phones类的实例,并且我们可以据此注解它的类型:
app/phone-list/phone-list.component.ts
app/phone-detail/phone-detail.component.ts
What we have here are two AngularJS components using an Angular service! The components don't need to be aware of this, though the fact that the service returns Observables and not Promises is a bit of a giveaway. In any case, what we've achieved is a migration of a service to Angular without having to yet migrate the components that use it.
这里的两个AngularJS控制器在使用Angular的服务!控制器不需要关心这一点,尽管实际上该服务返回的是可观察对象(Observable),而不是承诺(Promise)。 无论如何,我们达到的效果都是把服务移植到Angular,而不用被迫移植组件来使用它。
We could also use the toPromise method of Observable to turn those
Observables into Promises in the service. This can in many cases further
reduce the amount of changes needed in the component controllers.
我们也能使用Observable的toPromise方法来在服务中把这些可观察对象转变成承诺,以进一步减小组件控制器中需要修改的代码量。
Upgrading Components
升级组件
Next, let's upgrade our AngularJS components to Angular components. We'll do it one at a time, while still keeping the application in hybrid mode. As we make these conversions, we'll also be defining our first Angular pipes.
接下来,我们把AngularJS的控制器升级成Angular的组件。我们每次升级一个,同时仍然保持应用运行在混合模式下。 在做转换的同时,我们还将自定义首个Angular管道。
Let's look at the phone list component first. Right now it contains a TypeScript
controller class and a component definition object. We can morph this into
an Angular component by just renaming the controller class and turning the
AngularJS component definition object into an Angular @Component decorator.
We can then also remove the static $inject property from the class:
让我们先看看电话列表组件。它目前包含一个TypeScript控制器类和一个组件定义对象。重命名控制器类,
并把AngularJS的组件定义对象更换为Angular @Component装饰器,这样我们就把它变形为Angular
的组件了。然后,我们还从类中移除静态$inject属性。
app/phone-list/phone-list.component.ts
The selector attribute is a CSS selector that defines where on the page the component
should go. In AngularJS we do matching based on component names, but in Angular we
have these explicit selectors. This one will match elements with the name phone-list,
just like the AngularJS version did.
selector属性是一个CSS选择器,用来定义组件应该被放在页面的哪。在AngularJS,我们基于组件名字来匹配,
但是在Angular中,我们要有一个专门指定的选择器。本组件将会对应元素名字phone-list,和AngularJS版本一样。
We now also need to convert the template of this component into Angular syntax.
The search controls replace the AngularJS $ctrl expressions
with Angular's two-way [(ngModel)] binding syntax:
现在,我们还需要将组件的模版也转换为Angular语法。在搜索控件中,我们要为把AngularJS的$ctrl表达式替换成Angular的双向绑定语法[(ngModel)]:
app/phone-list/phone-list.template.html (search controls)
Replace the list's ng-repeat with an *ngFor as
described in the Template Syntax page.
Replace the image tag's ng-src with a binding to the native src property.
我们需要把列表中的ng-repeat替换为*ngFor以及它的let var of iterable语法,
该语法在模板语法指南中讲过。
对于图片,我们可以把img标签的ng-src替换为一个标准的src属性(property)绑定。
app/phone-list/phone-list.template.html (phones)
No Angular filter or orderBy filters
Angular中没有filter或orderBy过滤器
The built-in AngularJS filter and orderBy filters do not exist in Angular,
so we need to do the filtering and sorting ourselves.
Angular中并不存在AngularJS中内置的filter和orderBy过滤器。
所以我们得自己实现进行过滤和排序。
We replaced the filter and orderBy filters with bindings to the getPhones() controller method,
which implements the filtering and ordering logic inside the component itself.
我们把filter和orderBy过滤器改成绑定到控制器中的getPhones()方法,通过该方法,组件本身实现了过滤和排序逻辑。
app/phone-list/phone-list.component.ts
Now we need to downgrade our Angular component so we can use it in AngularJS.
Instead of registering a component, we register a phoneList directive,
a downgraded version of the Angular component.
现在我们需要降级我们的Angular组件,这样我们就可以在AngularJS中使用它。
我们需要注册一个phoneList指令,而不是注册一个组件,它是一个降级版的Angular组件。
The as angular.IDirectiveFactory cast tells the TypeScript compiler
that the return value of the downgradeComponent method is a directive factory.
强制类型转换as angular.IDirectiveFactory告诉TypeScript编译器downgradeComponent方法
的返回值是一个指令工厂。
app/phone-list/phone-list.component.ts
The new PhoneListComponent uses the Angular ngModel directive, located in the FormsModule.
Add the FormsModule to NgModule imports, declare the new PhoneListComponent and
finally add it to entryComponents since we downgraded it:
新的PhoneListComponent使用Angular的ngModel指令,它位于FormsModule中。
把FormsModule添加到NgModule的imports中,并声明新的PhoneListComponent组件,
最后由我们把它降级了,添加到entryComponents:
app.module.ts
Remove the <script> tag for the phone list component from index.html.
从index.html中移除电话列表组件的<script>标签。
Now set the remaining phone-detail.component.ts as follows:
现在,剩下的phone-detail.component.ts文件变成了这样:
app/phone-detail/phone-detail.component.ts
This is similar to the phone list component.
The new wrinkle is the RouteParams type annotation that identifies the routeParams dependency.
这和电话列表组件很相似。
这里的窍门在于@Inject装饰器,它标记出了$routeParams依赖。
The AngularJS injector has an AngularJS router dependency called $routeParams,
which was injected into PhoneDetails when it was still an AngularJS controller.
We intend to inject it into the new PhoneDetailsComponent.
AngularJS注入器具有AngularJS路由器的依赖,叫做$routeParams。
它被注入到了PhoneDetails中,但PhoneDetails现在还是一个AngularJS控制器。
我们应该把它注入到新的PhoneDetailsComponent中。
Unfortunately, AngularJS dependencies are not automatically available to Angular components.
We must use a Factory provider
to make $routeParams an Angular provider.
Do that in a new file called ajs-upgraded-providers.ts and import it in app.module.ts:
不幸的是,AngularJS的依赖不会自动在Angular的组件中可用。
我们必须使用工厂提供商(factory provider)
来把$routeParams包装成Angular的服务提供商。
新建一个名叫ajs-upgraded-providers.ts的文件,并且在app.module.ts中导入它:
app/ajs-upgraded-providers.ts
app/app.module.ts ($routeParams)
Convert the phone detail component template into Angular syntax as follows:
我们现在也要把该组件的模板转变成Angular的语法。 这里是它完整的新模板:
app/phone-detail/phone-detail.template.html
There are several notable changes here:
这里有几个值得注意的改动:
We've removed the
$ctrl.prefix from all expressions.我们从所有表达式中移除了
$ctrl.前缀。Just like we did in the phone list, we've replaced
ng-srcwith property bindings for the standardsrcproperty.正如我们在电话列表中做过的那样,我们把
ng-src替换成了标准的src属性绑定。We're using the property binding syntax around
ng-class. Though Angular does have a very similarngClassas AngularJS does, its value is not magically evaluated as an expression. In Angular we always specify in the template when an attribute's value is a property expression, as opposed to a literal string.我们在
ng-class周围使用了属性绑定语法。虽然Angular中有一个 和AngularJS中非常相似的ngClass指令, 但是它的值不会神奇的作为表达式进行计算。在Angular中,模板中的属性(Attribute)值总是被作为 属性(Property)表达式计算,而不是作为字符串字面量。We've replaced
ng-repeats with*ngFors.我们把
ng-repeat替换成了*ngFor。We've replaced
ng-clickwith an event binding for the standardclick.我们把
ng-click替换成了一个到标准click事件的绑定。We've wrapped the whole template in an
ngIfthat causes it only to be rendered when there is a phone present. We need this because when the component first loads, we don't havephoneyet and the expressions will refer to a non-existing value. Unlike in AngularJS, Angular expressions do not fail silently when we try to refer to properties on undefined objects. We need to be explicit about cases where this is expected.我们把整个模板都包裹进了一个
ngIf中,这导致只有当存在一个电话时它才会渲染。我们必须这么做, 是因为组件首次加载时我们还没有phone变量,这些表达式就会引用到一个不存在的值。 和AngularJS不同,当我们尝试引用未定义对象上的属性时,Angular中的表达式不会默默失败。 我们必须明确指出这种情况是我们所期望的。
Add PhoneDetailComponent component to the NgModule declarations and entryComponents:
把PhoneDetailComponent组件添加到NgModule的declarations和entryComponents中:
app.module.ts
We should now also remove the phone detail component <script> tag from index.html.
我们现在应该从index.html中移除电话详情组件的<script>。
Add the CheckmarkPipe
添加CheckmarkPipe
The AngularJS directive had a checkmark filter.
Let's turn that into an Angular pipe.
AngularJS指令中有一个checkmark过滤器,我们把它转换成Angular的管道。
There is no upgrade method to convert filters into pipes.
You won't miss it.
It's easy to turn the filter function into an equivalent Pipe class.
The implementation is the same as before, repackaged in the transform method.
Rename the file to checkmark.pipe.ts to conform with Angular conventions:
没有什么升级方法能把过滤器转换成管道。
但我们也并不需要它。
把过滤器函数转换成等价的Pipe类非常简单。
实现方式和以前一样,但把它们包装进transform方法中就可以了。
把该文件改名成checkmark.pipe.ts,以符合Angular中的命名约定:
app/core/checkmark/checkmark.pipe.ts
Now import and declare the newly created pipe and
remove the filter <script> tag from index.html:
当我们做这个修改时,也要同时从core模块文件中移除对该过滤器的注册。该模块的内容变成了:
app.module.ts
AoT compile the hybrid app
对混合式应用做AOT编译
To use AoT with our hybrid app we have to first set it up like any other Angular application, as shown in the Ahead-of-time Compilation chapter.
要在混合式应用中使用AOT编译,我们首先要像其它Angular应用一样设置它,就像AOT编译一章所讲的那样。
Then we have to change main-aot.ts bootstrap also bootstrap the AngularJS app
via UpgradeModule:
然后,我们就要修改main-aot.ts的引导代码,也通过UpgradeModule来引导AngularJS应用:
app/main-aot.ts
We need to load all the AngularJS files we already use in index.html in aot/index.html
as well:
我们还要把在index.html中已经用到的所有AngularJS文件加载到aot/index.html中:
aot/index.html
These files need to be copied together with the polyfills. Files our application
needs at runtime, like the .json phone lists and images, also need to be copied.
这些文件要带着相应的填充库复制到一起。应用运行时需要的文件,比如电话列表.json和图片,也需要复制过去。
Install fs-extra via npm install fs-extra --save-dev for better file copying, and change
copy-dist-files.js to the following:
通过npm install fs-extra --save-dev安装fs-extra可以更好的复制文件,并且把copy-dist-files.js文件改成这样:
copy-dist-files.js
And that's all you need to use AoT while upgrading your app!
这就是想要在升级应用期间AOT编译所需的一切!
Adding The Angular Router And Bootstrap
切换到Angular路由器和引导程序
At this point we've replaced all AngularJS application components with their Angular counterparts, even though we're still serving them from the AngularJS router.
此刻,我们已经把所有AngularJS的组件替换成了它们在Angular中的等价物,不过我们仍然在AngularJS路由器中使用它们。
Most AngularJS apps have more than a couple of routes though, and it's very helpful to migrate one route at a time.
大多数AngularJS应用都有多组路由,而如果能每次迁移一个路由就会非常有用。
Let's start by migrating the initial / and /phones routes to Angular,
while keeping /phones/:phoneId in the AngularJS router.
让我们开始把最初的/和/phones路由迁移到Angular,但把/phones/:phoneId留在AngularJS路由器中。
Add the Angular router
添加Angular路由器
Angular has an all-new router.
Angular有一个全新的路由器。
Like all routers, it needs a place in the UI to display routed views.
For Angular that's the <router-outlet> and it belongs in a root component
at the top of the applications component tree.
像所有的路由器一样,它需要在UI中指定一个位置来显示路由的视图。
在Angular中,它是<router-outlet>,并位于应用组件树顶部的根组件中。
We don't yet have such a root component, because the app is still managed as an AngularJS app.
Create a new app.component.ts file with the following AppComponent class:
我们还没有这样一个根组件,因为该应用仍然是像一个AngularJS应用那样被管理的。
创建新的app.component.ts文件,放入像这样的AppComponent类:
app/app.component.ts
It has a simple template that only includes the <router-outlet> for Angular routes
and ng-view for AngularJS routes.
This component just renders the contents of the active route and nothing else.
它有一个很简单的模板,只包含Angular路由的<router-outlet>和AngularJS路由的ng-view指令。
该组件只负责渲染活动路由的内容,此外啥也不干。
The selector tells Angular to plug this root component into the <phonecat-app>
element on the host web page when the application launches.
该选择器告诉Angular:当应用启动时就把这个根组件插入到宿主页面的<phonecat-app>元素中。
Add this <phonecat-app> element to the index.html.
It replaces the old AngularJS ng-view directive:
把这个<phonecat-app>元素插入到index.html中。
用它来代替AngularJS中的ng-view指令:
index.html (body)
Create the Routing Module
创建路由模块
A router needs configuration whether it's the AngularJS or Angular or any other router.
无论在AngularJS还是Angular或其它框架中,路由器都需要进行配置。
The details of Angular router configuration are best left to the Routing documentation
which recommends that you create a NgModule dedicated to router configuration
(called a Routing Module).
Angular路由器配置的详情最好去查阅下路由与导航文档。
它建议你创建一个专们用于路由器配置的NgModule(名叫路由模块)。
app/app-routing.module.ts
This module defines a routes object with one route to the phone list component
and a default route for the empty path.
It passes the routes to the RouterModule.forRoot method which does the rest.
该模块定义了一个routes对象,它带有两个路由,分别指向两个电话组件,以及为空路径指定的默认路由。
它把routes传给RouterModule.forRoot方法,该方法会完成剩下的事。
A couple of extra providers enable routing with "hash" URLs such as #!/phones
instead of the default "push state" strategy.
一些额外的提供商让路由器使用“hash”策略解析URL,比如#!/phones,而不是默认的“Push State”策略。
There's a twist to our Routing Module though: we're also adding a custom UrlHandlingStrategy
that tells the Angular router to only process the / and /phones routes.
这里路由模块会出现一个冲突:我们还添加了一个自定义的UrlHandlingStrategy,它会告诉Angular的路由器只处理/和/phones路由。
Now update the AppModule to import this AppRoutingModule and also the
declare the root AppComponent as the bootstrap component.
That tells Angular that it should bootstrap the app with the root AppComponent and
insert it's view into the host web page.
现在,修改AppModule,让它导入这个AppRoutingModule,并同时声明根组件AppComponent。
这会告诉Angular,它应该使用根组件AppComponent引导应用,并把它的视图插入到宿主页面中。
We can also remove the ngDoBootstrap() override from app.module.ts since we are now
bootstrapping from Angular.
我们也可以移除app.module.ts中对ngDoBootstrap()的改写,因为我们正在从Angular中引导。
And since PhoneListComponent isn't being rendered from a <phone-list> tag anymore,
but rather routed to, we can do away with it's Angular selector as well.
并且,由于PhoneListComponent不再渲染到<phone-list>标签下,而是路由到它,我们同样也可以去掉它的Angular选择器。
app/app.module.ts
Now we need to tell the AngularJS router to only process the /phones/:phoneId route:
现在,我们要让AngularJS路由器只处理/phones/:phoneId路由:
app/app.config.ts (route config)
Generate links for each phone
为每个电话生成链接
We no longer have to hardcode the links to phone details in the phone list.
We can generate data bindings for each phone's id to the routerLink directive
and let that directive construct the appropriate URL to the PhoneDetailComponent:
在电话列表中,我们不用再被迫硬编码电话详情的链接了。
我们可以通过把每个电话的id绑定到routerLink指令来生成它们了,该指令的构造函数会为PhoneDetailComponent生成正确的URL:
app/phone-list/phone-list.template.html (list with links)
We are now running both routers at the same time!
Angular is handling the initial / url, redirecting to /phones.
Meanwhile when we click a link to the phone detail, AngularJS takes over.
我们现在同时运行着两个路由器!
Angular负责处理初始URL /,并重定向到/phones。而AngularJS负责处理到手机详情的链接。
This way we can incrementally upgrade our app, reducing the risk of a massive one step router swap.
用这种方式,我们可以增量升级该应用,减少一次性更换路由带来的巨大风险。
The next step is to migrate the /phones/:phoneId route.
下一步是迁移/phones/:phoneId路由。
The Angular router passes route parameters differently.
Correct the PhoneDetail component constructor to expect an injected ActivatedRoute object.
Extract the phoneId from the ActivatedRoute.snapshot.params and fetch the phone data as before:
Angular路由器会传入不同的路由参数。
改正PhoneDetail组件的构造函数,让它改用注入进来的ActivatedRoute对象。
从ActivatedRoute.snapshot.params中提取出phoneId,并像以前一样获取手机的数据:
app/phone-detail/phone-detail.component.ts
Since this was the last route we want to migrate over, we can also now delete the last
route config from app/app.config.ts, and add it to the Angular router configuration.
由于这是我们要迁移的最后一个路由,因此现在可以从app/app.config.ts中移除最后一个路由配置了,并把它添加到Angular的路由器配置里。
We don't need our UrlHandlingStrategy anymore either, since now Angular is processing all
routes.
我们再也不需要UrlHandlingStrategy了,因为现在Angular会处理所有路由。
app/app-routing.module.ts
You are now running a pure Angular application!
我们现在运行的就是纯正的Angular应用了!
Say Goodbye to AngularJS
再见,AngularJS!
It is time to take off the training wheels and let our application begin its new life as a pure, shiny Angular app. The remaining tasks all have to do with removing code - which of course is every programmer's favorite task!
是时候把辅助训练的轮子摘下来了!让我们的应用作为一个纯粹、闪亮的Angular程序开始它的新生命吧。 剩下的所有任务就是移除代码 —— 这当然是每个程序员最喜欢的任务!
The application is still bootstrapped as a hybrid app. There's no need for that anymore.
应用仍然以混合式应用的方式启动,然而这再也没有必要了。
Switch the bootstrap method of the application from the UpgradeAdapter
to the Angular way.
把应用的引导(bootstrap)方法从UpgradeAdapter的改为Angular的。
main.ts
If you haven't already, remove all references to the UpgradeModule from app.module.ts,
as well as any Factory provider
for AngularJS services, and the app/ajs-upgraded-providers.ts file.
如果你还没有这么做,请从app.module.ts删除所有UpgradeModule的引用,
以及所有用于AngularJS服务的工厂供应商(factory provider)和app/ajs-upgraded-providers.ts文件。
Also remove any downgradeInjectable() or downgradeComponent() you find,
together with the associated AngularJS factory or directive declarations.
Since we have no downgraded components anymore, we also don't need to have them listed
in entryComponents either.
还要删除所有的downgradeInjectable()或downgradeComponent()以及与AngularJS相关的工厂或指令声明。
因为我们不再需要降级任何组件了,也不再需要把它们列在entryComponents中。
app.module.ts
You may also completely remove the following files. They are AngularJS module configuration files and not needed in Angular:
我们还要完全移除了下列文件。它们是AngularJS的模块配置文件和类型定义文件,在Angular中不需要了:
app/app.module.ajs.tsapp/app.config.tsapp/core/core.module.tsapp/core/phone/phone.module.tsapp/phone-detail/phone-detail.module.tsapp/phone-list/phone-list.module.ts
The external typings for AngularJS may be uninstalled as well. The only ones
we still need are for Jasmine and Angular polyfills.
The @angular/upgrade package and it's mapping in systemjs.config.js can also go.
还需要反安装AngularJS的外部类型定义文件。我们现在只需要Jasmine的那些。
systemjs.config.js中的@angular/upgrade包及其映射也可以移除了。
Finally, from index.html, remove all references to
AngularJS scripts, the Angular upgrade module, and jQuery. When we're done,
this is what it should look like:
最后,从index.html和karma.conf.js中,移除所有到AngularJS脚本的引用,比如jQuery。
当这些全部做完时,index.html应该是这样的:
index.html
That is the last we'll see of AngularJS! It has served us well but now it's time to say goodbye.
这是我们最后一次看到AngularJS了!它曾经带给我们很多帮助,不过现在,是时候说再见了。
Appendix: Upgrading PhoneCat Tests
附录:升级PhoneCat的测试
Tests can not only be retained through an upgrade process, but they can also be used as a valuable safety measure when ensuring that the application does not break during the upgrade. E2E tests are especially useful for this purpose.
测试不仅要在升级过程中被保留,它还是确保应用在升级过程中不会被破坏的一个安全指示器。 要达到这个目的,E2E测试尤其有用。
E2E Tests
E2E测试
The PhoneCat project has both E2E Protractor tests and some Karma unit tests in it. Of these two, E2E tests can be dealt with much more easily: By definition, E2E tests access our application from the outside by interacting with the various UI elements the app puts on the screen. E2E tests aren't really that concerned with the internal structure of the application components. That also means that although we modify our project quite a bit during the upgrade, the E2E test suite should keep passing with just minor modifications. This is because we don't change how the application behaves from the user's point of view.
PhoneCat项目中同时有基于Protractor的E2E测试和一些基于Karma的单元测试。 对这两者来说,E2E测试的转换要容易得多:根据定义,E2E测试通过与应用中显示的这些UI元素互动,从外部访问我们的应用来进行测试。 E2E测试实际上并不关心这些应用中各部件的内部结构。这也意味着,虽然我们已经修改了此应用程序, 但是E2E测试套件仍然应该能像以前一样全部通过。因为从用户的角度来说,我们并没有改变应用的行为。
During TypeScript conversion, there is nothing we have to do to keep E2E tests working. It is only when we change our bootstrap to that of a Hybrid app that we need to make some changes.
在转成TypeScript期间,我们不用做什么就能让E2E测试正常工作。 只有当我们想做些修改而把组件及其模板升级到Angular时才需要做些处理。
The following change is needed in protractor-conf.js to sync with hybrid apps:
需要对protractor-conf.js做如修改,与混合应用同步:
The next set of changes is when we start to upgrade components and their template to Angular. This is because the E2E tests have matchers that are specific to AngularJS. For PhoneCat we need to make the following changes in order to make things work with Angular:
当我们开始组件和模块升级到Angular时,还需要一系列后续的修改。 这是因为E2E测试有一些匹配器是AngularJS中特有的。对于PhoneCat来说,为了让它能在Angular下工作,我们得做下列修改:
Previous code 老代码 | New code 新代码 | Notes 说明 |
|---|---|---|
|
| The repeater matcher relies on AngularJS repeater匹配器依赖于AngularJS中的 |
|
| The repeater matcher relies on AngularJS repeater匹配器依赖于AngularJS中的 |
|
| The model matcher relies on AngularJS model匹配器依赖于AngularJS中的 |
|
| The model matcher relies on AngularJS model匹配器依赖于AngularJS中的 |
|
| The binding matcher relies on AngularJS data binding binding匹配器依赖于AngularJS的数据绑定 |
When the bootstrap method is switched from that of UpgradeModule to
pure Angular, AngularJS ceases to exist on the page completely.
At this point we need to tell Protractor that it should not be looking for
an AngularJS app anymore, but instead it should find Angular apps from
the page.
当引导方式从UpgradeModule切换到纯Angular的时,AngularJS就从页面中完全消失了。
此时,我们需要告诉Protractor,它不用再找AngularJS应用了,而是从页面中查找Angular应用。
于是在protractor-conf.js中做下列修改:
Replace the ng12Hybrid previously added with the following in protractor-conf.js:
替换之前在protractor-conf.js中加入 ng12Hybrid,象这样:
Also, there are a couple of Protractor API calls in the PhoneCat test code that
are using the AngularJS $location service under the hood. As that
service is no longer there after the upgrade, we need to replace those calls with ones
that use WebDriver's generic URL APIs instead. The first of these is
the redirection spec:
同样,我们的测试代码中有两个Protractor API调用内部使用了$location。该服务没有了,
我们就得把这些调用用一个WebDriver的通用URL API代替。第一个API是“重定向(redirect)”规约:
e2e-tests/scenarios.ts
And the second is the phone links spec:
然后是“电话链接(phone links)”规约:
e2e-tests/scenarios.ts
Unit Tests
单元测试
For unit tests, on the other hand, more conversion work is needed. Effectively they need to be upgraded along with the production code.
另一方面,对于单元测试来说,需要更多的转化工作。实际上,它们需要随着产品代码一起升级。
During TypeScript conversion no changes are strictly necessary. But it may be a good idea to convert the unit test code into TypeScript as well, as the same benefits we from TypeScript in production code also applies to tests.
在转成TypeScript期间,严格来讲没有什么改动是必须的。但把单元测试代码转成TypeScript仍然是个好主意, 产品代码从TypeScript中获得的那些增益也同样适用于测试代码。
For instance, in the phone detail component spec we can use not only ES2015 features like arrow functions and block-scoped variables, but also type definitions for some of the AngularJS services we're consuming:
比如,在这个电话详情组件的规约中,我们不仅用到了ES2015中的箭头函数和块作用域变量这些特性,还为所用的一些 AngularJS服务提供了类型定义。
app/phone-detail/phone-detail.component.spec.ts
Once we start the upgrade process and bring in SystemJS, configuration changes are needed for Karma. We need to let SystemJS load all the new Angular code, which can be done with the following kind of shim file:
一旦我们开始了升级过程并引入了SystemJS,还需要对Karma进行配置修改。 我们需要让SystemJS加载所有的Angular新代码,
karma-test-shim.js
The shim first loads the SystemJS configuration, then Angular's test support libraries, and then the application's spec files themselves.
这个shim文件首先加载了SystemJS的配置,然后是Angular的测试支持库,然后是应用本身的规约文件。
Karma configuration should then be changed so that it uses the application root dir
as the base directory, instead of app.
然后需要修改Karma配置,来让它使用本应用的根目录作为基础目录(base directory),而不是app。
karma.conf.js
Once this is done, we can load SystemJS and other dependencies, and also switch the configuration for loading application files so that they are not included to the page by Karma. We'll let the shim and SystemJS load them.
一旦这些完成了,我们就能加载SystemJS和其它依赖,并切换配置文件来加载那些应用文件,而不用在Karma页面中包含它们。 我们要让这个shim文件和SystemJS去加载它们。
karma.conf.js
Since the HTML templates of Angular components will be loaded as well, we need to help Karma out a bit so that it can route them to the right paths:
由于Angular组件中的HTML模板也同样要被加载,所以我们得帮Karma一把,帮它在正确的路径下找到这些模板:
karma.conf.js
The unit test files themselves also need to be switched to Angular when their production counterparts are switched. The specs for the checkmark pipe are probably the most straightforward, as the pipe has no dependencies:
如果产品代码被切换到了Angular,单元测试文件本身也需要切换过来。对勾(checkmark)管道的规约可能是最简单的,因为它没有任何依赖:
app/core/checkmark/checkmark.pipe.spec.ts
The unit test for the phone service is a bit more involved. We need to switch from the mocked-out
AngularJS $httpBackend to a mocked-out Angular Http backend.
Phone服务的测试会牵扯到一点别的。我们需要把模拟版的AngularJS $httpBackend服务切换到模拟板的Angular Http后端。
app/core/phone/phone.service.spec.ts
For the component specs we can mock out the Phone service itself, and have it provide
canned phone data. We use Angular's component unit testing APIs for both components.
对于组件的规约,我们可以模拟出Phone服务本身,并且让它提供电话的数据。我们可以对这些组件使用Angular的组件单元测试API。
app/phone-detail/phone-detail.component.spec.ts
app/phone-list/phone-list.component.spec.ts
Finally, we need to revisit both of the component tests when we switch to the Angular
router. For the details component we need to provide a mock of Angular ActivatedRoute object
instead of using the AngularJS $routeParams.
最后,当我们切换到Angular路由时,我们需要重新过一遍这些组件测试。对详情组件来说,我们需要提供一个Angular
RouteParams的mock对象,而不再用AngularJS中的$routeParams。
app/phone-detail/phone-detail.component.spec.ts
And for the phone list component we need to set up a few things for the router itself so that the route link directive will work.
对于电话列表组件来说,我们需要为路由器本身略作设置,以便它的路由链接(routerLink)指令能够正常工作。