In this page, you'll expand the Tour of Heroes app to display a list of heroes, and allow users to select a hero and display the hero's details.
我们需要管理多个英雄。我们将扩展《英雄指南》应用,让它显示一个英雄列表, 允许用户选择一个英雄,查看该英雄的详细信息。
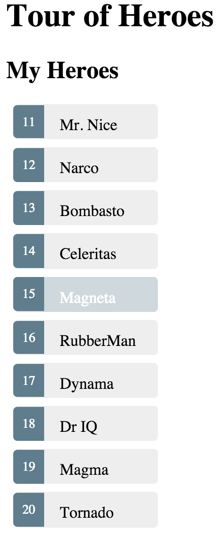
When you're done with this page, the app should look like this
当我们完成本章时,应用应该是这样的:
Where you left off
延续上一步教程
Before you continue with this page of the Tour of Heroes, verify that you have the following structure after The Hero Editor page. If your structure doesn't match, go back to that page to figure out what you missed.
在继续《英雄指南》的第二部分之前,先来检查一下,完成第一部分之后,你是否已经有了如下目录结构。如果没有,你得先回到第一部分,看看错过了哪里。
Keep the app transpiling and running
让应用代码保持转译和运行
Enter the following command in the terminal window:
在控制台中敲下列命令:
This command runs the TypeScript compiler in "watch mode", recompiling automatically when the code changes. The command simultaneously launches the app in a browser and refreshes the browser when the code changes.
这个命令会在“监听”模式下运行TypeScript编译器,当代码变化时,它会自动重新编译。 同时,该命令还会在浏览器中启动该应用,并且当代码变化时刷新浏览器。
You can keep building the Tour of Heroes without pausing to recompile or refresh the browser.
在后续构建《英雄指南》过程中,应用能持续运行,而不用中断服务来编译或刷新浏览器。
Displaying heroes
显示我们的英雄
To display a list of heroes, you'll add heroes to the view's template.
要显示英雄列表,我们就要先往视图模板中添加一些英雄。
Create heroes
创建英雄
Create an array of ten heroes.
我们先创建一个由十位英雄组成的数组。
src/app/app.component.ts (hero array)
The HEROES array is of type Hero, the class defined in the previous page.
Eventually this app will fetch the list of heroes from a web service, but for now
you can display mock heroes.
HEROES是一个由Hero类的实例构成的数组,我们在第一部分定义过它。
我们当然希望从一个 Web 服务中获取这个英雄列表,但别急,我们得把步子迈得小一点,先用一组模拟出来的英雄。
Expose heroes
暴露英雄
Create a public property in AppComponent that exposes the heroes for binding.
我们在AppComponent上创建一个公共属性,用来暴露这些英雄,以供绑定。
app.component.ts (hero array property)
The heroes type isn't defined because TypeScript infers it from the HEROES array.
我们并不需要明确定义heroes属性的数据类型,TypeScript 能从HEROES数组中推断出来。
The hero data is separated from the class implementation because ultimately the hero names will come from a data service.
英雄的数据从实现类中分离了出来,因为最终,英雄的名字会来自一个数据服务。
Display hero names in a template
在模板中显示英雄
To display the hero names in an unordered list, insert the following chunk of HTML below the title and above the hero details.
我们还要在模板中创建一个无序列表来显示这些英雄的名字。 那就在标题和英雄详情之间,插入下面这段 HTML 代码。
app.component.ts (heroes template)
Now you can fill the template with hero names.
现在,我们有了一个模板。接下来,就用英雄们的数据来填充它。
List heroes with ngFor
通过 ngFor 来显示英雄列表
The goal is to bind the array of heroes in the component to the template, iterate over them, and display them individually.
我们想要把组件中的heroes数组绑定到模板中,迭代并逐个显示它们。
Modify the <li> tag by adding the built-in directive *ngFor.
首先,修改<li>标签,往上添加内置指令*ngFor。
app.component.ts (ngFor)
The (*) prefix to ngFor is a critical part of this syntax.
It indicates that the <li> element and its children
constitute a master template.
ngFor的*前缀表示<li>及其子元素组成了一个主控模板。
The ngFor directive iterates over the component's heroes array
and renders an instance of this template for each hero in that array.
ngFor指令在AppComponent.heroes属性返回的heroes数组上迭代,并输出此模板的实例。
The let hero part of the expression identifies hero as the template input variable,
which holds the current hero item for each iteration.
You can reference this variable within the template to access the current hero's properties.
引号中赋值给ngFor的那段文本表示“从heroes数组中取出每个英雄,存入一个局部的hero变量,并让它在相应的模板实例中可用”。
Read more about ngFor and template input variables in the
Showing an array property with *ngFor section of the
Displaying Data page and the
ngFor section of the
Template Syntax page.
要学习更多关于ngFor和模板输入变量的知识,参见显示数据一章的用*ngFor显示数组属性和
模板语法章的ngFor。
Within the <li> tags, add content
that uses the hero template variable to display the hero's properties.
接着,我们在<li>标签中插入一些内容,以便使用模板变量hero来显示英雄的属性。
app.component.ts (ngFor template)
When the browser refreshes, a list of heroes appears.
当浏览器刷新时,我们就看到了英雄列表。
Style the heroes
给我们的英雄们“美容”
Users should get a visual cue of which hero they are hovering over and which hero is selected.
当用户的鼠标划过英雄或选中一个英雄时,我们得让他/她看起来醒目一点。
To add styles to your component, set the styles property on the @Component decorator
to the following CSS classes:
要想给我们的组件添加一些样式,请把@Component装饰器的styles属性设置为下列 CSS 类:
src/app/app.component.ts (styles)
Remember to use the backtick notation for multi-line strings.
注意,我们又使用了反引号语法来书写多行字符串。
Adding these styles makes the file much longer. In a later page you'll move the styles to a separate file.
添加这些样式会让此文件变得更长。在后面的章节中,我们将会把这些样式移到单独的文件中去。
When you assign styles to a component, they are scoped to that specific component.
These styles apply only to the AppComponent and don't affect the outer HTML.
当我们为一个组件指定样式时,它们的作用域将仅限于该组件。
上面的例子中,这些样式只会作用于AppComponent组件,而不会“泄露”到外部 HTML 中。
The template for displaying heroes should look like this:
用于显示英雄们的模板应该是这样的:
src/app/app.component.ts (styled heroes)
Selecting a hero
选择英雄
The app now displays a list of heroes as well as a single hero in the details view. But the list and the details view are not connected. When users select a hero from the list, the selected hero should appear in the details view. This UI pattern is known as "master/detail." In this case, the master is the heroes list and the detail is the selected hero.
我们的应用已经有了英雄列表和单个英雄的详情视图。 但列表和单独的英雄之间还没有任何关联。 我们希望用户在列表中选中一个英雄,然后让这个被选中的英雄出现在详情视图中。 这种 UI 布局模式,通常被称为“主从结构”。 在这个例子中,主视图是英雄列表,从视图则是被选中的英雄。
Next you'll connect the master to the detail through a selectedHero component property,
which is bound to a click event.
接下来,我们要通过组件中的一个selectedHero属性来连接主从视图,它被绑定到了点击事件上。
Handle click events
处理点击事件
Add a click event binding to the <li> like this:
我们再往<li>元素上插入一句点击事件的绑定代码:
app.component.ts (template excerpt)
The parentheses identify the <li> element's click event as the target.
The onSelect(hero) expression calls the AppComponent method, onSelect(),
passing the template input variable hero, as an argument.
That's the same hero variable you defined previously in the ngFor directive.
圆括号标识<li>元素上的click事件是绑定的目标。
等号右边的onSelect(hero)表达式调用AppComponent的onSelect()方法,并把模板输入变量hero作为参数传进去。
它是我们前面在ngFor指令中定义的那个hero变量。
Learn more about event binding at the User Input page and the Event binding section of the Template Syntax page.
Add a click handler to expose the selected hero
添加点击处理器以暴露选中的英雄
You no longer need the hero property because you're no longer displaying a single hero; you're displaying a list of heroes.
But the user will be able to select one of the heroes by clicking on it.
So replace the hero property with this simple selectedHero property:
我们不再需要AppComponent的hero属性,因为不需要再显示单个的英雄,我们只需要显示英雄列表。但是用户可以点选一个英雄。
所以我们要把hero属性替换成selectedHero属性。
src/app/app.component.ts (selectedHero)
The hero names should all be unselected before the user picks a hero, so
you won't initialize the selectedHero as you did with hero.
在用户选取一个英雄之前,所有的英雄名字都应该是未选中的。所以我们不希望像hero一样初始化selectedHero变量。
Add an onSelect() method that sets the selectedHero property to the hero that the user clicks.
现在,添加一个onSelect方法,用于将用户点击的英雄赋给selectedHero属性。
src/app/app.component.ts (onSelect)
The template still refers to the old hero property.
Bind to the new selectedHero property instead as follows:
我们将把所选英雄的详细信息显示在模板中。目前,它仍然引用之前的hero属性。
我们这就修改模板,让它绑定到新的selectedHero属性。
app.component.ts (template excerpt)
Hide the empty detail with ngIf
使用 ngIf 隐藏空的详情
When the app loads, selectedHero is undefined.
The selected hero is initialized when the user clicks a hero's name.
Angular can't display properties of the undefined selectedHero and throws the following error,
visible in the browser's console:
当应用加载时,我们会看到一个英雄列表,但还没有任何英雄被选中。
selectedHero属性是undefined。
因此,我们会看到浏览器控制台中出现下列错误:
Although selectedHero.name is displayed in the template,
you must keep the hero detail out of the DOM until there is a selected hero.
虽然我们要在模板中显示的是selectedHero.name,但在选中了一个英雄之前,我们必须让这些英雄详情留在DOM之外。
Wrap the HTML hero detail content of the template with a <div>.
Then add the ngIf built-in directive and set it to the selectedHero property of the component.
我们可以把模板中的英雄详情内容区放在一个<div>中。
然后,添加一个ngIf内置指令,把ngIf的值设置为组件的selectedHero属性。
src/app/app.component.ts (ngIf)
Don't forget the asterisk (*) in front of ngIf.
别忘了ngIf前的星号 (*)。
The app no longer fails and the list of names displays again in the browser.
应用不再出错,而名字列表也再次显示在浏览器中。
When there is no selected hero, the ngIf directive removes the hero detail HTML from the DOM.
There are no hero detail elements or bindings to worry about.
当没有选中英雄时,ngIf指令会从 DOM 中移除表示英雄详情的这段 HTML 。
没有了表示英雄详情的元素,也就不用担心绑定问题。
When the user picks a hero, selectedHero becomes defined and
ngIf puts the hero detail content into the DOM and evaluates the nested bindings.
当用户选取了一个英雄,selectedHero变成了“已定义的”值,于是ngIf把英雄详情加回 DOM 中,并计算它所嵌套的各种绑定。
Read more about ngIf and ngFor in the
Structural Directives page and the
Built-in directives section of the
Template Syntax page.
Style the selected hero
给所选英雄添加样式
While the selected hero details appear below the list, it's difficult to identify the selected hero within the list itself.
我们在下面的详情区看到了选中的英雄,但是我们还是没法在上面的列表区快速定位这位英雄。
In the styles metadata that you added above, there is a custom CSS class named selected.
To make the selected hero more visible, you'll apply this selected class to the <li> when the user clicks on a hero name.
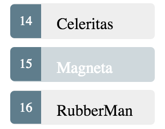
For example, when the user clicks "Magneta", it should render with a distinctive but subtle background color
like this:
在我们前面添加的styles元数据中,有一个名叫selected的自定义CSS类。
要想让选中的英雄更加醒目,当用户点击一个英雄名字时,我们要为<li>添加selected类。
例如,当用户点击“Magneta”时,它应该使用不一样的醒目的背景色。
In the template, add the following [class.selected] binding to the <li>:
在这个模板中,往<li>上添加一个[class.selected]绑定:
app.component.ts (setting the CSS class)
When the expression (hero === selectedHero) is true, Angular adds the selected CSS class.
When the expression is false, Angular removes the selected class.
当表达式(hero === selectedHero)为true时,Angular会添加一个CSS类selected。为false时则会移除selected类。
Read more about the [class] binding in the Template Syntax guide.
关于[class]绑定的更多信息,参见模板语法。
The final version of the <li> looks like this:
app.component.ts (styling each hero)
After clicking "Magneta", the list should look like this:
浏览器重新加载了我们的应用。 我们选中英雄 Magneta,通过背景色的变化,它被清晰的标记出来。
Here's the complete app.component.ts as of now:
完整的app.component.ts文件如下:
src/app/app.component.ts
The road you've travelled
已走的路
Here's what you achieved in this page:
在本章中,我们完成了以下内容:
The Tour of Heroes app displays a list of selectable heroes.
我们的《英雄指南》现在显示一个可选英雄的列表
You added the ability to select a hero and show the hero's details.
我们可以选择英雄,并显示这个英雄的详情
You learned how to use the built-in directives
ngIfandngForin a component's template.我们学会了如何在组件模板中使用内置的
ngIf和ngFor指令
Run the
运行这部分的
The Road Ahead
前方的路
Our Tour of Heroes has grown, but it’s far from complete. We can't put the entire app into a single component. We need to break it up into sub-components and teach them to work together as we learn in the next chapter.
我们的《英雄指南》长大了,但还远远不够完善。 我们显然不能把整个应用都放进一个组件中。 我们需要把它拆分成一系列子组件,然后教它们协同工作, 就像我们将在下一章学到的那样。