Dependency Injection is a powerful pattern for managing code dependencies. This cookbook explores many of the features of Dependency Injection (DI) in Angular.
依赖注入是一个用来管理代码依赖的强大模式。在这本“烹饪宝典”中,我们会讨论Angular依赖注入的许多特性。
Contents
目录
Provider token alternatives: the class-interface and
InjectionTokenBreak circularities with a forward class reference (forwardRef)
See the
要获取本“烹饪宝典”的代码,参见
Application-wide dependencies
应用程序全局依赖
Register providers for dependencies used throughout the application in the root application component, AppComponent.
在应用程序根组件AppComponent中注册那些被应用程序全局使用的依赖提供商。
The following example shows importing and registering
the LoggerService, UserContext, and the UserService
in the @Component metadata providers array.
在下面的例子中,通过@Component元数据的providers数组导入和注册了几个服务(LoggerService, UserContext和UserService)。
src/app/app.component.ts (excerpt)
All of these services are implemented as classes.
Service classes can act as their own providers which is why listing them in the providers array
is all the registration you need.
所有这些服务都是用类实现的。服务类能充当自己的提供商,这就是为什么只要把它们列在providers数组里就算注册成功了。
A provider is something that can create or deliver a service.
Angular creates a service instance from a class provider by using new.
Read more about providers in the Dependency Injection
guide.
提供商是用来新建或者交付服务的。
Angular拿到“类提供商”之后,会通过new操作来新建服务实例。
从依赖注入一章可以学到关于提供商的更多知识。
Now that you've registered these services, Angular can inject them into the constructor of any component or service, anywhere in the application.
现在我们已经注册了这些服务,这样Angular就能在应用程序的任何地方,把它们注入到任何组件和服务的构造函数里。
src/app/hero-bios.component.ts (component constructor injection)
src/app/user-context.service.ts (service constructor injection)
External module configuration
外部模块配置
Generally, register providers in the NgModule rather than in the root application component.
我们通常会在NgModule中注册提供商,而不是在应用程序根组件中。
Do this when you expect the service to be injectable everywhere, or you are configuring another application global service before the application starts.
如果你希望这个服务在应用中到处都可以被注入,或者必须在应用启动前注册一个全局服务,那就这么做。
Here is an example of the second case, where the component router configuration includes a non-default
location strategy by listing its provider
in the providers list of the AppModule.
下面的例子是第二种情况,它为组件路由器配置了一个非默认的地址策略(location strategy),并把它加入到AppModule的providers数组中。
src/app/app.module.ts (providers)
@Injectable() and nested service dependencies
@Injectable和嵌套服务依赖
The consumer of an injected service does not know how to create that service. It shouldn't care. It's the dependency injection's job to create and cache that service.
这些被注入服务的消费者不需要知道如何创建这个服务,它也不应该在乎。新建和缓存这个服务是依赖注入器的工作。
Sometimes a service depends on other services , which may depend on yet other services. Resolving these nested dependencies in the correct order is also the framework's job. At each step, the consumer of dependencies simply declares what it requires in its constructor and the framework takes over.
有时候一个服务依赖其它服务...而其它服务可能依赖另外的更多服务。按正确的顺序解析这些嵌套依赖也是框架的工作。 在每一步,依赖的使用者只要在它的构造函数里简单声明它需要什么,框架就会完成所有剩下的事情。
The following example shows injecting both the LoggerService and the UserContext in the AppComponent.
在下列例子中,我们往AppComponent里注入的LoggerService和UserContext。
src/app/app.component.ts
The UserContext in turn has its own dependencies on both the LoggerService and
a UserService that gathers information about a particular user.
UserContext有两个依赖LoggerService(再一次)和负责获取特定用户信息的UserService。
user-context.service.ts (injection)
When Angular creates the AppComponent, the dependency injection framework creates an instance of the LoggerService and
starts to create the UserContextService.
The UserContextService needs the LoggerService, which the framework already has, and the UserService, which it has yet to create.
The UserService has no dependencies so the dependency injection framework can justuse new to instantiateone .
当Angular新建AppComponent时,依赖注入框架先创建一个LoggerService的实例,然后创建UserContextService实例。
UserContextService需要框架已经创建好的LoggerService实例和尚未创建的UserService实例。
UserService没有其它依赖,所以依赖注入框架可以直接new一个实例。
The beauty of dependency injection is that AppComponent doesn't care about any of this.
You simply declare what is needed in the constructor (LoggerService and UserContextService) and the framework does the rest.
依赖注入最帅的地方在于,AppComponent的作者不需要在乎这一切。作者只是在(LoggerService和UserContextService的)构造函数里面简单的声明一下,框架就完成了剩下的工作。
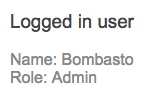
Once all the dependencies are in place, the AppComponent displays the user information:
一旦所有依赖都准备好了,AppComponent就会显示用户信息:
@Injectable()
@Injectable()
Notice the @Injectable()decorator on the UserContextService class.
注意在UserContextService类里面的@Injectable()装饰器。
user-context.service.ts (@Injectable)
That decorator makes it possible for Angular to identify the types of its two dependencies, LoggerService and UserService.
该装饰器让Angular有能力识别这两个依赖 LoggerService 和 UserService的类型。
Technically, the @Injectable()decorator is only required for a service class that has its own dependencies.
The LoggerService doesn't depend on anything. The logger would work if you omitted @Injectable()
and the generated code would be slightly smaller.
严格来说,这个@Injectable()装饰器只在一个服务类有自己的依赖的时候,才是不可缺少的。
LoggerService不依赖任何东西,所以该日志服务在没有@Injectable()的时候应该也能工作,生成的代码也更少一些。
But the service would break the moment you gave it a dependency and you'd have to go back
and add @Injectable() to fix it. Add @Injectable() from the start for the sake of consistency and to avoid future pain.
但是在给它添加依赖的那一瞬间,该服务就会停止工作,要想修复它,就必须要添加@Injectable()。
为了保持一致性和防止将来的麻烦,推荐从一开始就加上@Injectable()。
Although this site recommends applying @Injectable() to all service classes, don't feel bound by it.
Some developers prefer to add it only where needed and that's a reasonable policy too.
虽然推荐在所有服务中使用@Injectable(),但你也不需要一定要这么做。一些开发者就更喜欢在真正需要的地方才添加,这也是一个合理的策略。
The AppComponent class had two dependencies as well but no @Injectable().
It didn't need @Injectable() because that component class has the @Component decorator.
In Angular with TypeScript, a single decorator—any decorator—is sufficient to identify dependency types.
AppComponent类有两个依赖,但它没有@Injectable()。
它不需要@Injectable(),这是因为组件类有@Component装饰器。
在用TypeScript的Angular应用里,有一个单独的装饰器 — 任何装饰器 — 来标识依赖的类型就够了。
Limit service scope to a component subtree
把服务作用域限制到一个组件支树
All injected service dependencies are singletons meaning that, for a given dependency injector , there is only one instance of service.
所有被注入的服务依赖都是单例的,也就是说,在任意一个依赖注入器("injector")中,每个服务只有唯一的实例。
But an Angular application has multiple dependency injectors, arranged in a tree hierarchy that parallels the component tree. So a particular service can be provided and created at any component level and multiple times if provided in multiple components.
但是Angular应用程序有多个依赖注入器,组织成一个与组件树平行的树状结构。所以,可以在任何组件级别提供(和建立)特定的服务。如果在多个组件中注入,服务就会被新建出多个实例,分别提供给不同的组件。
By default, a service dependency provided in one component is visible to all of its child components and Angular injects the same service instance into all child components that ask for that service.
默认情况下,一个组件中注入的服务依赖,会在该组件的所有子组件中可见,而且Angular会把同样的服务实例注入到需要该服务的子组件中。
Accordingly, dependencies provided in the root AppComponent can be injected into any component anywhere in the application.
所以,在根部的AppComponent提供的依赖单例就能被注入到应用程序中任何地方的任何组件。
That isn't always desirable. Sometimes you want to restrict service availability to a particular region of the application.
但这不一定总是想要的。有时候我们想要把服务的有效性限制到应用程序的一个特定区域。
You can limit the scope of an injected service to a branch of the application hierarchy
by providing that service at the sub-root component for that branch.
This example shows how similar providing a service to a sub-root component is
to providing a service in the root AppComponent. The syntax is the same.
Here, the HeroService is availble to the HeroesBaseComponent because it is in the providers array:
通过在组件树的子级根组件中提供服务,可以把一个被注入服务的作用域局限在应用程序结构中的某个分支中。
这个例子中展示了为子组件和根组件AppComponent提供服务的相似之处,它们的语法是相同的。
这里通过列入providers数组,在HeroesBaseComponent中提供了HeroService:
src/app/sorted-heroes.component.ts (HeroesBaseComponent excerpt)
When Angular creates the HeroesBaseComponent, it also creates a new instance of HeroService
that is visible only to the component and its children, if any.
当Angular新建HeroBaseComponent的时候,它会同时新建一个HeroService实例,该实例只在该组件及其子组件(如果有)中可见。
You could also provide the HeroService to a different component elsewhere in the application.
That would result in a different instance of the service, living in a different injector.
也可以在应用程序别处的不同的组件里提供HeroService。这样就会导致在不同注入器中存在该服务的不同实例。
Examples of such scoped HeroService singletons appear throughout the accompanying sample code,
including the HeroBiosComponent, HeroOfTheMonthComponent, and HeroesBaseComponent.
Each of these components has its own HeroService instance managing its own independent collection of heroes.
这个例子中,局部化的HeroService单例,遍布整份范例代码,包括HeroBiosComponent、HeroOfTheMonthComponent和HeroBaseComponent。
这些组件每个都有自己的HeroService实例,用来管理独立的英雄库。
Take a break!
休息一下!
This much Dependency Injection knowledge may be all that many Angular developers ever need to build their applications. It doesn't always have to be more complicated.
对一些Angular开发者来说,这么多依赖注入知识可能已经是它们需要知道的全部了。不是每个人都需要更复杂的用法。
Multiple service instances (sandboxing)
多个服务实例(sandboxing)
Sometimes you want multiple instances of a service at the same level of the component hierarchy.
在同一个级别的组件树里,有时需要一个服务的多个实例。
A good example is a service that holds state for its companion component instance. You need a separate instance of the service for each component. Each service has its own work-state, isolated from the service-and-state of a different component. This is called sandboxing because each service and component instance has its own sandbox to play in.
一个用来保存其伴生组件的实例状态的服务就是个好例子。 每个组件都需要该服务的单独实例。 每个服务有自己的工作状态,与其它组件的服务和状态隔离。我们称作沙盒化,因为每个服务和组件实例都在自己的沙盒里运行。
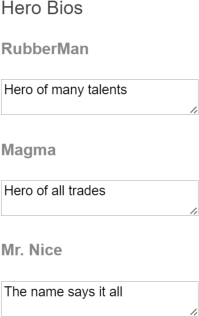
Imagine a HeroBiosComponent that presents three instances of the HeroBioComponent.
想象一下,一个HeroBiosComponent组件显示三个HeroBioComponent的实例。
ap/hero-bios.component.ts
Each HeroBioComponent can edit a single hero's biography.
A HeroBioComponent relies on a HeroCacheService to fetch, cache, and perform other persistence operations on that hero.
每个HeroBioComponent都能编辑一个英雄的生平。HeroBioComponent依赖HeroCacheService服务来对该英雄进行读取、缓存和执行其它持久化操作。
src/app/hero-cache.service.ts
Clearly the three instances of the HeroBioComponent can't share the same HeroCacheService.
They'd be competing with each other to determine which hero to cache.
很明显,这三个HeroBioComponent实例不能共享一样的HeroCacheService。要不然它们会相互冲突,争相把自己的英雄放在缓存里面。
Each HeroBioComponent gets its own HeroCacheService instance
by listing the HeroCacheService in its metadata providers array.
通过在自己的元数据(metadata)providers数组里面列出HeroCacheService, 每个HeroBioComponent就能拥有自己独立的HeroCacheService实例。
src/app/hero-bio.component.ts
The parent HeroBiosComponent binds a value to the heroId.
The ngOnInit passes that id to the service, which fetches and caches the hero.
The getter for the hero property pulls the cached hero from the service.
And the template displays this data-bound property.
父组件HeroBiosComponent把一个值绑定到heroId。ngOnInit把该id传递到服务,然后服务获取和缓存英雄。hero属性的getter从服务里面获取缓存的英雄,并在模板里显示它绑定到属性值。
Find this example in HeroBioComponent instances have their own cached hero data.
到HeroBioComponent实例拥有自己独立的英雄数据缓存。
Qualify dependency lookup with @Optional() and @Host()
使用@Optional()和@Host()装饰器来限定依赖查找方式
As you now know, dependencies can be registered at any level in the component hierarchy.
我们知道,依赖可以被注入到任何组件级别。
When a component requests a dependency, Angular starts with that component's injector and walks up the injector tree until it finds the first suitable provider. Angular throws an error if it can't find the dependency during that walk.
当组件申请一个依赖时,Angular从该组件本身的注入器开始,沿着依赖注入器的树往上找,直到找到第一个符合要求的提供商。如果Angular不能在这个过程中找到合适的依赖,它就会抛出一个错误。
You want this behavior most of the time.
But sometimes you need to limit the search and/or accommodate a missing dependency.
You can modify Angular's search behavior with the @Host and @Optional qualifying decorators,
used individually or together.
大部分时候,我们确实想要这个行为。
但是有时候,需要限制这个(依赖)查找逻辑,且/或提供一个缺失的依赖。
单独或联合使用@Host和@Optional限定型装饰器,就可以修改Angular的查找行为。
The @Optional decorator tells Angular to continue when it can't find the dependency.
Angular sets the injection parameter to null instead.
当Angular找不到依赖时,@Optional装饰器会告诉Angular继续执行。Angular把此注入参数设置为null(而不用默认的抛出错误的行为)。
The @Host decorator stops the upward search at the host component.
@Host装饰器将把往上搜索的行为截止在宿主组件
The host component is typically the component requesting the dependency. But when this component is projected into a parent component, that parent component becomes the host. The next example covers this second case.
宿主组件通常是申请这个依赖的组件。但当这个组件被投影(projected)进一个父组件后,这个父组件就变成了宿主。 下一个例子会演示第二种情况。
Demonstration
示范
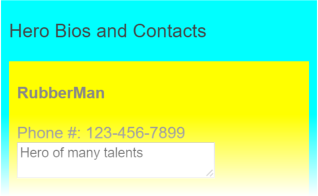
The HeroBiosAndContactsComponent is a revision of the HeroBiosComponent that you looked at above.
HeroBiosAndContactsComponent是前面见过的HeroBiosComponent的修改版。
src/app/hero-bios.component.ts (HeroBiosAndContactsComponent)
Focus on the template:
注意看模板:
Now there is a new <hero-contact> element between the <hero-bio> tags.
Angular projects, or transcludes, the corresponding HeroContactComponent into the HeroBioComponent view,
placing it in the <ng-content> slot of the HeroBioComponent template:
我们在<hero-bio>标签中插入了一个新的<hero-contact>元素。Angular就会把相应的HeroContactComponent投影(transclude)进HeroBioComponent的视图里,
将它放在HeroBioComponent模板的<ng-content>标签槽里。
src/app/hero-bio.component.ts (template)
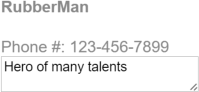
It looks like this, with the hero's telephone number from HeroContactComponent projected above the hero description:
从HeroContactComponent获得的英雄电话号码,被投影到上面的英雄描述里,就像这样:
Here's the HeroContactComponent which demonstrates the qualifying decorators:
下面的HeroContactComponent,示范了限定型装饰器(@Optional和@Host):
src/app/hero-contact.component.ts
Focus on the constructor parameters:
注意看构造函数的参数:
src/app/hero-contact.component.ts
The @Host() function decorating the heroCache property ensures that
you get a reference to the cache service from the parent HeroBioComponent.
Angular throws an error if the parent lacks that service, even if a component higher in the component tree happens to have it.
@Host()函数是heroCache属性的装饰器,确保从其父组件HeroBioComponent得到一个缓存服务。如果该父组件不存在这个服务,Angular就会抛出错误,即使组件树里的再上级有某个组件拥有这个服务,Angular也会抛出错误。
A second @Host() function decorates the loggerService property.
The only LoggerService instance in the app is provided at the AppComponent level.
The host HeroBioComponent doesn't have its own LoggerService provider.
另一个@Host()函数是属性loggerService的装饰器,我们知道在应用程序中,只有一个LoggerService实例,也就是在AppComponent级提供的服务。
该宿主HeroBioComponent没有自己的LoggerService提供商。
Angular would throw an error if you hadn't also decorated the property with the @Optional() function.
Thanks to @Optional(), Angular sets the loggerService to null and the rest of the component adapts.
如果没有同时使用@Optional()装饰器的话,Angular就会抛出错误。多亏了@Optional(),Angular把loggerService设置为null,并继续执行组件而不会抛出错误。
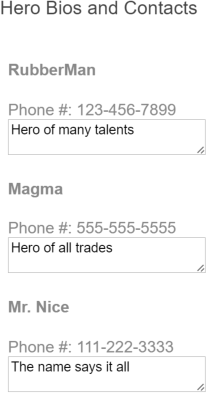
Here's the HeroBiosAndContactsComponent in action.
下面是HeroBiosAndContactsComponent的执行结果:
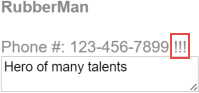
If you comment out the @Host() decorator, Angular now walks up the injector ancestor tree
until it finds the logger at the AppComponent level. The logger logic kicks in and the hero display updates
with the gratuitous "!!!", indicating that the logger was found.
如果注释掉@Host()装饰器,Angular就会沿着注入器树往上走,直到在AppComponent中找到该日志服务。日志服务的逻辑加入进来,更新了英雄的显示信息,这表明确实找到了日志服务。
On the other hand, if you restore the @Host() decorator and comment out @Optional,
the application fails for lack of the required logger at the host component level.
EXCEPTION: No provider for LoggerService! (HeroContactComponent -> LoggerService)
另一方面,如果恢复@Host()装饰器,注释掉@Optional,应用程序就会运行失败,因为它在宿主组件级别找不到需要的日志服务。
EXCEPTION: No provider for LoggerService! (HeroContactComponent -> LoggerService)
Inject the component's DOM element
注入组件的DOM元素
On occasion you might need to access a component's corresponding DOM element. Although developers strive to avoid it, many visual effects and 3rd party tools, such as jQuery, require DOM access.
偶尔,可能需要访问一个组件对应的DOM元素。尽量避免这样做,但还是有很多视觉效果和第三方工具(比如jQuery)需要访问DOM。
To illustrate, here's a simplified version of the HighlightDirective from
the Attribute Directives page.
为了说明这一点,我们在属性型指令HighlightDirective的基础上,编写了一个简化版本。
src/app/highlight.directive.ts
The directive sets the background to a highlight color when the user mouses over the DOM element to which it is applied.
当用户把鼠标移到DOM元素上时,指令将该元素的背景设置为一个高亮颜色。
Angular sets the constructor's el parameter to the injected ElementRef, which is
a wrapper around that DOM element.
Its nativeElement property exposes the DOM element for the directive to manipulate.
Angular把构造函数参数el设置为注入的ElementRef,该ElementRef代表了宿主的DOM元素, 它的nativeElement属性把该DOM元素暴露给了指令。
The sample code applies the directive's myHighlight attribute to two <div> tags,
first without a value (yielding the default color) and then with an assigned color value.
下面的代码把指令的myHighlight属性(Attribute)填加到两个<div>标签里,一个没有赋值,一个赋值了颜色。
src/app/app.component.html (highlight)
The following image shows the effect of mousing over the <hero-bios-and-contacts> tag.
下图显示了鼠标移到<hero-bios-and-contacts>标签的效果:
Define dependencies with providers
使用提供商来定义依赖
This section demonstrates how to write providers that deliver dependent services.
在这个部分,我们将演示如何编写提供商来提供被依赖的服务。
Get a service from a dependency injector by giving it a token.
我们给依赖注入器提供令牌来获取服务。
You usually let Angular handle this transaction by specifying a constructor parameter and its type. The parameter type serves as the injector lookup token. Angular passes this token to the injector and assigns the result to the parameter. Here's a typical example:
我们通常在构造函数里面,为参数指定类型,让Angular来处理依赖注入。该参数类型就是依赖注入器所需的令牌。 Angular把该令牌传给注入器,然后把得到的结果赋给参数。下面是一个典型的例子:
src/app/hero-bios.component.ts (组件构造器注入)
Angular asks the injector for the service associated with the LoggerService
and assigns the returned value to the logger parameter.
Angular向注入器请求与LoggerService对应的服务,并将返回值赋给logger参数。
Where did the injector get that value? It may already have that value in its internal container. If it doesn't, it may be able to make one with the help of a provider. A provider is a recipe for delivering a service associated with a token.
注入器从哪得到的依赖? 它可能在自己内部容器里已经有该依赖了。 如果它没有,也能在提供商的帮助下新建一个。 提供商就是一个用于交付服务的配方,它被关联到一个令牌。
If the injector doesn't have a provider for the requested token, it delegates the request to its parent injector, where the process repeats until there are no more injectors. If the search is futile, the injector throws an error—unless the request was optional.
如果注入器无法根据令牌在自己内部找到对应的提供商,它便将请求移交给它的父级注入器,这个过程不断重复,直到没有更多注入器为止。 如果没找到,注入器就抛出一个错误...除非这个请求是可选的。
A new injector has no providers.
Angular initializes the injectors it creates with some providers it cares about.
You have to register your own application providers manually,
usually in the providers array of the Component or Directive metadata:
新建的注入器中没有提供商。
Angular会使用一些自带的提供商来初始化这些注入器。我们必须自行注册属于自己的提供商,通常用组件或者指令元数据中的providers数组进行注册。
src/app/app.component.ts (提供商)
Defining providers
定义提供商
The simple class provider is the most typical by far.
You mention the class in the providers array and you're done.
简单的类提供商是最典型的例子。只要在providers数值里面提到该类就可以了。
src/app/hero-bios.component.ts (类提供商)
It's that simple because the most common injected service is an instance of a class. But not every dependency can be satisfied by creating a new instance of a class. You need other ways to deliver dependency values and that means you need other ways to specify a provider.
注册类提供商之所以这么简单,是因为最常见的可注入服务就是一个类的实例。 但是,并不是所有的依赖都只要创建一个类的新实例就可以交付了。我们还需要其它的交付方式,这意味着我们也需要其它方式来指定提供商。
The HeroOfTheMonthComponent example demonstrates many of the alternatives and why you need them.
It's visually simple: a few properties and the logs produced by a logger.
HeroOfTheMonthComponent例子示范了一些替代方案,展示了为什么需要它们。
它看起来很简单:一些属性和一个日志输出。

The code behind it gives you plenty to think about.
这段代码的背后有很多值得深入思考的地方。
hero-of-the-month.component.ts
The provide object literal
provide对象
The provide object literal takes a token and a definition object.
The token is usually a class but it doesn't have to be.
该provide对象需要一个令牌和一个定义对象。该令牌通常是一个类,但并非一定是
The definition object has a required property that specifies how to create the singleton instance of the service. In this case, the property.
该定义对象有一个主属性(即userValue),用来标识该提供商会如何新建和返回依赖。
useValue — the value provider
useValue - *值-提供商
Set the useValue property to a **fixed value* that the provider can return as the service instance (AKA, the "dependency object").
把一个*固定的值,也就是该提供商可以将其作为依赖对象返回的值,赋给userValue属性。
Use this technique to provide runtime configuration constants such as website base addresses and feature flags. You can use a value provider in a unit test to replace a production service with a fake or mock.
使用该技巧来进行运行期常量设置,比如网站的基础地址和功能标志等。 我们通常在单元测试中使用值-提供商,用一个假的或模仿的(服务)来取代一个生产环境的服务。
The HeroOfTheMonthComponent example has two value providers.
The first provides an instance of the Hero class;
the second specifies a literal string resource:
HeroOfTheMonthComponent例子有两个值-提供商。
第一个提供了一个Hero类的实例;第二个指定了一个字符串资源:
The Hero provider token is a class which makes sense because the value is a Hero
and the consumer of the injected hero would want the type information.
Hero提供商的令牌是一个类,这很合理,因为它提供的结果是一个Hero实例,并且被注入该英雄的消费者也需要知道它类型信息。
The TITLE provider token is not a class.
It's a special kind of provider lookup key called an InjectionToken.
You can use an InjectionToken for any kind of provider but it's particular
helpful when the dependency is a simple value like a string, a number, or a function.
TITLE 提供商的令牌不是一个类。它是一个特别类型的提供商查询键,名叫InjectionToken.
你可以把InjectionToken用作任何类型的提供商的令牌,但是它在依赖是简单类型(比如字符串、数字、函数)时会特别有帮助。
The value of a value provider must be defined now. You can't create the value later.
Obviously the title string literal is immediately available.
The someHero variable in this example was set earlier in the file:
一个值-提供商的值必须要立即定义。不能事后再定义它的值。很显然,标题字符串是立刻可用的。
该例中的someHero变量是以前在下面这个文件中定义的:
The other providers create their values lazily when they're needed for injection.
其它提供商只在需要注入它们的时候才创建并惰性加载它们的值。
useClass — the class provider
useClass - 类-提供商
The useClass provider creates and returns new instance of the specified class.
userClass提供商创建并返回一个指定类的新实例。
Use this technique to substitute an alternative implementation for a common or default class. The alternative could implement a different strategy, extend the default class, or fake the behavior of the real class in a test case.
使用该技术来为公共或默认类提供备选实现。该替代品能实现一个不同的策略,比如拓展默认类或者在测试的时候假冒真实类。
Here are two examples in the HeroOfTheMonthComponent:
请看下面HeroOfTheMonthComponent里的两个例子:
The first provider is the de-sugared, expanded form of the most typical case in which the
class to be created (HeroService) is also the provider's dependency injection token.
It's in this long form to de-mystify the preferred short form.
第一个提供商是展开了语法糖的,是一个典型情况的展开。一般来说,被新建的类(HeroService)同时也是该提供商的注入令牌。
这里用完整形态来编写它,来反衬我们更喜欢的缩写形式。
The second provider substitutes the DateLoggerService for the LoggerService.
The LoggerService is already registered at the AppComponent level.
When this component requests the LoggerService, it receives the DateLoggerService instead.
第二个提供商使用DateLoggerService来满足LoggerService。该LoggerService在AppComponent级别已经被注册。当这个组件要求LoggerService的时候,它得到的却是DateLoggerService服务。
This component and its tree of child components receive the DateLoggerService instance.
Components outside the tree continue to receive the original LoggerService instance.
这个组件及其子组件会得到DateLoggerService实例。这个组件树之外的组件得到的仍是LoggerService实例。
The DateLoggerService inherits from LoggerService; it appends the current date/time to each message:
DateLoggerService从LoggerService继承;它把当前的日期/时间附加到每条信息上。
src/app/date-logger.service.ts
useExisting—the alias provider
useExisting - 别名-提供商
The useExisting provider maps one token to another.
In effect, the first token is an alias for the service associated with the second token,
creating two ways to access the same service object.
使用useExisting,提供商可以把一个令牌映射到另一个令牌上。实际上,第一个令牌是第二个令牌所对应的服务的一个别名,创造了访问同一个服务对象的两种方法。
Narrowing an API through an aliasing interface is one important use case for this technique. The following example shows aliasing for that purpose.
通过使用别名接口来把一个API变窄,是一个很重要的该技巧的使用例子。我们在这里就是为了这个目的使用的别名。
Imagine that the LoggerService had a large API, much larger than the actual three methods and a property.
You might want to shrink that API surface to just the members you actually need.
Here the MinimalLogger class-interface reduces the API to two members:
想象一下如果LoggerService有个很大的API接口(虽然它其实只有三个方法,一个属性),通过使用MinimalLogger类-接口别名,就能成功的把这个API接口缩小到只暴露两个成员:
src/app/minimal-logger.service.ts
Now put it to use in a simplified version of the HeroOfTheMonthComponent.
现在,在一个简化版的HeroOfTheMonthComponent中使用它。
src/app/hero-of-the-month.component.ts (minimal version)
The HeroOfTheMonthComponent constructor's logger parameter is typed as MinimalLogger so only the logs and logInfo members are visible in a TypeScript-aware editor:
HeroOfTheMonthComponent构造函数的logger参数是一个MinimalLogger类型,支持TypeScript的编辑器里,只能看到它的两个成员logs和logInfo:

Behind the scenes,Angular actually sets the logger parameter to the full service registered under the LoggingService token
which happens to be the DateLoggerService that was provided above.
实际上,Angular确实想把logger参数设置为注入器里LoggerService的完整版本。只是在之前的提供商注册里使用了useClass,
所以该完整版本被DateLoggerService取代了。
The following image, which displays the logging date, confirms the point:
在下面的图片中,显示了日志日期,可以确认这一点:

useFactory— the factory provider
useFactory - 工厂-提供商
The useFactory provider creates a dependency object by calling a factory function
as in this example.
useFactory 提供商通过调用工厂函数来新建一个依赖对象,如下例所示。
Use this technique to create a dependency object with a factory function whose inputs are some combination of injected services and local state.
使用这项技术,可以用包含了一些依赖服务和本地状态输入的工厂函数来建立一个依赖对象。
The dependency object doesn't have to be a class instance. It could be anything. In this example, the dependency object is a string of the names of the runners-up to the "Hero of the Month" contest.
该依赖对象不一定是一个类实例。它可以是任何东西。在这个例子里,依赖对象是一个字符串,代表了本月英雄比赛的亚军的名字。
The local state is the number 2, the number of runners-up this component should show.
It executes runnersUpFactory immediately with 2.
本地状态是数字2,该组件应该显示的亚军的个数。我们立刻用2来执行runnersUpFactory。
The runnersUpFactory itself isn't the provider factory function.
The true provider factory function is the function that runnersUpFactory returns.
runnersUpFactory自身不是提供商工厂函数。真正的提供商工厂函数是runnersUpFactory返回的函数。
runners-up.ts (excerpt)
That returned function takes a winning Hero and a HeroService as arguments.
这个返回的函数需要一个Hero和一个HeroService参数。
Angular supplies these arguments from injected values identified by
the two tokens in the deps array.
The two deps values are tokens that the injector uses
to provide these factory function dependencies.
Angular通过使用deps数组中的两个令牌,来识别注入的值,用来提供这些参数。这两个deps值是供注入器使用的令牌,用来提供工厂函数的依赖。
After some undisclosed work, the function returns the string of names
and Angular injects it into the runnersUp parameter of the HeroOfTheMonthComponent.
一些内部工作后,这个函数返回名字字符串,Angular将其注入到HeroOfTheMonthComponent组件的runnersUp参数里。
The function retrieves candidate heroes from the HeroService,
takes 2 of them to be the runners-up, and returns their concatenated names.
Look at the
该函数从HeroService获取英雄参赛者,从中取2个作为亚军,并把它们的名字拼接起来。请到
Provider token alternatives: the class-interface and InjectionToken
备选提供商令牌:类-接口和InjectionToken
Angular dependency injection is easiest when the provider token is a class that is also the type of the returned dependency object , orwhat you usually call the service.
Angular依赖注入当令牌是类的时候是最简单的,该类同时也是返回的依赖对象的类型(通常直接称之为服务)。
But the token doesn't have to be a class and even when it is a class, it doesn't have to be the same type as the returned object. That's the subject of the next section.
但令牌不一定都是类,就算它是一个类,它也不一定都返回类型相同的对象。这是下一节的主题。
class-interface
The previous Hero of the Month example used the MinimalLogger class
as the token for a provider of a LoggerService.
在前面的每月英雄的例子中,我们用了MinimalLogger类作为LoggerService 提供商的令牌。
The MinimalLogger is an abstract class.
该MinimalLogger是一个抽象类。
You usually inherit from an abstract class.
But no class in this application inherits from MinimalLogger.
我们通常从一个抽象类继承。但这个应用中并没有类会继承MinimalLogger。
The LoggerService and the DateLoggerService could have inherited from MinimalLogger.
They could have implemented it instead in the manner of an interface.
But they did neither.
The MinimalLogger is used exclusively as a dependency injection token.
LoggerService和DateLoggerService本可以从MinimalLogger中继承。
它们也可以实现MinimalLogger,而不用单独定义接口。
但它们没有。
MinimalLogger在这里仅仅被用作一个 "依赖注入令牌"。
When you use a class this way, it's called a class-interface. The key benefit of a class-interface is that you can get the strong-typing of an interface and you can use it as a provider token in the way you would a normal class.
我们称这种用法的类叫做类-接口。它关键的好处是:提供了接口的强类型,能像正常类一样把它当做提供商令牌使用。
A class-interface should define only the members that its consumers are allowed to call. Such a narrowing interface helps decouple the concrete class from its consumers.
类-接口应该只定义允许它的消费者调用的成员。窄的接口有助于解耦该类的具体实现和它的消费者。
Why MinimalLogger is a class and not a TypeScript interface
为什么MinimalLogger是一个类而不是一个TypeScript接口
You can't use an interface as a provider token because interfaces are not JavaScript objects. They exist only in the TypeScript design space. They disappear after the code is transpiled to JavaScript.
不能把接口当做提供商的令牌,因为接口不是有效的JavaScript对象。 它们只存在在TypeScript的设计空间里。它们会在被编译为JavaScript之后消失。
A provider token must be a real JavaScript object of some kind: such as a function, an object, a string, or a class.
一个提供商令牌必须是一个真实的JavaScript对象,比如:一个函数,一个对象,一个字符串,或一个类。
Using a class as an interface gives you the characteristics of an interface in a real JavaScript object.
把类当做接口使用,可以为我们在一个JavaScript对象上提供类似于接口的特性。
Of course a real object occupies memory. To minimize memory cost, the class should have no implementation.
The MinimalLogger transpiles to this unoptimized, pre-minified JavaScript for a constructor function:
当然,一个真实的类会占用内存。为了节省内存占用,该类应该没有具体的实现。MinimalLogger会被转译成下面这段没有优化过的,尚未最小化的JavaScript:
Notice that it doesn't have a single member. It never grows no matter how many members you add to the class as long as those members are typed but not implemented. Look again at the TypeScript MinimalLogger class to confirm that it has no implementation.
注意,只要不实现它,不管添加多少成员,它永远不会增长大小。
InjectionToken
Dependency objects can be simple values like dates, numbers and strings, or shapeless objects like arrays and functions.
依赖对象可以是一个简单的值,比如日期,数字和字符串,或者一个无形的对象,比如数组和函数。
Such objects don't have application interfaces and therefore aren't well represented by a class. They're better represented by a token that is both unique and symbolic, a JavaScript object that has a friendly name but won't conflict with another token that happens to have the same name.
这样的对象没有应用程序接口,所以不能用一个类来表示。更适合表示它们的是:唯一的和符号性的令牌,一个JavaScript对象,拥有一个友好的名字,但不会与其它的同名令牌发生冲突。
The InjectionToken has these characteristics.
You encountered them twice in the Hero of the Month example,
in the title value provider and in the runnersUp factory provider.
InjectionToken具有这些特征。在Hero of the Month例子中遇见它们两次,一个是title的值,一个是runnersUp 工厂提供商。
You created the TITLE token like this:
这样创建TITLE令牌:
The type parameter, while optional, conveys the dependency's type to developers and tooling. The token description is another developer aid.
带类型(可选)的参数,向开发人员和开发工具揭示了该依赖的类型。 令牌描述则通过另一种形式给开发人员提供帮助。
Inject into a derived class
注入到派生类
Take care when writing a component that inherits from another component. If the base component has injected dependencies, you must re-provide and re-inject them in the derived class and then pass them down to the base class through the constructor.
当编写一个继承自另一个组件的组件时,要格外小心。如果基础组件有依赖注入,必须要在派生类中重新提供和重新注入它们,并将它们通过构造函数传给基类。
In this contrived example, SortedHeroesComponent inherits from HeroesBaseComponent
to display a sorted list of heroes.
在这个生造的例子里,SortedHeroesComponent继承自HeroesBaseComponent,显示一个被排序的英雄列表。

The HeroesBaseComponent could stand on its own.
It demands its own instance of the HeroService to get heroes
and displays them in the order they arrive from the database.
HeroesBaseComponent能自己独立运行。它在自己的实例里要求HeroService,用来得到英雄,并将它们按照数据库返回的顺序显示出来。
src/app/sorted-heroes.component.ts (HeroesBaseComponent)
Keep constructors simple. They should do little more than initialize variables.
This rule makes the component safe to construct under test without fear that it will do something dramatic like talk to the server.
That's why you call the HeroService from within the ngOnInit rather than the constructor.
让构造函数保持简单。它们应该只用来初始化变量。这个规则会帮助我们在测试环境中放心的构造组件,以免在构造它们时,无意做了一些非常戏剧化的动作(比如连接服务)。
这就是为什么我们要在ngOnInit里面调用HeroService,而不是在构造函数中。
Users want to see the heroes in alphabetical order.
Rather than modify the original component, sub-class it and create a
SortedHeroesComponent that sorts the heroes before presenting them.
The SortedHeroesComponent lets the base class fetch the heroes.
用户希望看到英雄按字母顺序排序。与其修改原始的组件,不如派生它,新建SortedHeroesComponent,以便展示英雄之前进行排序。
SortedHeroesComponent让基类来获取英雄。
Unfortunately, Angular cannot inject the HeroService directly into the base class.
You must provide the HeroService again for this component,
then pass it down to the base class inside the constructor.
可惜,Angular不能直接在基类里直接注入HeroService。必须在这个组件里再次提供HeroService,然后通过构造函数传给基类。
src/app/sorted-heroes.component.ts (SortedHeroesComponent)
Now take note of the afterGetHeroes() method.
Your first instinct might have been to create an ngOnInit method in SortedHeroesComponent and do the sorting there.
But Angular calls the derived class's ngOnInit before calling the base class's ngOnInit
so you'd be sorting the heroes array before they arrived. That produces a nasty error.
现在,请注意afterGetHeroes()方法。
我们第一反应是在SortedHeroesComponent组件里面建一个ngOnInit方法来做排序。但是Angular会先调用派生类的ngOnInit,后调用基类的ngOnInit,
所以可能在英雄到达之前就开始排序。这就产生了一个讨厌的错误。
Overriding the base class's afterGetHeroes() method solves the problem.
覆盖基类的afterGetHeroes()方法可以解决这个问题。
These complications argue for avoiding component inheritance.
分析上面的这些复杂性是为了强调避免使用组件继承这一点。
Find a parent component by injection
通过注入来找到一个父组件
Application components often need to share information. More loosely coupled techniques such as data binding and service sharing are preferable. But sometimes it makes sense for one component to have a direct reference to another component perhaps to access values or call methods on that component.
应用程序组件经常需要共享信息。我们喜欢更加松耦合的技术,比如数据绑定和服务共享。 但有时候组件确实需要拥有另一个组件的引用,用来访问该组件的属性值或者调用它的方法。
Obtaining a component reference is a bit tricky in Angular. Although an Angular application is a tree of components, there is no public API for inspecting and traversing that tree.
在Angular里,获取一个组件的引用比较复杂。虽然Angular应用程序是一个组件树,但它没有公开的API来在该树中巡查和穿梭。
There is an API for acquiring a child reference.
Check out Query, QueryList, ViewChildren, and ContentChildren
in the API Reference.
有一个API可以获取子级的引用(请看API参考手册中的Query, QueryList, ViewChildren,和ContentChildren)。
There is no public API for acquiring a parent reference. But because every component instance is added to an injector's container, you can use Angular dependency injection to reach a parent component.
但没有公开的API来获取父组件的引用。但是因为每个组件的实例都被加到了依赖注入器的容器中,可以使用Angular依赖注入来找到父组件。
This section describes some techniques for doing that.
本章节描述了这项技术。
#known-parentFind a parent component of known type
找到已知类型的父组件
You use standard class injection to acquire a parent component whose type you know.
我们使用标准的类注入来获取已知类型的父组件。
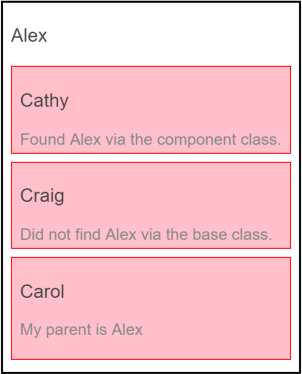
In the following example, the parent AlexComponent has several children including a CathyComponent:
在下面的例子中,父组件AlexComponent有几个子组件,包括CathyComponent:
parent-finder.component.ts (AlexComponent v.1)
Cathy reports whether or not she has access to Alex
after injecting an AlexComponent into her constructor:
在注入AlexComponent`进来后,Cathy报告它是否对Alex*有访问权:
parent-finder.component.ts (CathyComponent)
Notice that even though the @Optional qualifier
is there for safety,
the alex parameter is set.
安全起见,我们添加了@Optional装饰器,但是alex参数确实被设置了。
Cannot find a parent by its base class
无法通过它的基类找到一个父级
What if you don't know the concrete parent component class?
如果不知道具体的父组件类名怎么办?
A re-usable component might be a child of multiple components. Imagine a component for rendering breaking news about a financial instrument. For business reasons, this news component makes frequent calls directly into its parent instrument as changing market data streams by.
一个可复用的组件可能是多个组件的子级。想象一个用来渲染金融工具头条新闻的组件。为了合理(咳咳)的商业理由,该新闻组件在实时变化的市场数据流过时,要频繁的直接调用其父级工具。
The app probably defines more than a dozen financial instrument components.
If you're lucky, they all implement the same base class
whose API your NewsComponent understands.
该应用程序可能有多于一打的金融工具组件。如果幸运,它们可能会从同一个基类派生,其API是NewsComponent组件所能理解的。
Looking for components that implement an interface would be better. That's not possible because TypeScript interfaces disappear from the transpiled JavaScript, which doesn't support interfaces. There's no artifact to look for.
更好的方式是通过接口来寻找实现了它的组件。但这是不可能的,因为TypeScript的接口在编译成JavaScript以后就消失了,JavaScript不支持接口。我们没有东西可查。
This isn't necessarily good design. This example is examining whether a component can inject its parent via the parent's base class.
这并不是好的设计。问题是一个组件是否能通过它父组件的基类来注入它的父组件呢?
The sample's CraigComponent explores this question. Looking back ,
you see that the Alex component extends (inherits) from a class named Base.
CraigComponent例子探究了这个问题。[往回看Alex]{#alex},我们看到Alex组件扩展(派生)自一个叫Base的类。
parent-finder.component.ts (Alex class signature)
The CraigComponent tries to inject Base into its alex constructor parameter and reports if it succeeded.
CraigComponent试图把Base注入到到它的alex构造函数参数,来报告是否成功。
parent-finder.component.ts (CraigComponent)
Unfortunately, this does not work.
The alex parameter is null.
You cannot inject a parent by its base class.
可惜这样不行。alex参数是null。
不能通过基类注入父组件。
Find a parent by its class-interface
通过类-接口找到父组件
You can find a parent component with a class-interface.
可以通过类-接口找到一个父组件。
The parent must cooperate by providing an alias to itself in the name of a class-interface token.
该父组件必须通过提供一个与类-接口令牌同名的别名来与之合作。
Recall that Angular always adds a component instance to its own injector; that's why you could inject Alex into Cathy earlier.
请记住Angular总是从它自己的注入器添加一个组件实例;这就是为什么在之前可以Alex注入到Carol。
Write an alias provider—a provide object literal with a useExisting
definition—that creates an alternative way to inject the same component instance
and add that provider to the providers array of the @Component metadata for the AlexComponent:
我们编写一个别名提供商 &mdash;一个拥有useExisting定义的provide函数 —
它新建一个备选的方式来注入同一个组件实例,并把这个提供商添加到AlexComponent的@Component元数据里的providers数组。
parent-finder.component.ts (AlexComponent providers)
Parent is the provider's class-interface token.
The forwardRef breaks the circular reference you just created by having the AlexComponent refer to itself.
Parent是该提供商的类-接口令牌。AlexComponent引用了自身,造成循环引用,使用forwardRef打破了该循环。
Carol, the third of Alex's child components, injects the parent into its parent parameter,
the same way you've done it before:
Carol,Alex的第三个子组件,把父级注入到了自己的parent参数,和之前做的一样:
parent-finder.component.ts (CarolComponent class)
Here's Alex and family in action:
下面是Alex和其家庭的运行结果:
Find the parent in a tree of parentswith @SkipSelf()
通过父级树找到父组件
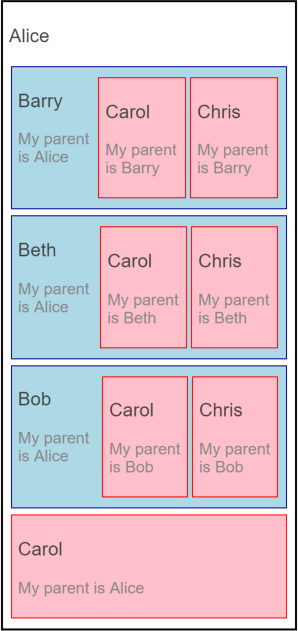
Imagine one branch of a component hierarchy: Alice -> Barry -> Carol.
Both Alice and Barry implement the Parent class-interface.
想象组件树中的一个分支为:Alice -> Barry -> Carol。
Alice和Barry都实现了这个Parent类-接口。
Barry is the problem. He needs to reach his parent, Alice, and also be a parent to Carol.
That means he must both inject the Parent class-interface to get Alice and
provide a Parent to satisfy Carol.
Barry是个问题。它需要访问它的父组件Alice,但同时它也是Carol的父组件。这个意味着它必须同时注入Parent类-接口来获取Alice,和提供一个Parent来满足Carol。
Here's Barry:
下面是Barry的代码:
parent-finder.component.ts (BarryComponent)
Barry's providers array looks just like Alex's.
If you're going to keep writing alias providers like this you should create a helper function.
Barry的providers数组看起来很像Alex的那个.
如果准备一直像这样编写别名提供商的话,我们应该建立一个帮助函数。
For now, focus on Barry's constructor:
眼下,请注意Barry的构造函数:
It's identical to Carol's constructor except for the additional @SkipSelf decorator.
除额外添加了一个的@SkipSelf外,它和Carol的构造函数一样。
@SkipSelf is essential for two reasons:
添加@SkipSelf主要是出于两个原因:
It tells the injector to start its search for a
Parentdependency in a component above itself, which is what parent means.它告诉注入器从一个在自己上一级的组件开始搜索一个
Parent依赖。Angular throws a cyclic dependency error if you omit the
@SkipSelfdecorator.如果没写
@SkipSelf装饰器的话,Angular就会抛出一个循环依赖错误。Cannot instantiate cyclic dependency! (BethComponent -> Parent -> BethComponent)不能创建循环依赖实例!(BethComponent -> Parent -> BethComponent)
Here's Alice, Barry and family in action:
这里是Alice,Barry和该家庭的操作演示:
The Parent class-interface
Parent类-接口
You learned earlier that a class-interface is an abstract class used as an interface rather than as a base class.
我们以前学过:类-接口是一个抽象类,被当成一个接口使用,而非基类。
The example defines a Parent class-interface.
我们的例子定义了一个Parent类-接口。
parent-finder.component.ts (Parent class-interface)
The Parent class-interface defines a name property with a type declaration but no implementation.
The name property is the only member of a parent component that a child component can call.
Such a narrow interface helps decouple the child component class from its parent components.
该Parent类-接口定义了Name属性,它有类型声明,但是没有实现,该name是该父级的所有子组件们唯一能调用的属性。
这种“窄接口”有助于解耦子组件类和它的父组件。
A component that could serve as a parent should implement the class-interface as the AliceComponent does:
一个能用做父级的组件应该实现类-接口,和下面的AliceComponent的做法一样:
parent-finder.component.ts (AliceComponent class signature)
Doing so adds clarity to the code. But it's not technically necessary.
Although the AlexComponent has a name property, as required by its Base class,
its class signature doesn't mention Parent:
这样做可以提升代码的清晰度,但严格来说并不是必须的。虽然AlexComponent有一个name属性(来自Base类的要求),但它的类签名并不需要提及Parent。
parent-finder.component.ts (AlexComponent class signature)
The AlexComponent should implement Parent as a matter of proper style.
It doesn't in this example only to demonstrate that the code will compile and run without the interface
为了正确的代码风格,该AlexComponent应该实现Parent。在这个例子里它没有这样,只是为了演示在没有该接口的情况下,该代码仍会被正确编译并运行。
A provideParent() helper function
provideParent()助手函数
Writing variations of the same parent alias provider gets old quickly, especially this awful mouthful with a forwardRef:
编写父组件相同的各种别名提供商很快就会变得啰嗦,在用*forwardRef的时候尤其绕口:
You can extract that logic into a helper function like this:
可以像这样把该逻辑抽取到一个助手函数里:
Now you can add a simpler, more meaningful parent provider to your components:
现在就可以为组件添加一个更简单、直观的父级提供商了:
You can do better. The current version of the helper function can only alias the Parent class-interface.
The application might have a variety of parent types, each with its own class-interface token.
我们可以做得更好。当前版本的助手函数只能为Parent类-接口提供别名。应用程序可能有很多类型的父组件,每个父组件有自己的类-接口令牌。
Here's a revised version that defaults to parent but also accepts an optional second parameter for a different parent class-interface.
下面是一个修改版本,默认接受一个Parent,但同时接受一个可选的第二参数,可以用来指定一个不同的父级类-接口。
And here's how you could use it with a different parent type:
下面的代码演示了如何使它添加一个不同类型的父级:
Break circularities with a forward class reference (forwardRef)
使用一个前向引用(forwardRef)来打破循环
The order of class declaration matters in TypeScript. You can't refer directly to a class until it's been defined.
在TypeScript里面,类声明的顺序是很重要的。如果一个类尚未定义,就不能引用它。
This isn't usually a problem, especially if you adhere to the recommended one class per file rule. But sometimes circular references are unavoidable. You're in a bind when class 'A' refers to class 'B' and 'B' refers to 'A'. One of them has to be defined first.
这通常不是一个问题,特别是当我们遵循一个文件一个类规则的时候。 但是有时候循环引用可能不能避免。当一个类A引用类B,同时'B'引用'A'的时候,我们就陷入困境了:它们中间的某一个必须要先定义。
The Angular forwardRef() function creates an indirect reference that Angular can resolve later.
Angular的forwardRef()函数建立一个间接地引用,Angular可以随后解析。
The Parent Finder sample is full of circular class references that are impossible to break.
Parent Finder是一个充满了无法解决的循环引用的例子
You face this dilemma when a class makes a reference to itself
as does the AlexComponent in its providers array.
The providers array is a property of the @Component decorator function which must
appear above the class definition.
当一个类需要引用自身的时候,我们面临同样的困境,就像在AlexComponent的provdiers数组中遇到的困境一样。
该providers数组是一个@Component装饰器函数的一个属性,它必须在类定义之前出现。
Break the circularity with forwardRef:
我们使用forwardRef来打破这种循环: