A component has a lifecycle managed by Angular .
每个组件都有一个被Angular管理的生命周期。
Angular creates it, renders it, creates and renders its children, checks it when its data-bound properties change, and destroys it before removing it from the DOM.
Angular创建它,渲染它,创建并渲染它的子组件,在它被绑定的属性发生变化时检查它,并在它从DOM中被移除前销毁它。
Angular offers lifecycle hooks that provide visibility into these key life moments and the ability to act when they occur.
Angular提供了生命周期钩子,把这些关键生命时刻暴露出来,赋予我们在它们发生时采取行动的能力。
A directive has the same set of lifecycle hooks, minus the hooks that are specific to component content and views.
除了那些组件内容和视图相关的钩子外,指令有相同生命周期钩子。
Contents
目录
Try the
试一试
Component lifecycle hooks overview
组件生命周期钩子概览
Directive and component instances have a lifecycle
as Angular creates, updates, and destroys them.
Developers can tap into key moments in that lifecycle by implementing
one or more of the lifecycle hook interfaces in the Angular core library.
指令和组件的实例有一个生命周期:新建、更新和销毁。
通过实现一个或多个Angular core库里定义的生命周期钩子接口,开发者可以介入该生命周期中的这些关键时刻。
Each interface has a single hook method whose name is the interface name prefixed with ng.
For example, the OnInit interface has a hook method named ngOnInit()
that Angular calls shortly after creating the component:
每个接口都有唯一的一个钩子方法,它们的名字是由接口名再加上ng前缀构成的。比如,OnInit接口的钩子方法叫做ngOnInit,
Angular在创建组件后立刻调用它,:
peek-a-boo.component.ts (excerpt)
No directive or component will implement all of the lifecycle hooks and some of the hooks only make sense for components. Angular only calls a directive/component hook method if it is defined.
没有指令或者组件会实现所有这些接口,并且有些钩子只对组件有意义。只有在指令/组件中定义过的那些钩子方法才会被Angular调用。
Lifecycle sequence
生命周期的顺序
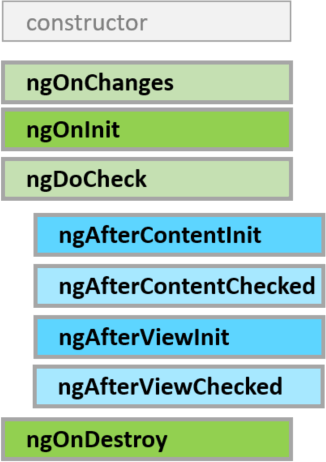
After creating a component/directive by calling its constructor, Angular calls the lifecycle hook methods in the following sequence at specific moments:
当Angular使用构造函数新建一个组件或指令后,就会按下面的顺序在特定时刻调用这些生命周期钩子方法:
Hook 钩子 | Purpose and Timing 目的和时机 |
|---|---|
ngOnChanges() | Respond when Angular (re)sets data-bound input properties.
The method receives a 当Angular(重新)设置数据绑定输入属性时响应。
该方法接受当前和上一属性值的 Called before 当被绑定的输入属性的值发生变化时调用,首次调用一定会发生在 |
ngOnInit() | Initialize the directive/component after Angular first displays the data-bound properties and sets the directive/component's input properties. 在Angular第一次显示数据绑定和设置指令/组件的输入属性之后,初始化指令/组件。 Called once, after the first 在第一轮 |
ngDoCheck() | Detect and act upon changes that Angular can't or won't detect on its own. 检测,并在发生Angular无法或不愿意自己检测的变化时作出反应。 Called during every change detection run, immediately after 在每个Angular变更检测周期中调用, |
ngAfterContentInit() | Respond after Angular projects external content into the component's view. 当把内容投影进组件之后调用。 Called once after the first 第一次 A component-only hook. 只适用于组件。 |
ngAfterContentChecked() | Respond after Angular checks the content projected into the component. 每次完成被投影组件内容的变更检测之后调用。 Called after the
A component-only hook. 只适合组件。 |
ngAfterViewInit() | Respond after Angular initializes the component's views and child views. 初始化完组件视图及其子视图之后调用。 Called once after the first 第一次 A component-only hook. 只适合组件。 |
ngAfterViewChecked() | Respond after Angular checks the component's views and child views. 每次做完组件视图和子视图的变更检测之后调用。 Called after the
A component-only hook. 只适合组件。 |
ngOnDestroy | Cleanup just before Angular destroys the directive/component. Unsubscribe Observables and detach event handlers to avoid memory leaks. 当Angular每次销毁指令/组件之前调用并清扫。 在这儿反订阅可观察对象和分离事件处理器,以防内存泄漏。 Called just before Angular destroys the directive/component. 在Angular销毁指令/组件之前调用。 |
Interfaces are optional (technically)
接口是可选的(理论上)?
The interfaces are optional for JavaScript and Typescript developers from a purely technical perspective. The JavaScript language doesn't have interfaces. Angular can't see TypeScript interfaces at runtime because they disappear from the transpiled JavaScript.
从纯技术的角度讲,接口对JavaScript和TypeScript的开发者都是可选的。JavaScript语言本身没有接口。 Angular在运行时看不到TypeScript接口,因为它们在编译为JavaScript的时候已经消失了。
Fortunately, they aren't necessary.
幸运的是,它们并不是必须的。
You don't have to add the lifecycle hook interfaces to directives and components to benefit from the hooks themselves.
我们并不需要在指令和组件上添加生命周期钩子接口就能获得钩子带来的好处。
Angular instead inspects directive and component classes and calls the hook methods if they are defined.
Angular finds and calls methods like ngOnInit(), with or without the interfaces.
Angular会去检测我们的指令和组件的类,一旦发现钩子方法被定义了,就调用它们。
Agnular会找到并调用像ngOnInit()这样的钩子方法,有没有接口无所谓。
Nonetheless, it's good practice to add interfaces to TypeScript directive classes in order to benefit from strong typing and editor tooling.
虽然如此,我们还是强烈建议你在TypeScript指令类中添加接口,以获得强类型和IDE等编辑器带来的好处。
Other Angular lifecycle hooks
其它生命周期钩子
Other Angular sub-systems may have their own lifecycle hooks apart from these component hooks.
Angular的其它子系统除了有这些组件钩子外,还可能有它们自己的生命周期钩子。
3rd party libraries might implement their hooks as well in order to give developers more control over how these libraries are used.
第三方库也可能会实现它们自己的钩子,以便让我们这些开发者在使用时能做更多的控制。
Lifecycle examples
生命周期练习
The AppComponent.
AppComponent的一些组件上进行的一系列练习,演示了生命周期钩子的运作方式。
They follow a common pattern: a parent component serves as a test rig for a child component that illustrates one or more of the lifecycle hook methods.
它们遵循了一个常用的模式:用子组件演示一个或多个生命周期钩子方法,而父组件被当作该子组件的测试台。
Here's a brief description of each exercise:
下面是每个练习简短的描述:
Component 组件 | Description 描述 |
|---|---|
| Peek-a-boo | Demonstrates every lifecycle hook. Each hook method writes to the on-screen log. 展示每个生命周期钩子,每个钩子方法都会在屏幕上显示一条日志。 |
| Spy | Directives have lifecycle hooks too.
A 指令也同样有生命周期钩子。我们新建了一个 This example applies the 本例把 |
| OnChanges | See how Angular calls the 这里将会看到:每当组件的输入属性发生变化时,Angular会如何以 |
| DoCheck | Implements an 实现了一个 |
| AfterView | Shows what Angular means by a view.
Demonstrates the 显示Angular中的视图所指的是什么。
演示了 |
| AfterContent | Shows how to project external content into a component and
how to distinguish projected content from a component's view children.
Demonstrates the 展示如何把外部内容投影进组件中,以及如何区分“投影进来的内容”和“组件的子视图”。
演示了 |
Counter 计数器 | Demonstrates a combination of a component and a directive each with its own hooks. 演示了组件和指令的组合,它们各自有自己的钩子。 In this example, a 在这个例子中,每当父组件递增它的输入属性 |
The remainder of this page discusses selected exercises in further detail.
接下来,我们将详细讨论这些练习。
Peek-a-boo: all hooks
Peek-a-boo:全部钩子
The PeekABooComponent demonstrates all of the hooks in one component.
PeekABooComponent组件演示了组件中所有可能存在的钩子。
You would rarely, if ever, implement all of the interfaces like this. The peek-a-boo exists to show how Angular calls the hooks in the expected order.
你可能很少、或者永远不会像这里一样实现所有这些接口。 我们之所以在peek-a-boo中这么做,只是为了观看Angular是如何按照期望的顺序调用这些钩子的。
This snapshot reflects the state of the log after the user clicked the Create... button and then the Destroy... button.
用户点击Create...按钮,然后点击Destroy...按钮后,日志的状态如下图所示:
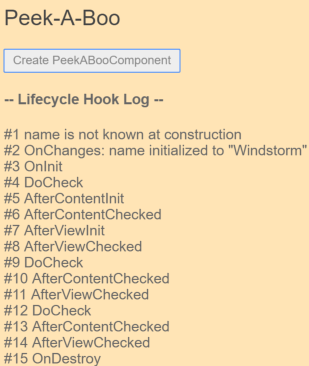
The sequence of log messages follows the prescribed hook calling order:
OnChanges, OnInit, DoCheck (3x), AfterContentInit, AfterContentChecked (3x),
AfterViewInit, AfterViewChecked (3x), and OnDestroy.
日志信息的日志和所规定的钩子调用顺序是一致的:
OnChanges、OnInit、DoCheck (3x)、AfterContentInit、AfterContentChecked (3x)、
AfterViewInit、AfterViewChecked (3x)和OnDestroy
The constructor isn't an Angular hook per se.
The log confirms that input properties (the name property in this case) have no assigned values at construction.
构造函数本质上不应该算作Angular的钩子。
记录确认了在创建期间那些输入属性(这里是name属性)没有被赋值。
Had the user clicked the Update Hero button, the log would show another OnChanges and two more triplets of
DoCheck, AfterContentChecked and AfterViewChecked.
Clearly these three hooks fire often. Keep the logic in these hooks as lean as possible!
如果我们点击Update Hero按钮,就会看到另一个OnChanges和至少两组DoCheck、AfterContentChecked和AfterViewChecked钩子。
显然,这三种钩子被触发了很多次,所以我们必须让这三种钩子里的逻辑尽可能的精简!
The next examples focus on hook details.
下一个例子就聚焦于这些钩子的细节上。
Spying OnInit and OnDestroy
窥探OnInit和OnDestroy
Go undercover with these two spy hooks to discover when an element is initialized or destroyed.
潜入这两个spy钩子来发现一个元素是什么时候被初始化或者销毁的。
This is the perfect infiltration job for a directive. The heroes will never know they're being watched.
指令是一种完美的渗透方式,我们的英雄永远不会知道该指令的存在。
Kidding aside, pay attention to two key points:
不开玩笑了,注意下面两个关键点:
Angular calls hook methods for directives as well as components.
就像对组件一样,Angular也会对指令调用这些钩子方法。
A spy directive can provide insight into a DOM object that you cannot change directly. Obviously you can't touch the implementation of a native
<div>. You can't modify a third party component either. But you can watch both with a directive.一个侦探(spy)指令可以让我们在无法直接修改DOM对象实现代码的情况下,透视其内部细节。 显然,你不能修改一个原生
<div>元素的实现代码。 你同样不能修改第三方组件。 但我们用一个指令就能监视它们了。
The sneaky spy directive is simple, consisting almost entirely of ngOnInit() and ngOnDestroy() hooks
that log messages to the parent via an injected LoggerService.
我们这个鬼鬼祟祟的侦探指令很简单,几乎完全由ngOnInit()和ngOnDestroy()钩子组成,它通过一个注入进来的LoggerService来把消息记录到父组件中去。
You can apply the spy to any native or component element and it'll be initialized and destroyed
at the same time as that element.
Here it is attached to the repeated hero <div>:
我们可以把这个侦探指令写到任何原生元素或组件元素上,它将与所在的组件同时初始化和销毁。
下面是把它附加到用来重复显示英雄数据的这个<div>上。
Each spy's birth and death marks the birth and death of the attached hero <div>
with an entry in the Hook Log as seen here:
每个“侦探”的出生和死亡也同时标记出了存放英雄的那个<div>的出生和死亡。钩子记录中的结构是这样的:
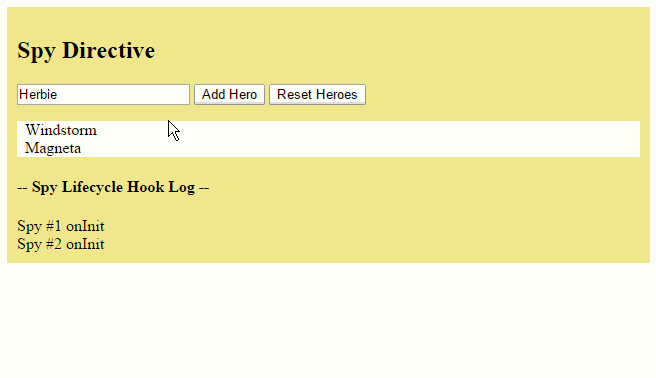
Adding a hero results in a new hero <div>. The spy's ngOnInit() logs that event.
添加一个英雄就会产生一个新的英雄<div>。侦探的ngOnInit()记录下了这个事件。
The Reset button clears the heroes list.
Angular removes all hero <div> elements from the DOM and destroys their spy directives at the same time.
The spy's ngOnDestroy() method reports its last moments.
Reset按钮清除了这个heroes列表。
Angular从DOM中移除了所有英雄的div,并且同时销毁了附加在这些div上的侦探指令。
侦探的ngOnDestroy()方法汇报了它自己的临终时刻。
The ngOnInit() and ngOnDestroy() methods have more vital roles to play in real applications.
在真实的应用程序中,ngOnInit()和ngOnDestroy()方法扮演着更重要的角色。
OnInit()
Use ngOnInit() for two main reasons:
使用ngOnInit()有两个原因:
To perform complex initializations shortly after construction.
在构造函数之后马上执行复杂的初始化逻辑
To set up the component after Angular sets the input properties.
在Angular设置完输入属性之后,对该组件进行准备。
Experienced developers agree that components should be cheap and safe to construct.
有经验的开发者认同组件的构建应该很便宜和安全。
Misko Hevery, Angular team lead, explains why you should avoid complex constructor logic.
Misko Hevery,Angular项目的头,在这里解释了你为什么应该避免复杂的构造函数逻辑。
Don't fetch data in a component constructor. You shouldn't worry that a new component will try to contact a remote server when created under test or before you decide to display it. Constructors should do no more than set the initial local variables to simple values.
不要在组件的构造函数中获取数据? 在测试环境下新建组件时或在我们决定显示它之前,我们不应该担心它会尝试联系远程服务器。 构造函数中除了使用简单的值对局部变量进行初始化之外,什么都不应该做。
An ngOnInit() is a good place for a component to fetch its initial data. The
Tour of HeroesTutorial and HTTPClient
guidesshow how.
ngOnInit()是组件获取初始数据的好地方。指南和HTTP章讲解了如何这样做。
Remember also that a directive's data-bound input properties are not set until after construction.
That's a problem if you need to initialize the directive based on those properties.
They'll have been set when ngOnInit() runs.
另外还要记住,在指令的构造函数完成之前,那些被绑定的输入属性还都没有值。
如果我们需要基于这些属性的值来初始化这个指令,这种情况就会出问题。
而当ngOnInit()执行的时候,这些属性都已经被正确的赋值过了。
The ngOnChanges() method is your first opportunity to access those properties.
Angular calls ngOnChanges() before ngOnInit() and many times after that.
It only calls ngOnInit() once.
我们访问这些属性的第一次机会,实际上是ngOnChanges()方法,Angular会在ngOnInit()之前调用它。
但是在那之后,Angular还会调用ngOnChanges()很多次。而ngOnInit()只会被调用一次。
You can count on Angular to call the ngOnInit() method soon after creating the component.
That's where the heavy initialization logic belongs.
你可以信任Angular会在创建组件后立刻调用ngOnInit()方法。
这里是放置复杂初始化逻辑的好地方。
OnDestroy()
Put cleanup logic in ngOnDestroy(), the logic that must run before Angular destroys the directive.
一些清理逻辑必须在Angular销毁指令之前运行,把它们放在ngOnDestroy()中。
This is the time to notify another part of the application that the component is going away.
这是在该组件消失之前,可用来通知应用程序中其它部分的最后一个时间点。
This is the place to free resources that won't be garbage collected automatically. Unsubscribe from Observables and DOM events. Stop interval timers. Unregister all callbacks that this directive registered with global or application services. You risk memory leaks if you neglect to do so.
这里是用来释放那些不会被垃圾收集器自动回收的各类资源的地方。 取消那些对可观察对象和DOM事件的订阅。停止定时器。注销该指令曾注册到全局服务或应用级服务中的各种回调函数。 如果不这么做,就会有导致内存泄露的风险。
OnChanges()
Angular calls its ngOnChanges() method whenever it detects changes to input properties of the component (or directive).
在这个例子中,我们监听了OnChanges钩子。
一旦检测到该组件(或指令)的输入属性发生了变化,Angular就会调用它的ngOnChanges()方法。
This example monitors the OnChanges hook.
本例监控OnChanges钩子。
on-changes.component.ts (excerpt)
The ngOnChanges() method takes an object that maps each changed property name to a
SimpleChange object holding the current and previous property values.
This hook iterates over the changed properties and logs them.
ngOnChanges()方法获取了一个对象,它把每个发生变化的属性名都映射到了一个SimpleChange对象,
该对象中有属性的当前值和前一个值。我们在这些发生了变化的属性上进行迭代,并记录它们。
The example component, OnChangesComponent, has two input properties: hero and power.
这个例子中的OnChangesComponent组件有两个输入属性:hero和power。
The host OnChangesParentComponent binds to them like this:
宿主OnChangesParentComponent绑定了它们,就像这样:
Here's the sample in action as the user makes changes.
下面是此例子中的当用户做出更改时的操作演示:
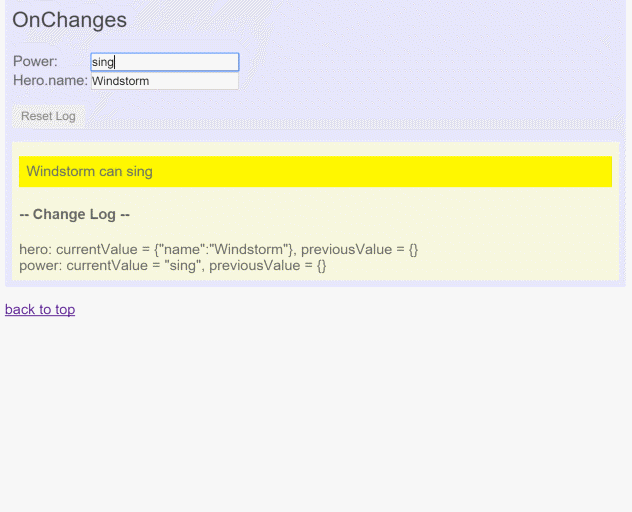
The log entries appear as the string value of the power property changes.
But the ngOnChanges does not catch changes to hero.name
That's surprising at first.
当power属性的字符串值变化时,相应的日志就出现了。
但是ngOnChanges并没有捕捉到hero.name的变化。
这是第一个意外。
Angular only calls the hook when the value of the input property changes.
The value of the hero property is the reference to the hero object.
Angular doesn't care that the hero's own name property changed.
The hero object reference didn't change so, from Angular's perspective, there is no change to report!
Angular只会在输入属性的值变化时调用这个钩子。
而hero属性的值是一个到英雄对象的引用。
Angular不会关注这个英雄对象的name属性的变化。
这个英雄对象的引用没有发生变化,于是从Angular的视角看来,也就没有什么需要报告的变化了。
DoCheck()
Use the DoCheck hook to detect and act upon changes that Angular doesn't catch on its own.
使用DoCheck钩子来检测那些Angular自身无法捕获的变更并采取行动。
Use this method to detect a change that Angular overlooked.
用这个方法来检测那些被Angular忽略的更改。
The DoCheck sample extends the OnChanges sample with the following ngDoCheck() hook:
DoCheck范例通过下面的ngDoCheck()实现扩展了OnChanges范例:
DoCheckComponent (ngDoCheck)
This code inspects certain values of interest, capturing and comparing their current state against previous values.
It writes a special message to the log when there are no substantive changes to the hero or the power
so you can see how often DoCheck is called. The results are illuminating:
该代码检测一些相关的值,捕获当前值并与以前的值进行比较。
当英雄或它的超能力发生了非实质性改变时,我们就往日志中写一条特殊的消息。
这样你可以看到DoCheck被调用的频率。结果非常显眼:
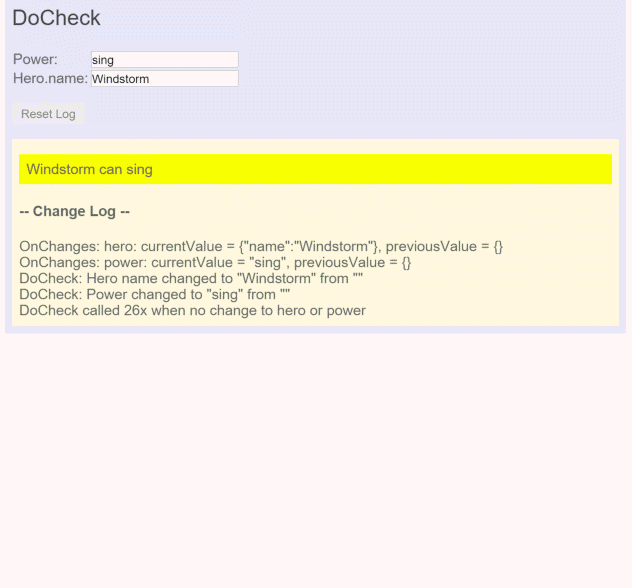
While the ngDoCheck() hook can detect when the hero's name has changed, it has a frightful cost.
This hook is called with enormous frequency—after every
change detection cycle no matter where the change occurred.
It's called over twenty times in this example before the user can do anything.
虽然ngDoCheck()钩子可以可以监测到英雄的name什么时候发生了变化。但我们必须小心。
这个ngDoCheck钩子被非常频繁的调用 —— 在每次变更检测周期之后,发生了变化的每个地方都会调它。
在这个例子中,用户还没有做任何操作之前,它就被调用了超过二十次。
Most of these initial checks are triggered by Angular's first rendering of unrelated data elsewhere on the page.
Mere mousing into another <input> triggers a call.
Relatively few calls reveal actual changes to pertinent data.
Clearly our implementation must be very lightweight or the user experience suffers.
大部分检查的第一次调用都是在Angular首次渲染该页面中其它不相关数据时触发的。
仅仅把鼠标移到其它<input>中就会触发一次调用。
只有相对较少的调用才是由于对相关数据的修改而触发的。
显然,我们的实现必须非常轻量级,否则将损害用户体验。
We also see that the ngOnChanges method is called in contradiction of the
incorrect API documentation.
我们还看到,ngOnChanges方法的调用方式与API文档中是不一样的,这是因为API文档过时了。
(译注:这是经过与官方开发组沟通得到的消息,由于代码快速迭代,因此API文档现在的更新不够及时,将来会进行一次系统的梳理和更正)
AfterView
The AfterView sample explores the AfterViewInit() and AfterViewChecked() hooks that Angular calls
after it creates a component's child views.
AfterView例子展示了AfterViewInit()和AfterViewChecked()钩子,Angular会在每次创建了组件的子视图后调用它们。
Here's a child view that displays a hero's name in an <input>:
下面是一个子视图,它用来把英雄的名字显示在一个<input>中:
ChildComponent
The AfterViewComponent displays this child view within its template:
AfterViewComponent把这个子视图显示在它的模板中:
AfterViewComponent (template)
The following hooks take action based on changing values within the child view, which can only be reached by querying for the child view via the property decorated with @ViewChild.
下列钩子基于子视图中的每一次数据变更采取行动,我们只能通过带@ViewChild装饰器的属性来访问子视图。
AfterViewComponent (class excerpts)
Abide by the unidirectional data flow rule
遵循单向数据流规则
The doSomething() method updates the screen when the hero name exceeds 10 characters.
当英雄的名字超过10个字符时,doSomething()方法就会更新屏幕。
AfterViewComponent (doSomething)
Why does the doSomething() method wait a tick before updating comment?
为什么在更新comment属性之前,doSomething()方法要等上一拍(tick)?
Angular's unidirectional data flow rule forbids updates to the view after it has been composed. Both of these hooks fire after the component's view has been composed.
Angular的“单向数据流”规则禁止在一个视图已经被组合好之后再更新视图。 而这两个钩子都是在组件的视图已经被组合好之后触发的。
Angular throws an error if the hook updates the component's data-bound comment property immediately (try it!).
The LoggerService.tick_then() postpones the log update
for one turn of the browser's JavaScript cycle and that's just long enough.
如果我们立即更新组件中被绑定的comment属性,Angular就会抛出一个错误(试试!)。
LoggerService.tick_then()方法延迟更新日志一个回合(浏览器JavaScript周期回合),这样就够了。
Here's AfterView in action:
这里是AfterView的操作演示:
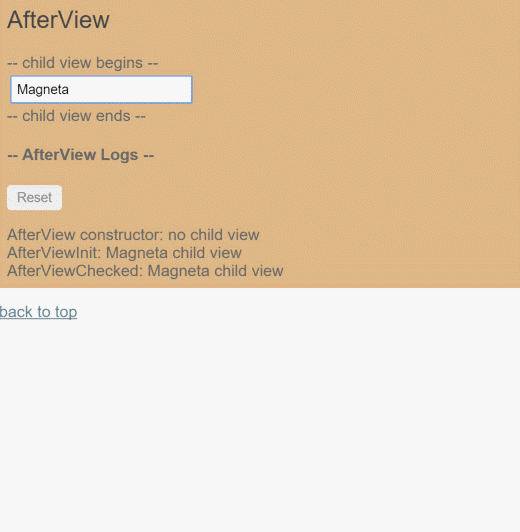
Notice that Angular frequently calls AfterViewChecked(), often when there are no changes of interest.
Write lean hook methods to avoid performance problems.
注意,Angular会频繁的调用AfterViewChecked(),甚至在并没有需要关注的更改时也会触发。
所以务必把这个钩子方法写得尽可能精简,以免出现性能问题。
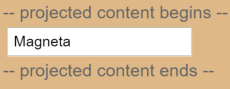
AfterContent
The AfterContent sample explores the AfterContentInit() and AfterContentChecked() hooks that Angular calls
after Angular projects external content into the component.
AfterContent例子展示了AfterContentInit()和AfterContentChecked()钩子,Angular会在外来内容被投影到组件中之后调用它们。
Content projection
内容投影
Content projection is a way to import HTML content from outside the component and insert that content into the component's template in a designated spot.
内容投影是从组件外部导入HTML内容,并把它插入在组件模板中指定位置上的一种途径。
AngularJS developers know this technique as transclusion.
AngularJS的开发者大概知道一项叫做transclusion的技术,对,这就是它的马甲。
Consider this variation on the previous AfterView example.
This time, instead of including the child view within the template, it imports the content from
the AfterContentComponent's parent. Here's the parent's template:
对比前一个例子考虑这个变化。
这次,我们不再通过模板来把子视图包含进来,而是改从AfterContentComponent的父组件中导入它。下面是父组件的模板:
AfterContentParentComponent (template excerpt)
Notice that the <my-child> tag is tucked between the <after-content> tags.
Never put content between a component's element tags unless you intend to project that content
into the component.
注意,<my-child>标签被包含在<after-content>标签中。
永远不要在组件标签的内部放任何内容 —— 除非我们想把这些内容投影进这个组件中。
Now look at the component's template:
现在来看下<after-content>组件的模板:
AfterContentComponent (template)
The <ng-content> tag is a placeholder for the external content.
It tells Angular where to insert that content.
In this case, the projected content is the <my-child> from the parent.
<ng-content>标签是外来内容的占位符。
它告诉Angular在哪里插入这些外来内容。
在这里,被投影进去的内容就是来自父组件的<my-child>标签。
The telltale signs of content projection are twofold:
下列迹象表明存在着内容投影:
HTML between component element tags.
在组件的元素标签中有HTML
The presence of
<ng-content>tags in the component's template.组件的模板中出现了
<ng-content>标签
AfterContent hooks
AfterContent钩子
AfterContent hooks are similar to the AfterView hooks. The key difference is in the child component.
AfterContent钩子和AfterView相似。关键的不同点是子组件的类型不同。
The AfterView hooks concern
ViewChildren, the child components whose element tags appear within the component's template.AfterView钩子所关心的是
ViewChildren,这些子组件的元素标签会出现在该组件的模板里面。The AfterContent hooks concern
ContentChildren, the child components that Angular projected into the component.AfterContent钩子所关心的是
ContentChildren,这些子组件被Angular投影进该组件中。
The following AfterContent hooks take action based on changing values in a content child, which can only be reached by querying for them via the property decorated with @ContentChild.
下列AfterContent钩子基于子级内容中值的变化而采取相应的行动,这里我们只能通过带有@ContentChild装饰器的属性来查询到“子级内容”。
AfterContentComponent (class excerpts)
No unidirectional flow worries with AfterContent
使用AfterContent时,无需担心单向数据流规则
This component's doSomething() method update's the component's data-bound comment property immediately.
There's no need to wait.
该组件的doSomething()方法立即更新了组件被绑定的comment属性。
它不用等下一回合。
Recall that Angular calls both AfterContent hooks before calling either of the AfterView hooks.
Angular completes composition of the projected content before finishing the composition of this component's view.
There is a small window between the AfterContent... and AfterView... hooks to modify the host view.
回忆一下,Angular在每次调用AfterView钩子之前也会同时调用AfterContent。 Angular在完成当前组件的视图合成之前,就已经完成了被投影内容的合成。 所以我们仍然有机会去修改那个视图。