This cookbook describes how to radically improve performance by compiling ahead-of-time (AOT) during a build process.
这个烹饪指南描述如何通过在构建过程中进行预编译(Ahead of Time - AOT)来从根本上提升性能。
Contents
目录
Overview
概览
An Angular application consists largely of components and their HTML templates. Before the browser can render the application, the components and templates must be converted to executable JavaScript by the Angular compiler.
Angular应用主要包含组件和它们的HTML模板。 在浏览器可以渲染应用之前,组件和模板必须要被Angular编译器转换为可以执行的JavaScript。
Watch compiler author Tobias Bosch explain the Angular Compiler at AngularConnect 2016.
观看编译器作者Tobias Bosch在AngularConnect 2016大会里,对Angular编译器的演讲。
You can compile the app in the browser, at runtime, as the application loads, using the just-in-time (JIT) compiler. This is the standard development approach shown throughout the documentation. It's great but it has shortcomings.
你可以在浏览器中使用即时编译器(Just-in-Time - JIT)在运行期间编译该应用,也就是在应用加载时。 这是本文档中展示过的标准开发方式。 它很不错,但是有自己的缺点。
JIT compilation incurs a runtime performance penalty. Views take longer to render because of the in-browser compilation step. The application is bigger because it includes the Angular compiler and a lot of library code that the application won't actually need. Bigger apps take longer to transmit and are slower to load.
JIT编译导致运行期间的性能损耗。 由于需要在浏览器中执行这个编译过程,视图需要花更长时间才能渲染出来。 由于应用包含了Angular编译器以及大量实际上并不需要的库代码,所以文件体积也会更大。 更大的应用需要更长的时间进行传输,加载也更慢。
Compilation can uncover many component-template binding errors. JIT compilation discovers them at runtime, which is late in the process.
编译可以发现一些组件模板绑定错误。JIT编译在运行时才揭露它们,那样有点太晚了。
The ahead-of-time (AOT) compiler can catch template errors early and improve performance by compiling at build time.
而预编译(AOT)会在构建时编译,这样可以在早期截获模板错误,提高应用性能。
Ahead-of-time (AOT) vs just-in-time (JIT)
预编译(AOT) vs 即时编译(JIT)
There is actually only one Angular compiler. The difference between AOT and JIT is a matter of timing and tooling. With AOT, the compiler runs once at build time using one set of libraries; with JIT it runs every time for every user at runtime using a different set of libraries.
事实上只有一个Angular编译器,AOT和JIT之间的差别仅仅在于编译的时机和所用的工具。 使用AOT,编译器仅仅使用一组库在构建期间运行一次;使用JIT,编译器在每个用户的每次运行期间都要用不同的库运行一次。
Why do AOT compilation?
为什么需要AOT编译?
Faster rendering
渲染得更快
With AOT, the browser downloads a pre-compiled version of the application. The browser loads executable code so it can render the application immediately, without waiting to compile the app first.
使用AOT,浏览器下载预编译版本的应用程序。 浏览器直接加载运行代码,所以它可以立即渲染该应用,而不用等应用完成首次编译。
Fewer asynchronous requests
需要的异步请求更少
The compiler inlines external HTML templates and CSS style sheets within the application JavaScript, eliminating separate ajax requests for those source files.
编译器把外部HTML模板和CSS样式表内联到了该应用的JavaScript中。 消除了用来下载那些源文件的Ajax请求。
Smaller Angular framework download size
需要下载的Angular框架体积更小
There's no need to download the Angular compiler if the app is already compiled. The compiler is roughly half of Angular itself, so omitting it dramatically reduces the application payload.
如果应用已经编译过了,自然不需要再下载Angular编译器了。 该编译器差不多占了Angular自身体积的一半儿,所以,省略它可以显著减小应用的体积。
Detect template errors earlier
提早检测模板错误
The AOT compiler detects and reports template binding errors during the build step before users can see them.
AOT编译器在构建过程中检测和报告模板绑定错误,避免用户遇到这些错误。
Better security
更安全
AOT compiles HTML templates and components into JavaScript files long before they are served to the client. With no templates to read and no risky client-side HTML or JavaScript evaluation, there are fewer opportunities for injection attacks.
AOT编译远在HTML模版和组件被服务到客户端之前,将它们编译到JavaScript文件。 没有模版可以阅读,没有高风险客户端HTML或JavaScript可利用,所以注入攻击的机会较少。
Compile with AOT
用AOT进行编译
Preparing for offline compilation takes a few simple steps.
Take the Setup as a starting point.
A few minor changes to the lone app.component lead to these two class and HTML files:
AOT编译需要一些简单的准备步骤。我们先从搭建本地开发环境开始。
只要单独对app.component文件的类文件和HTML文件做少量修改就可以了。
Install a few new npm dependencies with the following command:
用下列命令安装少量新的npm依赖:
You will run the ngc compiler provided in the @angular/compiler-cli npm package
instead of the TypeScript compiler (tsc).
你要用@angular/compiler-cli包中提供的ngc编译器来代替TypeScript编译器(tsc)。
ngc is a drop-in replacement for tsc and is configured much the same way.
ngc是一个tsc的高仿替代品,它们的配置方式几乎完全一样。
ngc requires its own tsconfig.json with AOT-oriented settings.
Copy the original src/tsconfig.json to a file called tsconfig-aot.json on the project root,
then modify it as follows.
ngc需要自己的带有AOT专用设置的tsconfig.json。
把原始的tsconfig.json拷贝到一个名叫tsconfig-aot.json的文件中,然后像这样修改它:
tsconfig-aot.json
The compilerOptions section is unchanged except for one property.
Set the module to es2015.
This is important as explained later in the Tree Shaking section.
compilerOptions部分只修改了一个属性:**把module设置为es2015。
这一点非常重要,我们会在后面的摇树优化部分解释为什么。
What's really new is the ngc section at the bottom called angularCompilerOptions.
Its genDir property tells the compiler
to store the compiled output files in a new aot folder.
ngc区真正新增的内容是底部的angularCompilerOptions。
它的genDir属性告诉编译器把编译结果保存在新的aot目录下。
The "skipMetadataEmit" : true property prevents the compiler from generating metadata files with the compiled application.
Metadata files are not necessary when targeting TypeScript files, so there is no reason to include them.
"skipMetadataEmit" : true属性阻止编译器为编译后的应用生成元数据文件。
当输出成TypeScript文件时,元数据并不是必须的,因此不需要包含它们。
Component-relative template URLS
相对于组件的模板URL
The AOT compiler requires that @Component URLS for external templates and CSS files be component-relative.
That means that the value of @Component.templateUrl is a URL value relative to the component class file.
For example, an 'app.component.html' URL means that the template file is a sibling of its companion app.component.ts file.
AOT编译器要求@Component中的外部模板和CSS文件的URL是相对于组件的。
这意味着@Component.templateUrl的值是一个相对于组件类文件的URL值。
例如,'app.component.html' URL表示模板文件与它相应的app.component.ts文件放在一起。
While JIT app URLs are more flexible, stick with component-relative URLs for compatibility with AOT compilation.
而JIT应用的URL更灵活,固定写成相对于组件的URL的形式对AOT编译的兼容性也更好。
Compiling the application
编译该应用
Initiate AOT compilation from the command line using the previously installed ngc compiler by executing:
在命令行中执行下列命令,借助刚安装好的ngc编译器来启动AOT编译:
Windows users should surround the ngc command in double quotes:
Windows用户应该双引号ngc命令:
ngc expects the -p switch to point to a tsconfig.json file or a folder containing a tsconfig.json file.
ngc希望-p选项指向一个tsconfig.json文件,或者一个包含tsconfig.json文件的目录。
After ngc completes, look for a collection of NgFactory files in the aot folder.
The aot folder is the directory specified as genDir in tsconfig-aot.json.
在ngc完成时,会在aot目录下看到一组NgFactory文件(该目录是在tsconfig-aot.json的genDir属性中指定的)。
These factory files are essential to the compiled application. Each component factory creates an instance of the component at runtime by combining the original class file and a JavaScript representation of the component's template. Note that the original component class is still referenced internally by the generated factory.
这些工厂文件对于编译后的应用是必要的。 每个组件工厂都可以在运行时创建一个组件的实例,其中带有一个原始的类文件和一个用JavaScript表示的组件模板。 注意,原始的组件类依然是由所生成的这个工厂进行内部引用的。
The curious can open aot/app.component.ngfactory.ts to see the original Angular template syntax
compiled to TypeScript, its intermediate form.
如果你好奇,可以打开aot/app.component.ngfactory.ts来看看原始Angular模板语法被编译成TypeScript时的中间结果。
JIT compilation generates these same NgFactories in memory where they are largely invisible. AOT compilation reveals them as separate, physical files.
JIT编译器在内存中同样会生成这一堆NgFactory,但它们大部分是不可见的。 AOT编译器则会生成在单独的物理文件中。
Do not edit the NgFactories! Re-compilation replaces these files and all edits will be lost.
不要编辑这些NgFactory!重新编译时会替换这些文件,你做的所有修改都会丢失。
Bootstrap
引导
The AOT approach changes application bootstrapping.
AOT也改变了应用的引导方式。
Instead of bootstrapping AppModule, you bootstrap the application with the generated module factory, AppModuleNgFactory.
引导的方式从引导AppModule改成了引导生成的模块工厂:AppModuleNgFactory。
Make a copy of main.ts and name it main-jit.ts.
This is the JIT version; set it aside as you may need it later.
复制一份main.ts并把它改名为main-jit.ts。
这就是JIT版本,先把它放在一边,我们稍后会用到它。
Open main.ts and convert it to AOT compilation.
Switch from the platformBrowserDynamic.bootstrap used in JIT compilation to
platformBrowser().bootstrapModuleFactory and pass in the AOT-generated AppModuleNgFactory.
打开main.ts,并把它改成AOT编译。
从platformBrowserDynamic.bootstrap改成使用platformBrowser().bootstrapModuleFactory并把AppModuleNgFactory的AOT编译结果传给它。
Here is AOT bootstrap in main.ts next to the original JIT version:
这里是AOT版本main.ts中的引导过程,下一个是你所熟悉的JIT版本。
Be sure to recompile with ngc!
确保用ngc进行重新编译!
Tree shaking
摇树优化(Tree shaking)
AOT compilation sets the stage for further optimization through a process called tree shaking. A tree shaker walks the dependency graph, top to bottom, and shakes out unused code like dead leaves in a tree.
AOT编译为接下来通过一个叫做摇树优化的过程做好了准备。 摇树优化器从上到下遍历依赖图谱,并且摇掉用不到的代码,这些代码就像是圣诞树中那些死掉的松针一样。
Tree shaking can greatly reduce the downloaded size of the application by removing unused portions of both source and library code. In fact, most of the reduction in small apps comes from removing unreferenced Angular features.
通过移除源码和库代码中用不到的部分,摇树优化可以大幅缩减应用的下载体积。 事实上,在小型应用中大部分的缩减都是因为筛掉了那些没用到的Angular特性。
For example, this demo application doesn't use anything from the @angular/forms library.
There is no reason to download forms-related Angular code and tree shaking ensures that you don't.
例如,这个演示程序中没有用到@angular/forms库中的任何东西,那么也就没有理由去下载这些与表单有关的Angular代码了。摇树优化可以帮你确保这一点。
Tree shaking and AOT compilation are separate steps. Tree shaking can only target JavaScript code. AOT compilation converts more of the application to JavaScript, which in turn makes more of the application "tree shakable".
摇树优化和AOT编译是单独的步骤。 摇树优化仅仅针对JavaScript代码。 AOT编译会把应用中的大部分都转换成JavaScript,这种转换会让应用更容易被“摇树优化”。
Rollup
This cookbook illustrates a tree shaking utility called Rollup.
这个烹饪宝典中用来示范的摇树优化工具是Rollup。
Rollup statically analyzes the application by following the trail of import and export statements.
It produces a final code bundle that excludes code that is exported, but never imported.
Rollup会通过跟踪import和export语句来对本应用进行静态分析。
它所生成的最终代码捆中会排除那些被导出过但又从未被导入的代码。
Rollup can only tree shake ES2015 modules which have import and export statements.
Rollup只能对ES2015模块摇树,因为那里有import和export语句。
Recall that tsconfig-aot.json is configured to produce ES2015 modules.
It's not important that the code itself be written with ES2015 syntax such as class and const.
What matters is that the code uses ES import and export statements rather than require statements.
回忆一下,tsconfig-aot.json中曾配置为生成ES2015的模块。
代码本身是否用到了ES2015语法(例如class和const)并不重要,重要的是这些代码使用的应该是import和export语句,而不是require语句。
In the terminal window, install the Rollup dependencies with this command:
通过下列命令安装Rollup依赖:
Next, create a configuration file (rollup-config.js)
in the project root directory to tell Rollup how to process the application.
The cookbook configuration file looks like this.
接下来,在项目根目录新建一个配置文件(rollup-config.js),来告诉Rollup如何处理应用。
本烹饪书配置文件是这样的:
rollup-config.js
This config file tells Rollup that the app entry point is src/app/main.js .
The dest attribute tells Rollup to create a bundle called build.js in the dist folder.
It overrides the default onwarn method in order to skip annoying messages about the AOT compiler's use of the this keyword.
这个配置文件告诉Rollup,该应用的入口点是app/main.js。
dest属性告诉Rollup要在dist目录下创建一个名叫build.js的捆文件。
它覆盖了默认的onwarn方法,以便忽略由于AOT编译器使用this关键字导致的噪音消息。
The next section covers the plugins in more depth.
下一节我们将深入讲解插件。
Rollup Plugins
Rollup插件
Optional plugins filter and transform the Rollup inputs and output.
这些可选插件过滤并转换Rollup的输入和输出。
RxJS
Rollup expects application source code to use ES2015 modules.
Not all external dependencies are published as ES2015 modules.
In fact, most are not. Many of them are published as CommonJS modules.
Rollup期望应用的源码使用ES2015模块。
但并不是所有外部依赖都发布成了ES2015模块。
事实上,大多数都不是。它们大多数都发布成了CommonJS模块。
The RxJs Observable library is an essential Angular dependency published as an ES5 JavaScript CommonJS module.
可观察对象库RxJS是Angular所依赖的基础之一,它就是发布成了ES5 JavaScript的CommonJS模块。
Luckily, there is a Rollup plugin that modifies RxJs
to use the ES import and export statements that Rollup requires.
Rollup then preserves the parts of RxJS referenced by the application
in the final bundle. Using it is straigthforward. Add the following to
the plugins array in rollup-config.js:
幸运的是,有一个Rollup插件,它会修改RxJS,以使用Rollup所需的ESimport和export语句。
然后Rollup就可以把该应用中用到的那部分RxJS代码留在“捆”文件中了。
它的用法很简单。把下列代码添加到rollup-config.js的plugins数组中:
rollup-config.js (CommonJs to ES2015 Plugin)
Minification
最小化
Rollup tree shaking reduces code size considerably. Minification makes it smaller still.
This cookbook relies on the uglify Rollup plugin to minify and mangle the code.
Add the following to the plugins array:
Rollup做摇树优化时会大幅减小代码体积。最小化过程则会让它更小。
本烹饪宝典依赖于Rollup插件uglify来最小化并混淆代码。
把下列代码添加到plugins数组中:
rollup-config.js (CommonJs to ES2015 Plugin)
In a production setting, you would also enable gzip on the web server to compress the code into an even smaller package going over the wire.
在生产环境中,我们还应该打开Web服务器的gzip特性来把代码压缩得更小。
Run Rollup
运行Rollup
Execute the Rollup process with this command:
通过下列命令执行Rollup过程:
Windows users should surround the rollup command in double quotes:
Windows用户要把rollup命令放进双引号中:
Load the bundle
加载捆文件
Loading the generated application bundle does not require a module loader like SystemJS.
Remove the scripts that concern SystemJS.
Instead, load the bundle file using a single <script> tag after the </body> tag:
加载所生成的应用捆文件,并不需要使用像SystemJS这样的模块加载器。
移除与SystemJS有关的那些脚本吧。
改用<script>标签来加载这些捆文件:
index.html (load bundle)
Serve the app
启动应用服务器
You'll need a web server to host the application.
Use the same lite-server employed elsewhere in the documentation:
你需要一个Web服务器来作为应用的宿主。
像与文档中其它部分一样,用lite-server吧:
The server starts, launches a browser, and the app should appear.
启动了服务器、打开浏览器,应用就出现了。
AOT QuickStart source code
AOT快速起步源代码
Here's the pertinent source code:
下面是相关源代码:
Workflow and convenience script
工作流与便利脚本
You'll rebuild the AOT version of the application every time you make a change. Those npm commands are long and difficult to remember.
每当修改时,我们都将重新构建应用的AOT版本。 那些npm命令太长,很难记。
Add the following npm convenience script to the package.json so you can compile and rollup in one command.
把下列npm便利脚本添加到package.json中,以便用一条命令就可以完成编译和Rollup打包工作。
package.json (build:aot convenience script)
Open a terminal window and try it.
打开终端窗口,并试一下。
Develop JIT along with AOT
先用JIT开发,再AOT发布
AOT compilation and rollup together take several seconds. You may be able to develop iteratively a little faster with SystemJS and JIT. The same source code can be built both ways. Here's one way to do that.
AOT编译和Rollup打包加起来要花好几秒钟。 用SystemJS和JIT可以让开发期间的迭代更快一点。 同一套源码可以用这两种方式构建。下面是方法之一:
Make a copy of
index.htmland call itindex-jit.html.复制一份
index.html并命名为index-jit.html。Delete the script at the bottom of
index-jit.htmlthat loadsbundle.js删除
index-jit.html底部用来加载bundle.js的脚本Restore the SystemJS scripts like this:
代之以如下的SystemJS脚本:
src/index-jit.html (SystemJS scripts)
Notice the slight change to the system.import which now specifies src/app/main-jit.
That's the JIT version of the bootstrap file that we preserved above.
注意,这里稍微修改了一下system.import,现在它指向了src/app/main-jit。
这就是我们以前预留的JIT版本的引导文件。
Open a different terminal window and enter npm start.
打开另一个终端窗口,并输入npm start:
That compiles the app with JIT and launches the server.
The server loads index.html which is still the AOT version, which you can confirm in the browser console.
Change the address bar to index-jit.html and it loads the JIT version.
This is also evident in the browser console.
它会使用JIT方式编译本应用,并启动服务器。
服务器仍然加载的是AOT版的index.html,我们可以在浏览器的控制台中确认这一点。
在地址栏中改为index-jit.html,它就会加载JIT版,这同样可以在浏览器控制台中确认。
Develop as usual. The server and TypeScript compiler are in "watch mode" so your changes are reflected immediately in the browser.
照常开发。服务器和TypeScript编译器都处于“监听模式”,因此我们的修改都可以立刻反映到浏览器中。
To see those changes in AOT, switch to the original terminal and re-run npm run build:aot.
When it finishes, go back to the browser and use the back button to
return to the AOT version in the default index.html.
要对比AOT版的变化,可以切换到原来的终端窗口中,并重新运行npm run build:aot。
结束时,回到浏览器中,并用浏览器的后退按钮回到默认index.html中的AOT版本。
Now you can develop JIT and AOT, side-by-side.
现在,我们就可以同时进行JIT和AOT开发了。
Tour of Heroes
英雄指南
The sample above is a trivial variation of the QuickStart application. In this section you apply what you've learned about AOT compilation and tree shaking to an app with more substance, the Tour of Heroes application.
上面的例子是《快速起步》应用的一个简单的变体。 在本节中,你将在一个更多内容的应用 - 英雄指南上使用从AOT编译和摇树优化学到的知识。
JIT in development, AOT in production
开发器使用JIT, 产品期使用AOT
Today AOT compilation and tree shaking take more time than is practical for development. That will change soon. For now, it's best to JIT compile in development and switch to AOT compilation before deploying to production.
目前,AOT编译和摇树优化对开发来说,占用的时间太多了。这将在未来得到改变。 当前的最佳实践是在开发器使用JIT编译,然后在发布产品前切换到AOT编译。
Fortunately, the source code can be compiled either way without change if you account for a few key differences.
幸运的是,如果你处理了几个关键不同点,源代码可以在没有任何变化时,采取两种方式的任何一种都能编译。
index.html
The JIT and AOT apps require their own index.html files because they setup and launch so differently.
JIT和AOT应用的设置和加载非常不一样,因此它们需要各自的index.html文件。
Here they are for comparison:
下面是它们的比较:
The JIT version relies on SystemJS to load individual modules.
Its scripts appear in its index.html.
JIT版本依靠SystemJS来加载单个模块,并需要reflect-metadata垫片。
所以它们出现在它的index.html中。
The AOT version loads the entire application in a single script, aot/dist/build.js.
It does not need SystemJS, so that script is absent from its index.html
main.ts
JIT and AOT applications boot in much the same way but require different Angular libraries to do so.
The key differences, covered in the Bootstrap section above,
are evident in these main files which can and should reside in the same folder:
AOT版本用一个单独的脚本来加载整个应用 - aot/dist/build.js。它不需要SystemJS和reflect-metadata垫片,所以它们不会出现在index.html中。
TypeScript configuration
TypeScript配置
JIT-compiled applications transpile to commonjs modules.
AOT-compiled applications transpile to ES2015/ES6 modules to facilitate tree shaking.
AOT requires its own TypeScript configuration settings as well.
JIT编译的应用编译为commonjs模块。
AOT编译的应用编译为ES2015/ES6模块,用来支持摇树优化。
而且AOT需要它自己的TypeScript配置设置。
You'll need separate TypeScript configuration files such as these:
你将需要单独的TypeScript配置文件,像这些:
In the file structure of this particular sample project,
the node_modules folder happens to be two levels up from the project root.
Therefore, "typeRoots" must be set to "../../node_modules/@types/".
在这个特定的示例项目的文件结构中,node_modules文件恰好比项目根目录高两级。
因此,"typeRoots"必须设置为"../../node_modules/@types/"。
In a more typical project, node_modules would be a sibling of tsconfig-aot.json
and "typeRoots" would be set to "node_modules/@types/".
Edit your tsconfig-aot.json to fit your project's file structure.
在一个更典型的项目中,node_modules位于tsconfig-aot.json同级,
这时"typeRoots"应设置为"node_modules/@types/"。
编辑你的tsconfig-aot.json,使之适合项目的文件结构。
Tree shaking
摇树优化
Rollup does the tree shaking as before.
Rollup和以前一样,仍然进行摇树优化。
rollup-config.js
Running the application
运行应用
The general audience instructions for running the AOT build of the Tour of Heroes app are not ready.
面向大众的运行AOT构建的英雄指南应用的说明还没有准备好。
The following instructions presuppose that you have cloned the angular.io github repository and prepared it for development as explained in the repo's README.md.
下面的说明假设你克隆了angular.io Github库,并按照该库的README.md准备了开发环境。
The Tour of Heroes source code is in the public/docs/_examples/toh-6/ts folder.
英雄指南源代码在public/docs/_examples/toh-6/ts目录。
Run the JIT-compiled app with npm start as for all other JIT examples.
和其他JIT例子一样,使用npm start命令,运行JIT编译的应用:
Compiling with AOT presupposes certain supporting files, most of them discussed above.
AOT编译假设上面介绍的一些支持文件都以准备好。
Extend the scripts section of the package.json with these npm scripts:
使用下面的npm脚本,扩展package.json文件的scripts部分:
package.json (convenience scripts)
Copy the AOT distribution files into the /aot folder with the node script:
使用下面的node脚本,拷贝AOT发布文件到/aot/目录:
You won't do that again until there are updates to zone.js or the core-js shim for old browsers.
直到zone.js或者支持老版本浏览器的core-js垫片有更新,你不需要再这样做。
Now AOT-compile the app and launch it with the lite-server:
现在AOT编译应用,并使用lite服务器启动它:
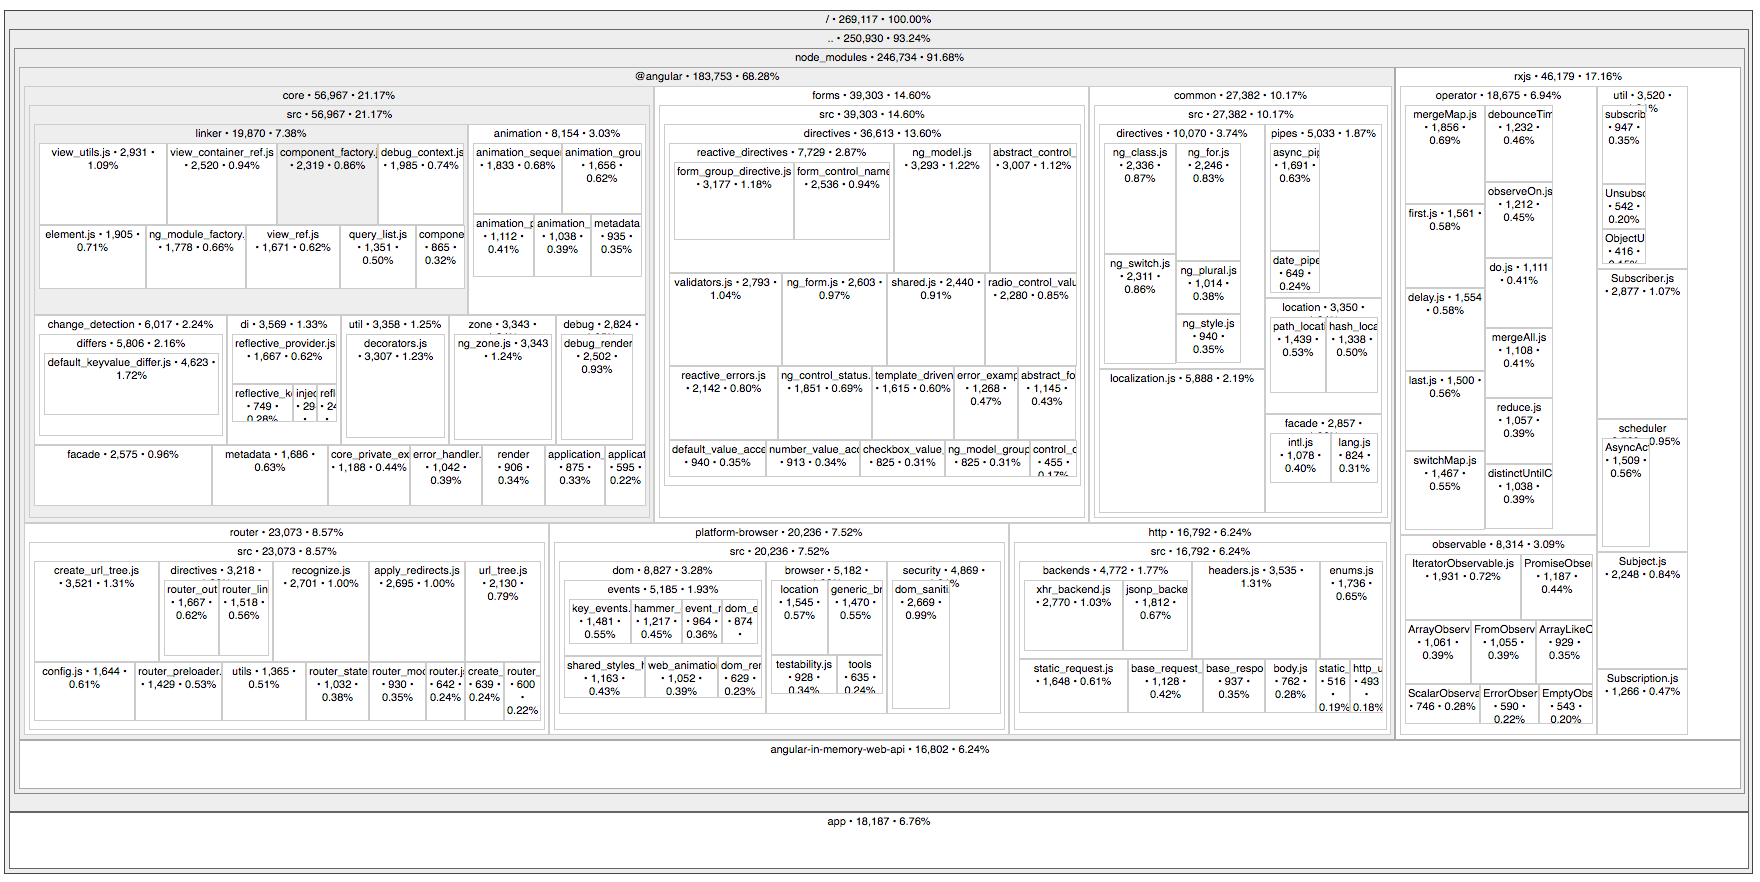
Inspect the Bundle
检查包裹
It's fascinating to see what the generated JavaScript bundle looks like after Rollup. The code is minified, so you won't learn much from inspecting the bundle directly. But the source-map-explorer tool can be quite revealing.
看看Rollup之后生成的JavaScript包,非常神奇。 代码已经被最小化,所以你不会从中直接学到任何知识。 但是source-map-explorer 工具非常有用。
Install it:
安装:
Run the following command to generate the map.
运行下面的命令来生成源映射。
The source-map-explorer analyzes the source map generated with the bundle and draws a map of all dependencies,
showing exactly which application and Angular modules and classes are included in the bundle.
source-map-explorer分析从包生成的源映射,并画出一个依赖地图,显示包中包含哪些应用程序和Angular模块和类。
Here's the map for Tour of Heroes.
下面是英雄指南的地图: