An Attribute directive changes the appearance or behavior of a DOM element.
属性型指令用于改变一个 DOM 元素的外观或行为。
Contents
目录
Try the
试试
Directives overview
指令概览
There are three kinds of directives in Angular:
在 Angular 中有三种类型的指令:
Components—directives with a template.
组件 — 拥有模板的指令
Structural directives—change the DOM layout by adding and removing DOM elements.
结构型指令 — 通过添加和移除 DOM 元素改变 DOM 布局的指令
Attribute directives—change the appearance or behavior of an element, component, or another directive.
属性型指令 — 改变元素、组件或其它指令的外观和行为的指令。
Components are the most common of the three directives. You saw a component for the first time in the QuickStart guide.
组件是这三种指令中最常用的。 你在快速起步例子中第一次见到组件。
Structural Directives change the structure of the view. Two examples are NgFor and NgIf. Learn about them in the Structural Directives guide.
结构型指令修改视图的结构。例如,NgFor 和 NgIf。 要了解更多,参见结构型指令 guide。
Attribute directives are used as attributes of elements. The built-in NgStyle directive in the Template Syntax guide, for example, can change several element styles at the same time.
属性型指令改变一个元素的外观或行为。例如,内置的 NgStyle 指令可以同时修改元素的多个样式。
Build a simple attribute directive
创建一个简单的属性型指令
An attribute directive minimally requires building a controller class annotated with
@Directive, which specifies the selector that identifies
the attribute.
The controller class implements the desired directive behavior.
属性型指令至少需要一个带有@Directive装饰器的控制器类。该装饰器指定了一个用于标识属性的选择器。
控制器类实现了指令需要的指令行为。
This page demonstrates building a simple myHighlight attribute directive to set an element's background color when the user hovers over that element. You can apply it like this:
本章展示了如何创建一个简单的属性型指令 myHighlight ,当用户把鼠标悬停在一个元素上时,改变它的背景色。你可以这样用它:
Write the directive code
编写指令代码
Follow the setup instructions for creating a new local project
named attribute-directives.
按照开发环境的说明,创建一个名叫attribute-directives的项目文件夹。
Create the following source file in the indicated folder:
在指定的文件夹下创建下列源码文件:
src/app/highlight.directive.ts
The import statement specifies symbols from the Angular core:
import语句指定了从 Angular 的core库导入的一些符号。
Directiveprovides the functionality of the@Directivedecorator.Directive提供@Directive装饰器功能。ElementRefinjects into the directive's constructor so the code can access the DOM element.ElementRef注入到指令构造函数中。这样代码就可以访问 DOM 元素了。Inputallows data to flow from the binding expression into the directive.Input将数据从绑定表达式传达到指令中。
Next, the @Directive decorator function contains the directive metadata in a configuration object
as an argument.
然后,@Directive装饰器函数以配置对象参数的形式,包含了指令的元数据。
@Directive requires a CSS selector to identify
the HTML in the template that is associated with the directive.
@Directive装饰器需要一个 CSS 选择器,以便从模板中识别出关联到这个指令的 HTML。
The CSS selector for an attribute
is the attribute name in square brackets.
Here, the directive's selector is [myHighlight].
Angular locates all elements in the template that have an attribute named myHighlight.
用于 attribute 的 CSS 选择器就是属性名称加方括号。
这里,指令的选择器是[myHighlight],Angular 将会在模板中找到所有带myHighlight属性的元素。
Why not call it "highlight"?
为什么不直接叫做 "highlight"?
Though highlight is a more concise name than myHighlight and would work, a best practice is to prefix selector names to ensure they don't conflict with standard HTML attributes. This also reduces the risk of colliding with third-party directive names.
尽管highlight 是一个比 myHighlight 更简洁的名字,而且它确实也能工作。 但是最佳实践是在选择器名字前面添加前缀,以确保它们不会与标准 HTML 属性冲突。 它同时减少了与第三方指令名字发生冲突的危险。
Make sure you do not prefix the highlight directive name with ng because
that prefix is reserved for Angular and using it could cause bugs that are difficult to diagnose.
For a simple demo, the short prefix, my, helps distinguish your custom directive.
确认你没有给highlight指令添加ng前缀。
那个前缀属于 Angular,使用它可能导致难以诊断的 bug。例如,这个简短的前缀my可以帮助你区分自定义指令。
After the @Directive metadata comes the directive's controller class,
called HighlightDirective, which contains the logic for the directive.
Exporting HighlightDirective makes it accessible to other components.
@Directive元数据之后就是该指令的控制器类,名叫HighlightDirective,它包含该指令的逻辑。
然后导出HighlightDirective,以便让它能从其它组件中访问到。
Angular creates a new instance of the directive's controller class for
each matching element, injecting an Angular ElementRef
into the constructor.
ElementRef is a service that grants direct access to the DOM element
through its nativeElement property.
Angular 会为每个匹配的元素创建一个指令控制器类的实例,并把 Angular 的ElementRef和Renderer注入进构造函数。
ElementRef是一个服务,它赋予我们通过它的nativeElement属性直接访问 DOM 元素的能力。
Renderer服务允许通过代码设置元素的样式。
Apply the attribute directive
使用属性型指令
To use the new HighlightDirective, create a template that
applies the directive as an attribute to a paragraph (<p>) element.
In Angular terms, the <p> element is the attribute host.
要使用这个新的HighlightDirective,创建一个模板,把这个指令作为属性应用到一个段落(p)元素上。
用 Angular 的话说,<p>元素就是这个属性型指令的宿主。
Put the template in its own app.component.html
file that looks like this:
我们把这个模板放到它的app.component.html文件中,就像这样:
src/app/app.component.html
Now reference this template in the AppComponent:
现在,在AppComponent中引用这个模板:
src/app/app.component.ts
Next, add an import statement to fetch the Highlight directive and
add that class to the declarations NgModule metadata. This way Angular
recognizes the directive when it encounters myHighlight in the template.
接下来,添加了一个import语句来获得Highlight指令类,并把这个类添加到 NgModule 元数据的declarations数组中。
这样,当 Angular 在模板中遇到myHighlight时,就能认出这是指令了。
src/app/app.module.ts
Now when the app runs, the myHighlight directive highlights the paragraph text.
运行应用,就会看到我们的指令确实高亮了段落中的文本。

Your directive isn't working?
你的指令没生效?
Did you remember to add the directive to the declarations attribute of @NgModule?
It is easy to forget!
你记着设置@NgModule的declarations数组了吗?它很容易被忘掉。
Open the console in the browser tools and look for an error like this:
打开浏览器调试工具的控制台,会看到像这样的错误信息:
Angular detects that you're trying to bind to something but it can't find this directive
in the module's declarations array.
After specifying HighlightDirective in the declarations array,
Angular knows it can apply the directive to components declared in this module.
Angular 检测到你正在尝试绑定到某些东西,但它不认识。所以它在declarations元数据数组中查找。
把HighlightDirective列在元数据的这个数组中,Angular 就会检查对应的导入语句,从而找到highlight.directive.ts,并了解myHightlight的功能。
To summarize, Angular found the myHighlight attribute on the <p> element.
It created an instance of the HighlightDirective class and
injected a reference to the <p> element into the directive's constructor
which sets the <p> element's background style to yellow.
总结:Angular 在<p>元素上发现了一个myHighlight属性。
然后它创建了一个HighlightDirective类的实例,并把所在元素的引用注入到了指令的构造函数中。
在构造函数中,我们把<p>元素的背景设置为了黄色。
Respond to user-initiated events
响应用户引发的事件
Currently, myHighlight simply sets an element color.
The directive could be more dynamic.
It could detect when the user mouses into or out of the element
and respond by setting or clearing the highlight color.
当前,myHighlight只是简单的设置元素的颜色。
这个指令应该在用户鼠标悬浮一个元素时,设置它的颜色。
Begin by adding HostListener to the list of imported symbols;
add the Input symbol as well because you'll need it soon.
先把HostListener加进导入列表中,同时再添加Input符号,因为我们很快就要用到它。
Then add two eventhandlers that respond when the mouse enters or leaves,
each adorned by the HostListener decorator.
然后使用HostListener装饰器添加两个事件处理器,它们会在鼠标进入或离开时进行响应。
The @HostListener decorator lets you subscribe to events of the DOM
element that hosts an attribute directive, the <p> in this case.
@HostListener装饰器引用属性型指令的宿主元素,在这个例子中就是<p>。
Of course you could reach into the DOM with standard JavaScript and and attach event listeners manually. There are at least three problems with that approach:
当然,你可以通过标准的JavaScript方式手动给宿主 DOM 元素附加一个事件监听器。 但这种方法至少有三个问题:
You have to write the listeners correctly.
必须正确的书写事件监听器。
The code must detach the listener when the directive is destroyed to avoid memory leaks.
当指令被销毁的时候,必须拆卸事件监听器,否则会导致内存泄露。
Talking to DOM API directly isn't a best practice.
必须直接和 DOM API 打交道,应该避免这样做。
The handlers delegate to a helper method that sets the color on the DOM element, el,
which you declare and initialize in the constructor.
这些处理器委托给了一个辅助方法,它用于为DOM元素设置颜色,el就是你在构造器中声明和初始化过的。
src/app/highlight.directive.ts (constructor)
Here's the updated directive in full:
下面是修改后的指令代码:
src/app/highlight.directive.ts
Run the app and confirm that the background color appears when the mouse hovers over the p and
disappears as it moves out.We run the app and confirm that the background color appears as we move the mouse over the p and
disappears as we move out.
运行本应用并确认:当把鼠标移到p上的时候,背景色就出现了,而移开的时候,它消失了。
Pass values into the directive with an @Input data binding
使用数据绑定向指令传递值
Currently the highlight color is hard-coded within the directive. That's inflexible. In this section, you give the developer the power to set the highlight color while applying the directive.
现在的高亮颜色是硬编码在指令中的,这不够灵活。 我们应该让指令的使用者可以在模板中通过绑定来设置颜色。
Start by adding a highlightColor property to the directive class like this:
我们先把highlightColor属性添加到指令类中,就像这样:
src/app/highlight.directive.ts (highlightColor)
Binding to an @Input property
绑定到@Input属性
Notice the @Input decorator. It adds metadata to the class that makes the directive's highlightColor property available for binding.
注意看@Input装饰器。它往类上添加了一些元数据,从而让该指令的highlightColor能用于绑定。
It's called an input property because data flows from the binding expression into the directive. Without that input metadata, Angular rejects the binding; see below for more about that.
它之所以称为输入属性,是因为数据流是从绑定表达式流向指令内部的。 如果没有这个元数据,Angular就会拒绝绑定,参见稍后了解更多。
Try it by adding the following directive binding variations to the AppComponent template:
试试把下列指令绑定变量添加到AppComponent的模板中:
src/app/app.component.html (excerpt)
Add a color property to the AppComponent.
把color属性添加到AppComponent中:
src/app/app.component.ts (class)
Let it control the highlight color with a property binding.
让它通过属性绑定来控制高亮颜色。
src/app/app.component.html (excerpt)
That's good, but it would be nice to simultaneously apply the directive and set the color in the same attribute like this.
很不错,但还可以更好。我们可以在应用该指令时在同一个属性中设置颜色,就像这样:
The [myHighlight] attribute binding both applies the highlighting directive to the <p> element
and sets the directive's highlight color with a property binding.
You're re-using the directive's attribute selector ([myHighlight]) to do both jobs.
That's a crisp, compact syntax.
[myHighlight]属性同时做了两件事:把这个高亮指令应用到了<p>元素上,并且通过属性绑定设置了该指令的高亮颜色。
我们复用了该指令的属性选择器[myHighlight]来同时完成它们。
这是清爽、简约的语法。
You'll have to rename the directive's highlightColor property to myHighlight because that's now the color property binding name.
我们还要把该指令的highlightColor改名为myHighlight,因为它是颜色属性目前的绑定名。
src/app/highlight.directive.ts (renamed to match directive selector)
This is disagreeable. The word, myHighlight, is a terrible property name and it doesn't convey the property's intent.
这可不好。因为myHighlight是一个糟糕的属性名,而且不能反映该属性的意图。
Bind to an @Input alias
绑定到@Input别名
Fortunately you can name the directive property whatever you want and alias it for binding purposes.
幸运的是,我们可以随意命名该指令的属性,并且给它指定一个用于绑定的别名。
Restore the original property name and specify the selector as the alias in the argument to @Input.
恢复原始属性名,并在@Input的参数中把选择器myHighlight指定为别名。
src/app/highlight.directive.ts (color property with alias)
Inside the directive the property is known as highlightColor.
Outside the directive, where you bind to it, it's known as myHighlight.
在指令内部,该属性叫highlightColor,在外部,当我们绑定到它时,它叫myHighlight。
You get the best of both worlds: the property name you want and the binding syntax you want:
这是最好的结果:理想的内部属性名,理想的绑定语法:
Now that you're binding to highlightColor, modify the onMouseEnter() method to use it.
If someone neglects to bind to highlightColor, highlight in red:
现在,我们绑定到了highlightColor属性,并修改onMouseEnter()方法来使用它。
如果有人忘了绑定到highlightColor,那就用红色进行高亮。
src/app/highlight.directive.ts (mouse enter)
Here's the latest version of the directive class.
这是最终版本的指令类。
src/app/highlight.directive.ts (excerpt)
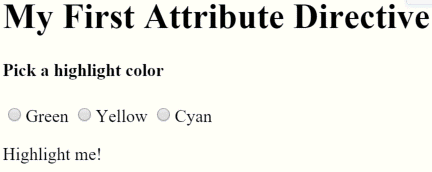
Write a harness to try it
写个测试程序试验下
It may be difficult to imagine how this directive actually works.
In this section, you'll turn AppComponent into a harness that
lets you pick the highlight color with a radio button and bind your color choice to the directive.
凭空想象该指令如何工作可不容易。
在本节,我们将把AppComponent改成一个测试程序,它让你可以通过单选按钮来选取高亮颜色,并且把你选取的颜色绑定到指令中。
Update app.component.html as follows:
把app.component.html修改成这样:
Revise the AppComponent.color so that it has no initial value.
修改AppComponent.color,让它不再有初始值。
Here are the harness and directive in action.
下面是测试程序和指令的动图。
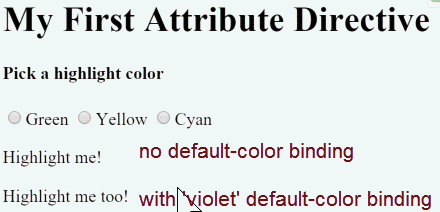
Bind to a second property
绑定到第二个属性
This highlight directive has a single customizable property. In a real app, it may need more.
本例的指令只有一个可定制属性,真实的应用通常需要更多。
At the moment, the default color—the color that prevails until the user picks a highlight color—is hard-coded as "red". Let the template developer set the default color.
目前,默认颜色(它在用户选取了高亮颜色之前一直有效)被硬编码为红色。我们要让模板的开发者也可以设置默认颜色。
Add a second input property to HighlightDirective called defaultColor:
把第二个名叫defaultColor的输入属性添加到HighlightDirective中:
Revise the directive's onMouseEnter so that it first tries to highlight with the highlightColor,
then with the defaultColor, and falls back to "red" if both properties are undefined.
修改该指令的onMouseEnter,让它首先尝试使用highlightColor进行高亮,然后用defaultColor,如果它们都没有指定,那就用红色作为后备。
How do you bind to a second property when you're already binding to the myHighlight attribute name?
当已经绑定过myHighlight属性时,要如何绑定到第二个属性呢?
As with components, you can add as many directive property bindings as you need by stringing them along in the template.
The developer should be able to write the following template HTML to both bind to the AppComponent.color
and fall back to "violet" as the default color.
像组件一样,你也可以绑定到指令的很多属性,只要把它们依次写在模板中就行了。
开发者可以绑定到AppComponent.color,并且用紫罗兰色作为默认颜色,代码如下:
Angular knows that the defaultColor binding belongs to the HighlightDirective
because you made it public with the @Input decorator.
Angular之所以知道defaultColor绑定属于HighlightDirective,是因为我们已经通过@Input装饰器把它设置成了公共属性。
Here's how the harness should work when you're done coding.
当这些代码完成时,测试程序工作时的动图如下:
Summary
总结
This page covered how to:
本章介绍了如何:
Build an attribute directive that modifies the behavior of an element.
构建一个属性型指令,它用于修改一个元素的行为。
Apply the directive to an element in a template.
把一个指令应用到模板中的某个元素上。
Respond to events that change the directive's behavior.
响应事件以改变指令的行为。
The final source code follows:
最终的源码如下:
You can also experience and download the
你还可以体验和下载
Appendix: Why add @Input?
附录:为什么要加@Input?
In this demo, the hightlightColor property is an input property of
the HighlightDirective. You've seen it applied without an alias:
在这个例子中hightlightColor是HighlightDirective的一个输入型属性。我们见过它没有用别名时的代码:
You've seen it with an alias:
也见过用别名时的代码:
Either way, the @Input decorator tells Angular that this property is
public and available for binding by a parent component.
Without @Input, Angular refuses to bind to the property.
无论哪种方式,@Input装饰器都告诉Angular,该属性是公共的,并且能被父组件绑定。
如果没有@Input,Angular就会拒绝绑定到该属性。
You've bound template HTML to component properties before and never used @Input.
What's different?
但我们以前也曾经把模板HTML绑定到组件的属性,而且从来没有用过@Input。
差异何在?
The difference is a matter of trust.
Angular treats a component's template as belonging to the component.
The component and its template trust each other implicitly.
Therefore, the component's own template may bind to any property of that component,
with or without the @Input decorator.
差异在于信任度不同。
Angular把组件的模板看做从属于该组件的。
组件和它的模板默认会相互信任。
这也就是意味着,组件自己的模板可以绑定到组件的任意属性,无论是否使用了@Input装饰器。
But a component or directive shouldn't blindly trust other components and directives.
The properties of a component or directive are hidden from binding by default.
They are private from an Angular binding perspective.
When adorned with the @Input decorator, the property becomes public from an Angular binding perspective.
Only then can it be bound by some other component or directive.
但组件或指令不应该盲目的信任其它组件或指令。
因此组件或指令的属性默认是不能被绑定的。
从Angular绑定机制的角度来看,它们是私有的,而当添加了@Input时,它们变成了公共的
只有这样,它们才能被其它组件或属性绑定。
You can tell if @Input is needed by the position of the property name in a binding.
你可以根据属性名在绑定中出现的位置来判定是否要加@Input。
When it appears in the template expression to the right of the equals (=), it belongs to the template's component and does not require the
@Inputdecorator.当它出现在等号右侧的模板表达式中时,它属于模板所在的组件,不需要
@Input装饰器。When it appears in square brackets ([ ]) to the left of the equals (=), the property belongs to some other component or directive; that property must be adorned with the
@Inputdecorator.当它出现在等号左边的方括号([ ])中时,该属性属于其它组件或指令,它必须带有
@Input装饰器。
Now apply that reasoning to the following example:
试用此原理分析下列范例:
The
colorproperty in the expression on the right belongs to the template's component. The template and its component trust each other. Thecolorproperty doesn't require the@Inputdecorator.color属性位于右侧的绑定表达式中,它属于模板所在的组件。 该模板和组件相互信任。因此color不需要@Input装饰器。The
myHighlightproperty on the left refers to an aliased property of theHighlightDirective, not a property of the template's component. There are trust issues. Therefore, the directive property must carry the@Inputdecorator.myHighlight属性位于左侧,它引用了MyHighlightDirective中一个带别名的属性,它不是模板所属组件的一部分,因此存在信任问题。 所以,该属性必须带@Input装饰器。