The Angular Router enables navigation from one view to the next
as users perform application tasks.
在用户使用应用程序时,Angular的路由器能让用户从一个视图导航到另一个视图。
This guide covers the router's primary features, illustrating them through the evolution
of a small application that you can
本章覆盖了该路由器的主要特性。我们通过一个小型应用的成长演进来讲解它。参见
To see the URL changes in the browser address bar of the live example, open it again in the Plunker editor by clicking the icon in the upper right, then pop out the preview window by clicking the blue 'X' button in the upper right corner. 要看到这个在线例子中浏览器地址栏的URL变化情况,请点击右上角的图标,在Plunker编辑器中打开它,接下来在弹出的预览窗口中点击右上角的蓝色'X'按钮就可以了。 | 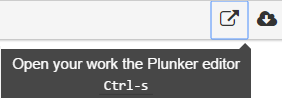  |
Overview
概览
The browser is a familiar model of application navigation:
浏览器具有我们熟悉的导航模式:
Enter a URL in the address bar and the browser navigates to a corresponding page.
在地址栏输入URL,浏览器就会导航到相应的页面。
Click links on the page and the browser navigates to a new page.
在页面中点击链接,浏览器就会导航到一个新页面。
Click the browser's back and forward buttons and the browser navigates backward and forward through the history of pages you've seen.
点击浏览器的前进和后退按钮,浏览器就会在你的浏览历史中向前或向后导航。
The Angular Router ("the router") borrows from this model.
It can interpret a browser URL as an instruction to navigate to a client-generated view.
It can pass optional parameters along to the supporting view component that help it decide what specific content to present.
You can bind the router to links on a page and it will navigate to
the appropriate application view when the user clicks a link.
You can navigate imperatively when the user clicks a button, selects from a drop box,
or in response to some other stimulus from any source. And the router logs activity
in the browser's history journal so the back and forward buttons work as well.
Angular的Router(即“路由器”)借鉴了这个模型。它把浏览器中的URL看做一个操作指南,
据此导航到一个由客户端生成的视图,并可以把参数传给支撑视图的相应组件,帮它决定具体该展现哪些内容。
我们可以为页面中的链接绑定一个路由,这样,当用户点击链接时,就会导航到应用中相应的视图。
当用户点击按钮、从下拉框中选取,或响应来自任何地方的事件时,我们也可以在代码控制下进行导航。
路由器还在浏览器的历史日志中记录下这些活动,这样浏览器的前进和后退按钮也能照常工作。
Contents
目录
The Basics
基础知识
This guide proceeds in phases, marked by milestones, starting from a simple two-pager and building toward a modular, multi-view design with child routes.
本章是包括一系列里程碑,从一个单模块、两个页面的简单程序逐步走向带有多个子路由的多视图设计。
An introduction to a few core router concepts will help orient you to the details that follow.
在接触细节之前,我们先来介绍关于路由的一些核心概念。
<base href>
Most routing applications should add a <base> element to the index.html as the first child in the <head> tag
to tell the router how to compose navigation URLs.
大多数带路由的应用都要在index.html的<head>标签下先添加一个<base>元素,来告诉路由器该如何合成导航用的URL。
If the app folder is the application root, as it is for the sample application,
set the href value exactly as shown here.
如果app文件夹是该应用的根目录(就像我们的范例应用一样),那就把href的值设置为下面这样:
src/index.html (base-href)
Router imports
从路由库中导入
The Angular Router is an optional service that presents a particular component view for a given URL.
It is not part of the Angular core. It is in its own library package, @angular/router.
Import what you need from it as you would from any other Angular package.
Angular的路由器是一个可选的服务,它用来呈现指定的URL所对应的视图。
它并不是Angular核心库的一部分,而是在它自己的@angular/router包中。
像其它Angular包一样,我们可以从它导入所需的一切。
src/app/app.module.ts (import)
You'll learn about more options in the details below.
我们将会在后面详细讲解其它选项。
Configuration
配置
A routed Angular application has one singleton instance of the Router service.
When the browser's URL changes, that router looks for a corresponding Route
from which it can determine the component to display.
每个带路由的Angular应用都有一个Router(路由器)服务的单例对象。
当浏览器的URL变化时,路由器会查找对应的Route(路由),并据此决定该显示哪个组件。
A router has no routes until you configure it.
The following example creates four route definitions, configures the router via the RouterModule.forRoot method,
and adds the result to the AppModule's imports array.
路由器需要先配置才会有路由信息。
下面的例子创建了四个路由定义,并用RouterModule.forRoot方法来配置路由器,
并把它的返回值添加到AppModule的imports数组中。
src/app/app.module.ts (excerpt)
The appRoutes array of routes describes how to navigate.
Pass it to the RouterModule.forRoot method in the module imports to configure the router.
这里的路由树组appRoutes描述如何进行导航。
把它传给RouterModule.forRoot方法并传给本模块的imports数组就可以配置路由器。
Each Route maps a URL path to a component.
There are no leading slashes in the path.
The router parses and builds the final URL for you,
allowing you to use both relative and absolute paths when navigating between application views.
每个Route都会把一个URL的path映射到一个组件。
注意,path不能以斜杠(/)开头。
路由器会为解析和构建最终的URL,这样当我们在应用的多个视图之间导航时,可以任意使用相对路径和绝对路径。
The :id in the first route is a token for a route parameter. In a URL such as /hero/42, "42"
is the value of the id parameter. The corresponding HeroDetailComponent
will use that value to find and present the hero whose id is 42.
You'll learn more about route parameters later in this guide.
第一个路由中的:id是一个路由参数的令牌(Token)。比如/hero/42这个URL中,“42”就是id参数的值。
此URL对应的HeroDetailComponent组件将据此查找和展现id为42的英雄。
在本章中稍后的部分,我们将会学习关于路由参数的更多知识。
The data property in the third route is a place to store arbitrary data associated with
this specific route. The data property is accessible within each activated route. Use it to store
items such as page titles, breadcrumb text, and other read-only, static data.
You'll use the resolve guard to retrieve dynamic data later in the guide.
第三个路由中的data属性用来存放于每个具体路由有关的任意信息。该数据可以被任何一个激活路由访问,并能用来保存诸如
页标题、面包屑以及其它静态只读数据。本章稍后的部分,我们将使用resolve守卫来获取动态数据。
The empty path in the fourth route represents the default path for the application,
the place to go when the path in the URL is empty, as it typically is at the start.
This default route redirects to the route for the /heroes URL and, therefore, will display the HeroesListComponent.
第四个路由中的空路径('')表示应用的默认路径,当URL为空时就会访问那里,因此它通常会作为起点。
这个默认路由会重定向到URL /heroes,并显示HeroesListComponent。
The ** path in the last route is a wildcard. The router will select this route
if the requested URL doesn't match any paths for routes defined earlier in the configuration.
This is useful for displaying a "404 - Not Found" page or redirecting to another route.
最后一个路由中的**路径是一个通配符。当所请求的URL不匹配前面定义的路由表中的任何路径时,路由器就会选择此路由。
这个特性可用于显示“404 - Not Found”页,或自动重定向到其它路由。
The order of the routes in the configuration matters and this is by design. The router uses a first-match wins strategy when matching routes, so more specific routes should be placed above less specific routes. In the configuration above, routes with a static path are listed first, followed by an empty path route, that matches the default route. The wildcard route comes last because it matches every URL and should be selected only if no other routes are matched first.
这些路由的定义顺序是刻意如此设计的。路由器使用先匹配者优先的策略来匹配路由,所以,具体路由应该放在通用路由的前面。在上面的配置中,带静态路径的路由被放在了前面,后面是空路径路由,因此它会作为默认路由。而通配符路由被放在最后面,这是因为它能匹配上每一个URL,因此应该只有在前面找不到其它能匹配的路由时才匹配它。
Router outlet
路由出口
Given this configuration, when the browser URL for this application becomes /heroes,
the router matches that URL to the route path /heroes and displays the HeroListComponent
after a RouterOutlet that you've placed in the host view's HTML.
有了这份配置,当本应用在浏览器中的URL变为/heroes时,路由器就会匹配到path为heroes的Route,并在宿主视图中的RouterOutlet之后显示HeroListComponent组件。
Router links
路由器链接
Now you have routes configured and a place to render them, but how do you navigate? The URL could arrive directly from the browser address bar. But most of the time you navigate as a result of some user action such as the click of an anchor tag.
现在,我们已经有了配置好的一些路由,还找到了渲染它们的地方,但又该如何导航到它呢?固然,从浏览器的地址栏直接输入URL也能做到,但是大多数情况下,导航是某些用户操作的结果,比如点击一个A标签。
Consider the following template:
考虑下列模板:
The RouterLink directives on the anchor tags give the router control over those elements.
The navigation paths are fixed, so you can assign a string to the routerLink (a "one-time" binding).
a标签上的RouterLink指令让路由器得以控制这个a元素。
这里的导航路径是固定的,因此可以把一个字符串赋给routerLink(“一次性”绑定)。
Had the navigation path been more dynamic, you could have bound to a template expression that returned an array of route link parameters (the link parameters array). The router resolves that array into a complete URL.
如果需要更加动态的导航路径,那就把它绑定到一个返回链接参数数组的模板表达式。 路由器会把这个数组解析成完整的URL。
The RouterLinkActive directive on each anchor tag helps visually distinguish the anchor for the currently selected "active" route.
The router adds the active CSS class to the element when the associated RouterLink becomes active.
You can add this directive to the anchor or to its parent element.
每个a标签上的RouterLinkActive指令可以帮用户在外观上区分出当前选中的“活动”路由。
当与它关联的RouterLink被激活时,路由器会把CSS类active添加到这个元素上。
我们可以把该指令添加到a元素或它的父元素上。
Router state
路由器状态
After the end of each successful navigation lifecycle, the router builds a tree of ActivatedRoute objects
that make up the current state of the router. You can access the current RouterState from anywhere in the
application using the Router service and the routerState property.
在导航时的每个生命周期成功完成时,路由器会构建出一个ActivatedRoute组成的树,它表示路由器的当前状态。
我们可以在应用中的任何地方用Router服务及其routerState属性来访问当前的RouterState值。
Each ActivatedRoute in the RouterState provides methods to traverse up and down the route tree
to get information from parent, child and sibling routes.
路由器状态为我们提供了从任意激活路由开始向上或向下遍历路由树的一种方式,以获得关于父、子、兄弟路由的信息。
Summary
总结一下
The application has a configured router.
The shell component has a RouterOutlet where it can display views produced by the router.
It has RouterLinks that users can click to navigate via the router.
该应用有一个配置过的路由器。
外壳组件中有一个RouterOutlet,它能显示路由器所生成的视图。
它还有一些RouterLink,用户可以点击它们,来通过路由器进行导航。
Here are the key Router terms and their meanings:
下面是一些路由器中的关键词汇及其含义:
Router Part 路由器部件 | Meaning 含义 |
|---|---|
| Displays the application component for the active URL. Manages navigation from one component to the next. 为激活的URL显示应用组件。管理从一个组件到另一个组件的导航 |
| A separate Angular module that provides the necessary service providers and directives for navigating through application views. 一个独立的Angular模块,用于提供所需的服务提供商,以及用来在应用视图之间进行导航的指令。 |
| Defines an array of Routes, each mapping a URL path to a component. 定义了一个路由数组,每一个都会把一个URL路径映射到一个组件。 |
| Defines how the router should navigate to a component based on a URL pattern. Most routes consist of a path and a component type. 定义路由器该如何根据URL模式(pattern)来导航到组件。大多数路由都由路径和组件类构成。 |
| The directive ( 该指令( |
| The directive for binding a clickable HTML element to
a route. Clicking an element with a 该指令用来把一个可点击的HTML元素绑定到路由。
点击带有绑定到字符串或链接参数数组的 |
| The directive for adding/removing classes from an HTML element when an associated
当HTML元素上或元素内的 |
| A service that is provided to each route component that contains route specific information such as route parameters, static data, resolve data, global query params, and the global fragment. 为每个路由组件提供提供的一个服务,它包含特定于路由的信息,比如路由参数、静态数据、解析数据、全局查询参数和全局碎片(fragment)。 |
| The current state of the router including a tree of the currently activated routes together with convenience methods for traversing the route tree. 路由器的当前状态包含了一棵由程序中激活的路由构成的树。它包含一些用于遍历路由树的快捷方法。 |
Link parameters array 链接参数数组 | An array that the router interprets as a routing instruction.
You can bind that array toa 这个数组会被路由器解释成一个路由操作指南。我们可以把一个 |
Routing component 路由组件 | An Angular component with a 一个带有 |
The sample application
范例应用
This guide describes development of a multi-page routed sample application. Along the way, it highlights design decisions and describes key features of the router such as:
本章要讲的是如何开发一个带路由的多页面应用。 接下来,我们会重点讲它的设计决策,并描述路由的关键特性,比如:
Organizing the application features into modules.
把应用的各个特性组织成模块。
Navigating to a component (Heroes link to "Heroes List").
导航到组件(Heroes链接到“英雄列表”组件)。
Including a route parameter (passing the Hero
idwhile routing to the "Hero Detail").包含一个路由参数(当路由到“英雄详情”时,把该英雄的
id传进去)。Child routes (the Crisis Center has its own routes).
子路由(危机中心特性有一组自己的路由)。
The
CanActivateguard (checking route access).CanActivate守卫(检查路由的访问权限)。The
CanActivateChildguard (checking child route access).CanActivateChild守卫(检查子路由的访问权限)。The
CanDeactivateguard (ask permission to discard unsaved changes).CanDeactivate守卫(询问是否丢弃未保存的更改)。The
Resolveguard (pre-fetching route data).Resolve守卫(预先获取路由数据)。Lazy loading feature modules.
惰性加载特性模块。
The
CanLoadguard (check before loading feature module assets).CanLoad守卫(在加载特性模块之前进行检查)。
The guide proceeds as a sequence of milestones as if you were building the app step-by-step. But, it is not a tutorial and it glosses over details of Angular application construction that are more thoroughly covered elsewhere in the documentation.
如果打算一步步构建出本应用,本章就会经过一系列里程碑。 但是,本章并不是一个教程,它隐藏了构造Angular应用的细节,那些细节会在本文档的其它地方展开。
The full source for the final version of the app can be seen and downloaded from the
本应用的最终版源码可以在
The sample application in action
范例程序的动图
Imagine an application that helps the Hero Employment Agency run its business. Heroes need work and the agency finds crises for them to solve.
假设本程序会用来帮助“英雄管理局”运行他们的业务。 英雄们需要找工作,而“英雄管理局”为它们寻找待解决的危机。
The application has three main feature areas:
本应用具有三个主要的特性区:
A Crisis Center for maintaining the list of crises for assignment to heroes.
危机中心用于维护要指派给英雄的危机列表。
A Heroes area for maintaining the list of heroes employed by the agency.
英雄区用于维护管理局雇佣的英雄列表。
An Admin area to manage the list of crises and heroes.
管理区会管理危机和英雄的列表。
Try it by clicking on this
点击
Once the app warms up, you'll see a row of navigation buttons and the Heroes view with its list of heroes.
等应用热身完毕,我们就会看到一排导航按钮,以及一个英雄列表视图。
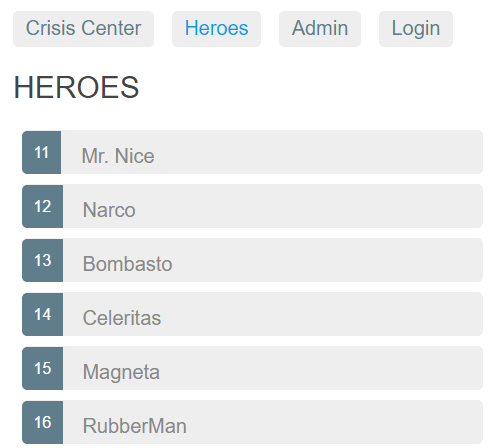
Select one hero and the app takes you to a hero editing screen.
选择其中之一,该应用就会把我们带到此英雄的编辑页面。
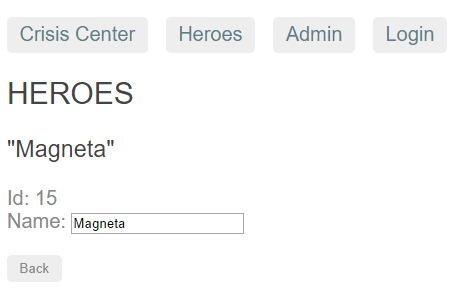
Alter the name. Click the "Back" button and the app returns to the heroes list which displays the changed hero name. Notice that the name change took effect immediately.
修改完名字,再点击“后退”按钮,我们又回到了英雄列表页,其中显示的英雄名已经变了。注意,对名字的修改会立即生效。
Had you clicked the browser's back button instead of the "Back" button, the app would have returned you to the heroes list as well. Angular app navigation updates the browser history as normal web navigation does.
另外我们也可以点击浏览器本身的后退按钮,这样也同样会回到英雄列表页。 在Angular应用中导航也会和标准的Web导航一样更新浏览器中的历史。
Now click the Crisis Center link for a list of ongoing crises.
现在,点击危机中心链接,前往危机列表页。
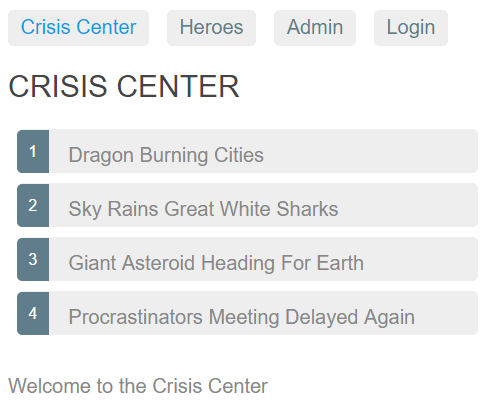
Select a crisis and the application takes you to a crisis editing screen. The Crisis Detail appears in a child view on the same page, beneath the list.
选择其中之一,该应用就会把我们带到此危机的编辑页面。 危机详情出现在了当前页的子视图区,也就是在列表的紧下方。
Alter the name of a crisis. Notice that the corresponding name in the crisis list does not change.
修改危机的名称。 注意,危机列表中的相应名称并没有修改。
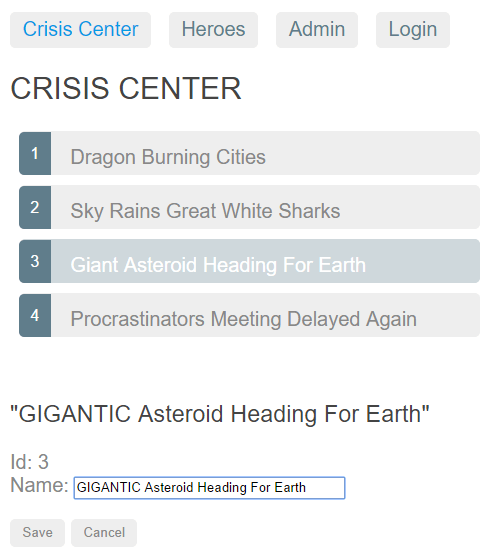
Unlike Hero Detail, which updates as you type, Crisis Detail changes are temporary until you either save or discard them by pressing the "Save" or "Cancel" buttons. Both buttons navigate back to the Crisis Center and its list of crises.
这和英雄详情页略有不同。英雄详情会立即保存我们所做的更改。 而危机详情页中,我们的更改都是临时的 —— 除非按“保存”按钮保存它们,或者按“取消”按钮放弃它们。 这两个按钮都会导航回危机中心,显示危机列表。
Do not click either button yet. Click the browser back button or the "Heroes" link instead.
先不要点击这些按钮。 而是点击浏览器的后退按钮,或者点击“Heroes”链接。
Up pops a dialog box.
我们会看到弹出了一个对话框。
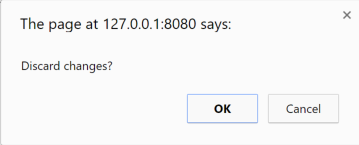
You can say "OK" and lose your changes or click "Cancel" and continue editing.
我们可以回答“确定”以放弃这些更改,或者回答“取消”来继续编辑。
Behind this behavior is the router's CanDeactivate guard.
The guard gives you a chance to clean-up or ask the user's permission before navigating away from the current view.
这种行为的幕后是路由器的CanDeactivate守卫。
该守卫让我们有机会进行清理工作或在离开当前视图之前请求用户的许可。
The Admin and Login buttons illustrate other router capabilities to be covered later in the guide.
This short introduction will do for now.
Admin和Login按钮用于演示路由器的其它能力,本章稍后的部分会讲解它们。我们现在先不管它。
Proceed to the first application milestone.
我们这就开始本应用的第一个里程碑。
Milestone 1: Getting started with the router
里程碑1:从路由器开始
Begin with a simple version of the app that navigates between two empty views.
开始本应用的一个简版,它在两个空路由之间导航。

Set the <base href>
设置<base href>
The router uses the browser's
history.pushState
for navigation. Thanks to pushState, you can make in-app URL paths look the way you want them to
look, e.g. localhost:3000/crisis-center. The in-app URLs can be indistinguishable from server URLs.
路由器使用浏览器的history.pushState进行导航。
感谢pushState!有了它,我们就能按所期望的样子来显示应用内部的URL路径,比如:localhost:3000/crisis-center。虽然我们使用的全部是客户端合成的视图,但应用内部的这些URL看起来和来自服务器的没有什么不同。
Modern HTML5 browsers were the first to support pushState which is why many people refer to these URLs as
"HTML5 style" URLs.
现代HTML 5浏览器是最早支持pushState的,这也就是很多人喜欢把这种URL称作“HTML 5风格的”URL的原因。
HTML5 style navigation is the router default. In the LocationStrategy and browser URL styles Appendix, learn why HTML5 style is preferred, how to adjust its behavior, and how to switch to the older hash (#) style, if necessary.
HTML 5风格的导航是路由器的默认值。请到下面的附录浏览器URL风格中学习为什么首选“HTML 5”风格、如何调整它的行为,以及如何在必要时切换回老式的hash(#)风格。
You must add a
<base href> element
to the app's index.html for pushState routing to work.
The browser uses the <base href> value to prefix relative URLs when referencing
CSS files, scripts, and images.
我们必须往本应用的index.html中添加一个<base href> 元素,这样pushState才能正常工作。
当引用CSS文件、脚本和图片时,浏览器会用<base href>的值作为相对URL的前缀。
Add the <base> element just after the <head> tag.
If the app folder is the application root, as it is for this application,
set the href value in index.html exactly as shown here.
把<base>元素添加到<head>元素中。
如果app目录是应用的根目录,对于本应用,可以像这样设置index.html中的href值:
src/index.html (base-href)
A live coding environment like Plunker sets the application base address dynamically so you can't specify a fixed address.
That's why the example code replaces the <base href...> with a script that writes the <base> tag on the fly.
像Plunker这样的在线编程环境会动态设置应用的基地址(base href),因此我们没办法指定固定的地址。
这就是为什么我们要用一个脚本动态写入<base>标签,而不是直接写<base href...>。
You only need this trick for the live example, not production code.
我们只应该在在线例子这种情况下使用这种小花招,不要把它用到产品的正式代码中。
Importing from the router library
从路由库中导入
Begin by importing some symbols from the router library.
The Router is in its own @angular/router package.
It's not part of the Angular core. The router is an optional service because not all applications
need routing and, depending on your requirements, you may need a different routing library.
先从路由库导入一些符号。
路由器在它自己的@angular/router包中。
它不是Angular内核的一部分。该路由器是可选的服务,这是因为并不是所有应用都需要路由,并且,如果需要,你还可能需要另外的路由库。
You teach the router how to navigate by configuring it with routes.
通过一些路由来配置路由器,我们可以教它如何进行导航。
Define routes
定义路由
A router must be configured with a list of route definitions.
路由器必须用“路由定义”的列表进行配置。
The first configuration defines an array of two routes with simple paths leading to the
CrisisListComponent and HeroListComponent.
我们的第一个配置中定义了由两个路由构成的数组,它们分别通过路径(path)导航到了CrisisListComponent和HeroListComponent组件。
Each definition translates to a Route object which has two things: a
path, the URL path segment for this route; and a
component, the component associated with this route.
每个定义都被翻译成了一个Route对象。该对象有一个path字段,表示该路由中的URL路径部分,和一个component字段,表示与该路由相关联的组件。
The router draws upon its registry of definitions when the browser URL changes or when application code tells the router to navigate along a route path.
当浏览器的URL变化时或在代码中告诉路由器导航到一个路径时,路由器就会翻出它用来保存这些路由定义的注册表。
In simpler terms, you might say this of the first route:
直白的说,我们可以这样解释第一个路由:
When the browser's location URL changes to match the path segment
/crisis-center, then the router activates an instance of theCrisisListComponentand displays its view.当浏览器地址栏的URL变化时,如果它匹配上了路径部分
/crisis-center,路由器就会激活一个CrisisListComponent的实例,并显示它的视图。When the application requests navigation to the path
/crisis-center, the router activates an instance ofCrisisListComponent, displays its view, and updates the browser's address location and history with the URL for that path.当应用程序请求导航到路径
/crisis-center时,路由器激活一个CrisisListComponent的实例,显示它的视图,并将该路径更新到浏览器地址栏和历史。
Here is the first configuration. Pass the array of routes, appRoutes, to the RouterModule.forRoot method.
It returns a module, containing the configured Router service provider, plus other providers that the routing library requires.
Once the application is bootstrapped, the Router performs the initial navigation based on the current browser URL.
下面是第一个配置。我们将路由数组传递到RouterModule.forRoot方法,该方法返回一个包含已配置的Router服务提供商模块和一些其它路由包需要的服务提供商。应用启动时,Router将在当前浏览器URL的基础上进行初始导航。
src/app/app.module.ts (first-config)
Adding the configured RouterModule to the AppModule is sufficient for simple route configurations.
As the application grows, you'll want to refactor the routing configuration into a separate file
and create a Routing Module, a special type of Service Module dedicated to the purpose
of routing in feature modules.
作为简单的路由配置,将添加配置好的RouterModule到AppModule中就足够了。
随着应用的成长,我们将需要将路由配置重构到单独的文件,并创建路由模块 - 一种特别的、专门为特性模块的路由器服务的服务模块。
Providing the RouterModule in the AppModule makes the Router available everywhere in the application.
在AppModule中提供RouterModule,让该路由器在应用的任何地方都能被使用。
The AppComponent shell
AppComponent外壳组件
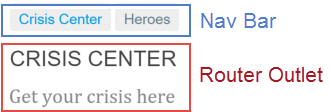
The root AppComponent is the application shell. It has a title, a navigation bar with two links,
and a router outlet where the router swaps views on and off the page. Here's what you get:
根组件AppComponent是本应用的壳。它在顶部有一个标题、一个带两个链接的导航条,在底部有一个路由器出口,路由器会在它所指定的位置上把视图切入或调出页面。就像下图中所标出的:
The corresponding component template looks like this:
该组件所对应的模板是这样的:
RouterOutlet
The RouterOutlet is a directive from the router library that marks
the spot in the template where the router should display the views for that outlet.
RouterOutlet是一个来自路由库的组件。
路由器会在<router-outlet>标签中显示视图。
The router adds the <router-outlet> element to the DOM
and subsequently inserts the navigated view element
immediately after the <router-outlet>.
一个模板中只能有一个未命名的<router-outlet>。
但路由器可以支持多个命名的出口(outlet),将来我们会涉及到这部分特性。
RouterLink binding
routerLink 绑定
Above the outlet, within the anchor tags, you see
attribute bindings to
the RouterLink directive that look like routerLink="...".
在出口上方的A标签中,有一个绑定RouterLink指令的属性绑定,就像这样:routerLink="..."。我们从路由库中导入了RouterLink。
The links in this example each have a string path, the path of a route that you configured earlier. There are no route parameters yet.
例子中的每个链接都有一个字符串型的路径,也就是我们以前配置过的路由路径,但还没有指定路由参数。
You can also add more contextual information to the RouterLink by providing query string parameters
or a URL fragment for jumping to different areas on the page. Query string parameters
are provided through the [queryParams] binding which takes an object (e.g. { name: 'value' }), while the URL fragment
takes a single value bound to the [fragment] input binding.
我们还可以通过提供查询字符串参数为RouterLink提供更多情境信息,或提供一个URL片段(Fragment或hash)来跳转到本页面中的其它区域。
查询字符串可以由[queryParams]绑定来提供,它需要一个对象型参数(如{ name: 'value' }),而URL片段需要一个绑定到[fragment]的单一值。
Learn about the how you can also use the link parameters array in the appendix below.
还可以到后面的附录中学习如何使用链接参数数组。
RouterLinkActive binding
routerLinkActive绑定
On each anchor tag, you also see property bindings to
the RouterLinkActive directive that look like routerLinkActive="...".
每个A标签还有一个到RouterLinkActive指令的属性绑定,就像routerLinkActive="..."。
The template expression to the right of the equals (=) contains a space-delimited string of CSS classes
that the Router will add when this link is active (and remove when the link is inactive).
You can also set the RouterLinkActive directive to a string of classes such as [routerLinkActive]="active fluffy"
or bind it to a component property that returns such a string.
等号(=)右侧的模板表达式包含用空格分隔的一些CSS类。当路由激活时路由器就会把它们添加到此链接上(反之则移除)。我们还可以把RouterLinkActive指令绑定到一个CSS类组成的数组,如[routerLinkActive]="['...']"。
The RouterLinkActive directive toggles css classes for active RouterLinks based on the current RouterState.
This cascades down through each level of the route tree, so parent and child router links can be active at the same time.
To override this behavior, you can bind to the [routerLinkActiveOptions] input binding with the { exact: true } expression.
By using { exact: true }, a given RouterLink will only be active if its URL is an exact match to the current URL.
RouterLinkActive指令会基于当前的RouterState对象来为激活的RouterLink切换CSS类。
这会一直沿着路由树往下进行级联处理,所以父路由链接和子路由链接可能会同时激活。
要改变这种行为,可以把[routerLinkActiveOptions]绑定到{exact: true}表达式。
如果使用了{ exact: true },那么只有在其URL与当前URL精确匹配时才会激活指定的RouterLink。
Router directives
路由器指令集
RouterLink, RouterLinkActive and RouterOutlet are directives provided by the Angular RouterModule package.
They are readily available for you to use in the template.
RouterLink、RouterLinkActive和RouterOutlet是由RouterModule包提供的指令。
现在它已经可用于我们自己的模板中。
The current state of app.component.ts looks like this:
app.component.ts目前是这样的:
src/app/app.component.ts (excerpt)
Wildcard route
通配符路由
You've created two routes in the app so far, one to /crisis-center and the other to /heroes.
Any other URL causes the router to throw an error and crash the app.
我们以前在应用中创建过两个路由,一个是/crisis-center,另一个是/heroes。
所有其它URL都会导致路由器抛出错误,并让应用崩溃。
Add a wildcard route to intercept invalid URLs and handle them gracefully. A wildcard route has a path consisting of two asterisks. It matches every URL. The router will select this route if it can't match a route earlier in the configuration. A wildcard route can navigate to a custom "404 Not Found" component or redirect to an existing route.
可以添加一个通配符路由来拦截所有无效的URL,并优雅的处理它们。
通配符路由的path是两个星号(**),它会匹配任何 URL。
当路由器匹配不上以前定义的那些路由时,它就会选择这个路由。
通配符路由可以导航到自定义的“404 Not Found”组件,也可以重定向到一个现有路由。
The router selects the route with a first match wins strategy. Wildcard routes are the least specific routes in the route configuration. Be sure it is the last route in the configuration.
路由器使用先匹配者优先的策略来选择路由。 通配符路由是路由配置中最没有特定性的那个,因此务必确保它是配置中的最后一个路由。
To test this feature, add a button with a RouterLink to the HeroListComponent template and set the link to "/sidekicks".
要测试本特性,请往HeroListComponent的模板中添加一个带RouterLink的按钮,并且把它的链接设置为"/sidekicks"。
src/app/hero-list.component.ts (excerpt)
The application will fail if the user clicks that button because you haven't defined a "/sidekicks" route yet.
当用户点击该按钮时,应用就会失败,因为我们尚未定义过"/sidekicks"路由。
Instead of adding the "/sidekicks" route, define a wildcard route instead and have it navigate to a simple PageNotFoundComponent.
不要添加"/sidekicks"路由,而是定义一个“通配符”路由,让它直接导航到PageNotFoundComponent组件。
src/app/app.module.ts (wildcard)
Create the PageNotFoundComponent to display when users visit invalid URLs.
创建PageNotFoundComponent,以便在用户访问无效网址时显示它。
src/app/not-found.component.ts (404 component)
As with the other components, add the PageNotFoundComponent to the AppModule declarations.
像其它组件一样,把PageNotFoundComponent添加到AppModule的声明中。
Now when the user visits /sidekicks, or any other invalid URL, the browser displays "Page not found".
The browser address bar continues to point to the invalid URL.
现在,当用户访问/sidekicks或任何无效的URL时,浏览器就会显示“Page not found”。
浏览器的地址栏仍指向无效的URL。
The default route to heroes
把默认路由设置为英雄列表
When the application launches, the initial URL in the browser bar is something like:
应用启动时,浏览器地址栏中的初始URL是这样的:
That doesn't match any of the configured routes which means that the application won't display any component when it's launched. The user must click one of the links to trigger a navigation and display a component.
它不能匹配任何已配置的路由,这表示当应用启动时,它不会显示任何组件。 用户必须点击一个链接来触发导航或者显示组件。
It would be nicer if the application had a default route that displayed the list of heroes immediately,
just as it will when the user clicks the "Heroes" link or pastes localhost:3000/heroes into the address bar.
如果应用有一个默认路由显然会更好,它会立即显示英雄列表,就像用户点击了“Heroes”链接或者把localhost:3000/heroes粘贴进地址栏一样。
Redirecting routes
重定向路由
The preferred solution is to add a redirect route that translates the initial relative URL ('')
to the desired default path (/heroes). The browser address bar shows .../heroes as if you'd navigated there directly.
首选方案是添加一个redirect路由来把最初的相对路径('')转换成期望的默认路径(/heroes)。
浏览器地址栏会显示.../heroes,就像你直接导航到那里一样。
Add the default route somewhere above the wildcard route.
It's just above the wildcard route in the following excerpt showing the complete appRoutes for this milestone.
在通配符路由上方添加一个默认路由。
在下方的代码片段中,它出现在通配符路由的紧上方,展示了这个里程碑的完整appRoutes。
src/app/app-routing.module.ts (appRoutes)
A redirect route requires a pathMatch property to tell the router how to match a URL to the path of a route.
The router throws an error if you don't.
In this app, the router should select the route to the HeroListComponent only when the entire URL matches '',
so set the pathMatch value to 'full'.
重定向路由需要一个pathMatch属性,来告诉路由器如何用URL去匹配路由的路径,否则路由器就会报错。
在本应用中,路由器应该只有在完整的URL等于''时才选择HeroListComponent组件,因此我们要把pathMatch设置为'full'。
Technically, pathMatch = 'full' results in a route hit when the remaining, unmatched segments of the URL match ''.
In this example, the redirect is in a top level route so the remaining URL and the entire URL are the same thing.
从技术角度说,pathMatch = 'full'导致URL中剩下的、未匹配的部分必须等于''。
在这个例子中,跳转路由在一个顶级路由中,因此剩下的URL和完整的URL是一样的。
The other possible pathMatch value is 'prefix' which tells the router
to match the redirect route when the remaining URL begins with the redirect route's prefix path.
pathMatch的另一个可能的值是'prefix',它会告诉路由器:当剩下的URL以这个跳转路由中的prefix值开头时,就会匹配上这个跳转路由。
Don't do that here.
If the pathMatch value were 'prefix', every URL would match ''.
在这里不能这么做!如果pathMatch的值是'prefix',那么每个URL都会匹配上''。
Try setting it to 'prefix' then click the Go to sidekicks button.
Remember that's a bad URL and you should see the "Page not found" page.
Instead, you're still on the "Heroes" page.
Enter a bad URL in the browser address bar.
You're instantly re-routed to /heroes.
Every URL, good or bad, that falls through to this route definition
will be a match.
尝试把它设置为'prefix',然后点击Go to sidekicks按钮。别忘了,它是一个无效URL,本应显示“Page not found”页。
但是,我们看到了“英雄列表”页。在地址栏中输入一个无效的URL,我们又被路由到了/heroes。
每一个URL,无论有效与否,都会匹配上这个路由定义。
The default route should redirect to the HeroListComponent only when the entire url is ''.
Remember to restore the redirect to pathMatch = 'full'.
默认路由应该只有在整个URL等于''时才重定向到HeroListComponent,别忘了把重定向路由设置为pathMatch = 'full'。
Learn more in Victor Savkin's post on redirects.
要了解更多,参见Victor Savkin的帖子关于重定向。
Basics wrap up
“起步阶段”总结
You've got a very basic navigating app, one that can switch between two views when the user clicks a link.
我们得到了一个非常基本的、带导航的应用,当用户点击链接时,它能在两个视图之间切换。
You've learned how to do the following:
我们已经学会了如何:
Load the router library.
加载路由库
Add a nav bar to the shell template with anchor tags,
routerLinkandrouterLinkActivedirectives.往壳组件的模板中添加一个导航条,导航条中有一些A标签、
routerLink指令和routerLinkActive指令Add a
router-outletto the shell template where views will be displayed.往壳组件的模板中添加一个
router-outlet指令,视图将会被显示在那里Configure the router module with
RouterModule.forRoot.用
RouterModule.forRoot配置路由器模块Set the router to compose HTML5 browser URLs.
设置路由器,使其合成HTML5模式的浏览器URL。
handle invalid routes with a
wildcardroute.使用通配符路由来处理无效路由
navigate to the default route when the app launches with an empty path.
当应用在空路径下启动时,导航到默认路由
The rest of the starter app is mundane, with little interest from a router perspective. Here are the details for readers inclined to build the sample through to this milestone.
这个初学者应用的其它部分有点平淡无奇,从路由器的角度来看也很平淡。 如果你还是倾向于在这个里程碑里构建它们,参见下面的构建详情。
The starter app's structure looks like this:
这个初学者应用的结构是这样的:
Here are the files discussed in this milestone.
下面是当前里程碑中讨论过的文件列表:
Milestone 2: Routing module
里程碑 #2:路由模块
In the initial route configuration, you provided a simple setup with two routes used
to configure the application for routing. This is perfectly fine for simple routing.
As the application grows and you make use of more Router features, such as guards,
resolvers, and child routing, you'll naturally want to refactor the routing configuration into its own file.
We recommend moving the routing information into a special-purpose module called a Routing Module.
在原始的路由配置中,我们提供了仅有两个路由的简单配置来设置应用的路由。对于简单的路由,这没有问题。 随着应用的成长,我们使用更多路由器特征,比如守卫、解析器和子路由等,我们很自然想要重构路由。 建议将路由信息移到一个单独的特殊用途的模块,叫做路由模块。
The Routing Module has several characteristics:
路由模块有一系列特性:
Separates routing concerns from other application concerns.
把路由这个关注点从其它应用类关注点中分离出去
Provides a module to replace or remove when testing the application.
测试特性模块时,可以替换或移除路由模块
Provides a well-known location for routing service providers including guards and resolvers.
为路由服务提供商(包括守卫和解析器等)提供一个共同的地方
Does not declare components.
不要声明组件
Refactor the routing configuration into a routing module
将路由配置重构为路由模块
Create a file named app-routing.module.ts in the /app folder to contain the routing module.
在/app目录下创建一个名叫app-routing.module.ts的文件,以包含这个路由模块。
Import the CrisisListComponent and the HeroListComponent components
just like you did in the app.module.ts. Then move the Router imports
and routing configuration, including RouterModule.forRoot, into this routing module.
导入CrisisListComponent和HeroListComponent组件,就像app.module.ts中一样。然后把Router的导入语句和路由配置以及RouterModule.forRoot移入这个路由模块中。
Following convention, add a class name AppRoutingModule and export it
so you can import it later in AppModule.
遵循规约,添加一个AppRoutingModule类并导出它,以便稍后在AppModule中导入它。
Finally, re-export the Angular RouterModule by adding it to the module exports array.
By re-exporting the RouterModule here and importing AppRoutingModule in AppModule,
the components declared in AppModule will have access to router directives such as RouterLink and RouterOutlet.
最后,可以通过把它添加到该模块的exports数组中来再次导出RouterModule。
通过在AppModule中导入AppRoutingModule并再次导出RouterModule,那些声明在AppModule中的组件就可以访问路由指令了,比如RouterLink 和 RouterOutlet。
After these steps, the file should look like this.
做完这些之后,该文件变成了这样:
src/app/app-routing.module.ts
Next, update the app.module.ts file,
first importing the newly created AppRoutingModule from app-routing.module.ts,
then replacing RouterModule.forRoot in the imports array with the AppRoutingModule.
接下来,修改app.module.ts文件,首先从app-routing.module.ts中导入新创建的AppRoutingModule,
然后把imports数组中的RouterModule.forRoot替换为AppRoutingModule。
src/app/app.module.ts
Later in this guide you will create multiple routing modules and discover that you must import those routing modules in the correct order.
本章稍后的部分,我们将创建一个多路由模块,并讲解为何我们必须以正确的顺序导入那些路由模块。
The application continues to work just the same, and you can use AppRoutingModule as
the central place to maintain future routing configuration.
应用继续正常运行,我们可以把路由模块作为为每个特性模块维护路由配置的中心地方。
Do you need a Routing Module?
你需要路由模块吗?
The Routing Module replaces the routing configuration in the root or feature module. Either configure routes in the Routing Module or within the module itself but not in both.
路由模块在根模块或者特性模块替换了路由配置。在路由模块或者在模块内部配置路由,但不要同时在两处都配置。
The Routing Module is a design choice whose value is most obvious when the configuration is complex and includes specialized guard and resolver services. It can seem like overkill when the actual configuration is dead simple.
路由模块是设计选择,它的价值在配置很复杂,并包含专门守卫和解析器服务时尤其明显。 在配置很简单时,它可能看起来很多余。
Some developers skip the Routing Module (for example, AppRoutingModule) when the configuration is simple and
merge the routing configuration directly into the companion module (for example, AppModule).
在配置很简单时,一些开发者跳过路由模块(例如AppRoutingModule),并将路由配置直接混合在关联模块中(比如AppModule )。
Choose one pattern or the other and follow that pattern consistently.
我们建议你选择其中一种模式,并坚持模式的一致性。
Most developers should always implement a Routing Module for the sake of consistency.
大多数开发者应该采用路由模块,以保持一致性。
It keeps the code clean when configuration becomes complex. It makes testing the feature module easier. Its existence calls attention to the fact that a module is routed. It is where developers expect to find and expand routing configuration.
它在配置复杂时,能确保代码干净。 它让测试特性模块更加容易。 它的存在突出了模块时被路由的事实。 开发者可以很自然的从路由模块中查找和扩展路由配置。
Milestone 3: Heroes feature
里程碑 #2 英雄特征区
You've seen how to navigate using the RouterLink directive.
Now you'll learn the following:
我们刚刚学习了如何用RouterLink指令进行导航。接下来我们将到:
Organize the app and routes into feature areas using modules.
用模块把应用和路由组织为一些特性区
Navigate imperatively from one component to another.
命令式地从一个组件导航到另一个组件
Pass required and optional information in route parameters.
通过路由传递必要信息和可选信息
This example recreates the heroes feature in the "Services" episode of the
Tour of Heroes tutorial,
and you'll be copying much of the code
from the
这个例子重写了《英雄指南》的“服务”部分的英雄列表特性,我们可以从
Here's how the user will experience this version of the app:
下面是用户将看到的版本:

A typical application has multiple feature areas, each dedicated to a particular business purpose.
典型的应用具有多个特性区,每个特性区都专注于特定的业务用途。
While you could continue to add files to the src/app/ folder,
that is unrealistic and ultimately not maintainable.
Most developers prefer to put each feature area in its own folder.
虽然我们也可以把文件都放在src/app/目录下,但那样是不现实的,而且很难维护。
大部分开发人员更喜欢把每个特性区都放在它自己的目录下。
You are about to break up the app into different feature modules, each with its own concerns. Then you'll import into the main module and navigate among them.
我们准备把应用拆分成多个不同的特性模块,每个特有模块都有自己的关注点。 然后,我们就会把它们导入到主模块中,并且在它们之间导航。
Add heroes functionality
添加英雄管理功能
Follow these steps:
按照下列步骤:
Create the
src/app/heroesfolder; you'll be adding files implementing hero management there.创建
src/app/heroes文件夹,我们将会把英雄管理功能的实现文件放在这里。Delete the placeholder
hero-list.component.tsthat's in theappfolder.在
app目录下删除占位用的hero-list.component.ts文件。Create a new
hero-list.component.tsundersrc/app/heroes.在
src/app/heroes目录下创建新的hero-list.component.ts文件。Copy into it the contents of the
app.component.tsfrom the"Services" tutorial .把
教程中的“服务”部分 的代码复制到app.component.ts中。Make a few minor but necessary changes:
做一些微小但必要的修改:
Delete the
selector(routed components don't need them).删除
selector(路由组件不需要它们)。Delete the
<h1>.删除
<h1>。Relabel the
<h2>to<h2>HEROES</h2>.给
<h2>加文字,改成<h2>HEROES</h2>。Delete the
<hero-detail>at the bottom of the template.删除模板底部的
<hero-detail>。Rename the
AppComponentclass toHeroListComponent.把
AppComponent类改名为HeroListComponent。
Copy the
hero-detail.component.tsand thehero.service.tsfiles into theheroessubfolder.把
hero-detail.component.ts和hero.service.ts复制到heroes子目录下。Create a (pre-routing)
heroes.module.tsin the heroes folder that looks like this:在
heroes子目录下(不带路由)的heroes.module.ts文件,内容如下:
src/app/heroes/heroes.module.ts (pre-routing)
When you're done, you'll have these hero management files:
安排完这些,我们就有了四个英雄管理特性区的文件:
Hero feature routing requirements
英雄特性区的路由需求
The heroes feature has two interacting components, the hero list and the hero detail. The list view is self-sufficient; you navigate to it, it gets a list of heroes and displays them.
“英雄”特性有两个相互协作的组件,列表和详情。 列表视图是自给自足的,我们导航到它,它会自行获取英雄列表并显示它们。
The detail view is different. It displays a particular hero. It can't know which hero to show on its own. That information must come from outside.
详情视图就不同了。它要显示一个特定的英雄,但是它本身却无法知道显示哪一个,此信息必须来自外部。
When the user selects a hero from the list, the app should navigate to the detail view and show that hero. You tell the detail view which hero to display by including the selected hero's id in the route URL.
当用户从列表中选择了一个英雄时,我们就导航到详情页以显示那个英雄。 通过把所选英雄的id编码进路由的URL中,就能告诉详情视图该显示哪个英雄。
Hero feature route configuration
英雄特性区的路由配置
Create a new heroes-routing.module.ts in the heroes folder
using the same techniques you learned while creating the AppRoutingModule.
在heroes目录下创建一个新的heroes-routing.module.ts文件,使用的技术和以前创建AppRoutingModule时的一样。
src/app/heroes/heroes-routing.module.ts
Put the routing module file in the same folder as its companion module file.
Here both heroes-routing.module.ts and heroes.module.ts are in the same src/app/heroes folder.
把路由模块文件和它对应的模块文件放在同一个目录下。
比如这里的heroes-routing.module.ts和heroes.module.ts都位于src/app/heroes目录下。
Consider giving each feature module its own route configuration file. It may seem like overkill early when the feature routes are simple. But routes have a tendency to grow more complex and consistency in patterns pays off over time.
将路由模块文件放到它相关的模块文件所在目录里。
这里,heroes-routing.module.ts和heroes.module.ts都在app/heroes目录中。
Import the hero components from their new locations in the src/app/heroes/ folder, define the two hero routes,
and export the HeroRoutingModule class.
从新位置src/app/heroes/目录中导入英雄相关的组件,定义两个“英雄管理”路由,并导出HeroRoutingModule类。
Now that you have routes for the Heroes module, register them with the Router via the
RouterModule almost as you did in the AppRoutingModule.
现在,我们有了Heroes模块的路由,还得在RouterModule中把它们注册给路由器,和AppRoutingModule中的做法几乎完全一样。
There is a small but critical difference.
In the AppRoutingModule, you used the static RouterModule.forRoot method to register the routes and application level service providers.
In a feature module you use the static forChild method.
这里有少量但是关键的不同点。
在AppRoutingModule中,我们使用了静态的RouterModule.forRoot方法来注册我们的路由和全应用级服务提供商。
在特性模块中,我们要改用forChild静态方法。
Only call RouterModule.forRoot in the root AppRoutingModule
(or the AppModule if that's where you register top level application routes).
In any other module, you must call the RouterModule.forChild method to register additional routes.
只在根模块AppRoutingModule中调用RouterModule.forRoot(如果在AppModule中注册应用的顶级路由,那就在AppModule中调用)。
在其它模块中,我们就必须调用RouterModule.forChild方法来注册附属路由。
Add the routing module to the HeroesModule
把路由模块添加到HeroesModule中
Add the HeroRoutingModule to the HeroModule
just as you added AppRoutingModule to the AppModule.
我们在Heroes模块中从heroes-routing.module.ts中导入HeroRoutingModule,并注册其路由。
Open heroes.module.ts.
Import the HeroRoutingModule token from heroes-routing.module.ts and
add it to the imports array of the HeroesModule.
The finished HeroesModule looks like this:
打开heroes.module.ts,从heroes-routing.module.ts中导入HeroRoutingModule并把它添加到HeroesModule的imports数组中。
写完后的HeroesModule是这样的:
src/app/heroes/heroes.module.ts
Remove duplicate hero routes
移除重复的“英雄管理”路由
The hero routes are currently defined in two places: in the HeroesRoutingModule,
by way of the HeroesModule, and in the AppRoutingModule.
英雄类的路由目前定义在两个地方:HeroesRoutingModule中(并最终给HeroesModule)和AppRoutingModule中。
Routes provided by feature modules are combined together into their imported module's routes by the router. This allows you to continue defining the feature module routes without modifying the main route configuration.
由特性模块提供的路由会被路由器再组合上它们所导入的模块的路由。 这让我们可以继续定义特性路由模块中的路由,而不用修改主路由配置。
But you don't want to define the same routes twice.
Remove the HeroListComponent import and the /heroes route from the app-routing.module.ts.
但我们显然不会想把同一个路由定义两次,那就移除HeroListComponent的导入和来自app-routing.module.ts中的/heroes路由。
Leave the default and the wildcard routes! These are concerns at the top level of the application itself.
保留默认路由和通配符路由! 它们是应用程序顶层该自己处理的关注点。
src/app/app-routing.module.ts (v2)
Import hero module into AppModule
把“英雄管理”模块导入到AppModule
The heroes feature module is ready, but the application doesn't know about the HeroesModule yet.
Open app.module.ts and revise it as follows.
英雄这个特性模块已经就绪,但应用仍然不知道HeroesModule的存在。
打开app.module.ts,并按照下述步骤修改它。
Import the HeroesModule and add it to the imports array in the @NgModule metadata of the AppModule.
导入HeroesModule并且把它加到根模块AppModule的@NgModule元数据中的imports数组中。
Remove the HeroListComponent from the AppModule's declarations because it's now provided by the HeroesModule.
This is important. There can be only one owner for a declared component.
In this case, the Heroes module is the owner of the Heroes components and is making them available to
components in the AppModule via the HeroesModule.
从AppModule的declarations中移除HeroListComponent,因为它现在已经改由HeroesModule提供了。
这一步很重要!因为一个组件只能声明在一个属主模块中。
这个例子中,Heroes模块就是Heroes组件的属主模块,而AppModule要通过导入HeroesModule才能使用这些组件。
As a result, the AppModule no longer has specific knowledge of the hero feature, its components, or its route details.
You can evolve the hero feature with more components and different routes.
That's a key benefit of creating a separate module for each feature area.
最终,AppModule不再了解那些特定于“英雄”特性的知识,比如它的组件、路由细节等。
我们可以让“英雄”特性独立演化,添加更多的组件或各种各样的路由。
这是我们为每个特性区创建独立模块后获得的核心优势。
After these steps, the AppModule should look like this:
经过这些步骤,AppModule变成了这样:
src/app/app.module.ts
Module import order matters
导入模块的顺序很重要
Look at the module imports array. Notice that the AppRoutingModule is last.
Most importantly, it comes after the HeroesModule.
看看该模块的imports数组。注意,AppRoutingModule是最后一个。最重要的是,它位于HeroesModule之后。
src/app/app.module.ts (module-imports)
The order of route configuration matters. The router accepts the first route that matches a navigation request path.
路由配置的顺序很重要。 路由器会接受第一个匹配上导航所要求的路径的那个路由。
When all routes were in one AppRoutingModule,
you put the default and wildcard routes last, after the /heroes route,
so that the router had a chance to match a URL to the /heroes route before
hitting the wildcard route and navigating to "Page not found".
当所有路由都在同一个AppRoutingModule时,我们要把默认路由和通配符路由放在最后(这里是在/heroes路由后面),
这样路由器才有机会匹配到/heroes路由,否则它就会先遇到并匹配上该通配符路由,并导航到“页面未找到”路由。
The routes are no longer in one file.
They are distributed across two modules, AppRoutingModule and HeroesRoutingModule.
这些路由不再位于单一文件中。他们分布在两个不同的模块中:AppRoutingModule和HeroesRoutingModule。
Each routing module augments the route configuration in the order of import.
If you list AppRoutingModule first, the wildcard route will be registered
before the hero routes.
The wildcard route — which matches every URL —
will intercept the attempt to navigate to a hero route.
每个路由模块都会根据导入的顺序把自己的路由配置追加进去。
如果我们先列出了AppRoutingModule,那么通配符路由就会被注册在“英雄管理”路由之前。
通配符路由(它匹配任意URL)将会拦截住每一个到“英雄管理”路由的导航,因此事实上屏蔽了所有“英雄管理”路由。
Reverse the routing modules and see for yourself that a click of the heroes link results in "Page not found". Learn about inspecting the runtime router configuration below.
反转路由模块的导入顺序,我们就会看到当点击英雄相关的链接时被导向了“页面未找到”路由。 要学习如何在运行时查看路由器配置,参见稍后的内容。
Route definition with a parameter
带参数的路由定义
Return to the HeroesRoutingModule and look at the route definitions again.
The route to HeroDetailComponent has a twist.
回到HeroesRoutingModule并再次检查这些路由定义。
HeroDetailComponent的路由有点特殊。
src/app/heroes/heroes-routing.module.ts (excerpt)
Notice the :id token in the path. That creates a slot in the path for a Route Parameter.
In this case, the router will insert the id of a hero into that slot.
注意路径中的:id令牌。它为路由参数在路径中创建一个“空位”。在这里,我们期待路由器把英雄的id插入到那个“空位”中。
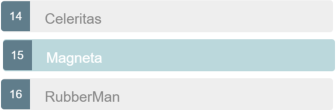
If you tell the router to navigate to the detail component and display "Magneta", you expect a hero id to appear in the browser URL like this:
如果要告诉路由器导航到详情组件,并让它显示“Magneta”,我们会期望这个英雄的id像这样显示在浏览器的URL中:
If a user enters that URL into the browser address bar, the router should recognize the pattern and go to the same "Magneta" detail view.
如果用户把此URL输入到浏览器的地址栏中,路由器就会识别出这种模式,同样进入“Magneta”的详情视图。
Embedding the route parameter token, :id,
in the route definition path is a good choice for this scenario
because the id is required by the HeroDetailComponent and because
the value 15 in the path clearly distinguishes the route to "Magneta" from
a route for some other hero.
在这个场景下,把路由参数的令牌:id嵌入到路由定义的path中是一个好主意,因为对于HeroDetailComponent来说id是必须的,
而且路径中的值15已经足够把到“Magneta”的路由和到其它英雄的路由明确区分开。
Navigate to hero detail imperatively
命令式地导航到英雄详情
Users will not navigate to the detail component by clicking a link
so you won't add a new RouterLink anchor tag to the shell.
这次我们不打算通过点击链接来导航到详情组件,因此也不用再把带RouterLink的新的A标签加到壳组件中。
Instead, when the user clicks a hero in the list, you'll ask the router to navigate to the hero detail view for the selected hero.
而是改为当用户在列表中点击一个英雄时,我们将要求路由器导航到所选英雄的详情视图
Start in the HeroListComponent.
Revise its constructor so that it acquires the Router and the HeroService by dependency injection:
从HeroListComponent开始。
修改它的构造函数,让它通过依赖注入获得Router和HeroService:
src/app/heroes/hero-list.component.ts (constructor)
Make the following few changes to the component's template:
还要对模板进行一点修改:
The template defines an *ngFor repeater such as you've seen before.
There's a (click) event binding to the component's
onSelect method which you implement as follows:
模板像以前一样定义了一个*ngFor重复器。
还有一个(click)事件绑定,绑定到了组件的onSelect方法,就像这样:
src/app/heroes/hero-list.component.ts (select)
The component's onSelect calls the router's navigate method with a link parameters array.
You can use this same syntax in a RouterLink if you decide later to navigate in HTML template rather than in component code.
它用一个链接参数数组调用路由器的navigate方法。
如果我们想把它用在HTML中,那么也可以把相同的语法用在RouterLink中。
Setting the route parameters in the list view
在列表视图中设置路由参数
After navigating to the HeroDetailComponent, you expect to see the details of the selected hero.
You need two pieces of information: the routing path to the component and the hero's id.
我们将导航到HeroDetailComponent组件。在那里,我们期望看到所选英雄的详情,这需要两部分信息:导航目标和该英雄的id。
Accordingly, the link parameters array has two items: the routing path and a route parameter that specifies the
id of the selected hero.
因此,这个链接参数数组中有两个条目:目标路由的path(路径),和一个用来指定所选英雄id的路由参数。
src/app/heroes/hero-list.component.ts (link-parameters-array)
The router composes the destination URL from the array like this:
localhost:3000/hero/15.
路由器从该数组中组合出了目标URL:
localhost:3000/hero/15。
How does the target HeroDetailComponent learn about that id?
Don't analyze the URL. Let the router do it.
目标组件HeroDetailComponent该怎么知道这个id参数呢?
当然不会是自己去分析URL了!那是路由器的工作。
The router extracts the route parameter (id:15) from the URL and supplies it to
the HeroDetailComponent via the ActivatedRoute service.
路由器从URL中解析出路由参数(id:15),并通过ActivatedRoute服务来把它提供给HeroDetailComponent组件。
ActivatedRoute: the one-stop-shop for route information
ActivatedRoute:一站式获取路由信息
The route path and parameters are available through an injected router service called the ActivatedRoute. It has a great deal of useful information including:
该路由的路径和参数可以通过注入进来的一个名叫ActivatedRoute的路由服务来获取。 它有一大堆有用的信息,包括:
url: An Observable of the route path(s), represented as an array of strings for each part of the route path.
url: 该路由路径的Observable对象。它的值是一个由路径中各个部件组成的字符串数组。
data: An Observable that contains the data object provided for the route. Also contains any resolved values from the resolve guard.
data: 该路由提供的data对象的一个Observable对象。还包含从resolve守卫中解析出来的值。
params: An Observable that contains the required and optional parameters specific to the route.
params: 包含该路由的必选参数和可选参数的Observable对象。
queryParams: An Observable that contains the query parameters available to all routes.
queryParams: 一个包含对所有路由都有效的查询参数的Observable对象。
fragment: An Observable of the URL fragment available to all routes.
fragment: 一个包含对所有路由都有效的片段值的Observable对象。
outlet: The name of the RouterOutlet used to render the route. For an unnamed outlet, the outlet name is primary.
outlet: RouterOutlet的名字,用于指示渲染该路由的位置。对于未命名的RouterOutlet,这个名字是primary。
routeConfig: The route configuration used for the route that contains the origin path.
routeConfig: 与该路由的原始路径对应的配置信息。
parent: an ActivatedRoute that contains the information from the parent route when using child routes.
parent: 当使用子路由时,它是一个包含父路由信息的ActivatedRoute对象。
firstChild: contains the first ActivatedRoute in the list of child routes.
firstChild: 包含子路由列表中的第一个ActivatedRoute对象。
children: contains all the child routes activated under the current route.
children: 包含当前路由下激活的全部子路由。
Import the Router, ActivatedRoute, and Params tokens from the router package.
我们要从路由器(router)包中导入Router、ActivatedRoute和Params类。
src/app/heroes/hero-detail.component.ts (activated route)
Import the switchMap operator because you need it later to process the Observable route parameters.
这里导入switchMap操作符是因为我们稍后将会处理路由参数的可观察对象Observable。
src/app/heroes/hero-detail.component.ts (switchMap operator import)
As usual, you write a constructor that asks Angular to inject services that the component requires and reference them as private variables.
通常,我们会直接写一个构造函数,让Angular把组件所需的服务注入进来,自动定义同名的私有变量,并把它们存进去。
src/app/heroes/hero-detail.component.ts (constructor)
Later, in the ngOnInit method, you use the ActivatedRoute service to retrieve the parameters for the route,
pull the hero id from the parameters and retrieve the hero to display.
然后,在ngOnInit方法中,我们用ActivatedRoute服务来接收路由的参数,从参数中取得该英雄的id,并接收此英雄用于显示。
Put this data access logic in the ngOnInit method rather than inside the constructor to improve the component's testability.
Angular calls the ngOnInit method shortly after creating an instance of the HeroDetailComponent
so the hero will be retrieved in time to use it.
把数据访问逻辑放进ngOnInit方法中,而不是构造函数中可以提升组件的可测试性。
Angular会在创建完HeroDetailComponent的实例之后调用ngOnInit方法,因此该英雄会在即将使用时接收到。
Learn more about the ngOnInit method and other component lifecycle hooks in the Lifecycle Hooks guide.
要了解关于ngOnInit方法和其它组件生命周期钩子的更多知识,参见生命周期钩子一章。
src/app/heroes/hero-detail.component.ts (ngOnInit)
Since the parameters are provided as an Observable, you use the switchMap operator to
provide them for the id parameter by name and tell the HeroService to fetch the hero with that id.
由于参数是作为Observable提供的,所以我们得用switchMap操作符来根据名字取得id参数,并告诉HeroService来获取带有那个id的英雄。
The switchMap operator allows you to perform an action with the current value of the Observable,
and map it to a new Observable. As with many rxjs operators, switchMap handles
an Observable as well as a Promise to retrieve the value they emit.
switchMap允许你在Observable的当前值上执行一个动作,并将它映射一个新的Observable。像许多其它rxjs操作符一样,
switchMap既可以处理Observable也可以处理Promise发射的值。
The switchMap operator will also cancel any in-flight requests if the user re-navigates to the route
while still retrieving a hero.
如果用户重新导航到该路由,并且它正在获取一个英雄时,switchMap操作符还将取消任何正在执行的请求。
Use the subscribe method to detect id changes and to (re)set the retrieved Hero.
使用subscribe方法来检测id的变化,并据此重新获取英雄。
Observable params and component reuse
参数的可观察对象(Observable)与组件复用
In this example, you retrieve the route params from an Observable.
That implies that the route params can change during the lifetime of this component.
在这个例子中,我们订阅了路由参数的Observable对象。
这种写法暗示着这些路由参数在该组件的生存期内可能会变化。
They might. By default, the router re-uses a component instance when it re-navigates to the same component type without visiting a different component first. The route parameters could change each time.
确实如此!默认情况下,如果它没有访问过其它组件就导航到了同一个组件实例,那么路由器倾向于复用组件实例。如果复用,这些参数可以变化。
Suppose a parent component navigation bar had "forward" and "back" buttons
that scrolled through the list of heroes.
Each click navigated imperatively to the HeroDetailComponent with the next or previous id.
假设父组件的导航栏有“前进”和“后退”按钮,用来轮流显示英雄列表中中英雄的详情。
每次点击都会强制导航到带前一个或后一个id的HeroDetailComponent组件。
You don't want the router to remove the current HeroDetailComponent instance from the DOM only to re-create it for the next id.
That could be visibly jarring.
Better to simply re-use the same component instance and update the parameter.
我们不希望路由器仅仅从DOM中移除当前的HeroDetailComponent实例,并且用下一个id重新创建它。
那可能导致界面抖动。
更好的方式是复用同一个组件实例,并更新这些参数。
Unfortunately, ngOnInit is only called once per component instantiation.
You need a way to detect when the route parameters change from within the same instance.
The observable params property handles that beautifully.
不幸的是,ngOnInit对每个实例只调用一次。
我们需要一种方式来检测在同一个实例中路由参数什么时候发生了变化。
而params属性这个可观察对象(Observable)干净漂亮的处理了这种情况。
When subscribing to an observable in a component, you almost always arrange to unsubscribe when the component is destroyed.
当在组件中订阅一个可观察对象时,我们通常总是要在组件销毁时取消这个订阅。
There are a few exceptional observables where this is not necessary.
The ActivatedRoute observables are among the exceptions.
但是也有少数例外情况不需要取消订阅。
ActivateRoute中的各种可观察对象就是属于这种情况。
The ActivatedRoute and its observables are insulated from the Router itself.
The Router destroys a routed component when it is no longer needed and the injected ActivatedRoute dies with it.
ActivateRoute及其可观察对象都是由Router本身负责管理的。
Router会在不再需要时销毁这个路由组件,而注入进去的ActivateRoute也随之销毁了。
Feel free to unsubscribe anyway. It is harmless and never a bad practice.
不过,我们仍然可以随意取消订阅,这不会造成任何损害,而且也不是一项坏的实践。
Snapshot: the no-observable alternative
Snapshot(快照):当不需要Observable时的替代品
This application won't re-use the HeroDetailComponent.
The user always returns to the hero list to select another hero to view.
There's no way to navigate from one hero detail to another hero detail
without visiting the list component in between.
Therefore, the router creates a new HeroDetailComponent instance every time.
本应用不需要复用HeroDetailComponent。
我们总会先返回英雄列表,再选择另一位英雄。
所以,不存在从一个英雄详情导航到另一个而不用经过英雄列表的情况。
这意味着我们每次都会得到一个全新的HeroDetailComponent实例。
When you know for certain that a HeroDetailComponent instance will never, never, ever
be re-used, you can simplify the code with the snapshot.
假如我们很确定这个HeroDetailComponent组件的实例永远、永远不会被复用,那就可以使用快照来简化这段代码。
The route.snapshot provides the initial value of the route parameters.
You can access the parameters directly without subscribing or adding observable operators.
It's much simpler to write and read:
route.snapshot提供了路由参数的初始值。
我们可以通过它来直接访问参数,而不用订阅或者添加Observable的操作符。
这样在读写时就会更简单:
src/app/heroes/hero-detail.component.ts (ngOnInit snapshot)
Remember: you only get the initial value of the parameters with this technique.
Stick with the observable params approach if there's even a chance that the router
could re-use the component.
This sample stays with the observable params strategy just in case.
记住:,用这种技巧,我们只得到了这些参数的初始值。
如果有可能连续多次导航到此组件,那么就该用params可观察对象的方式。
我们在这里选择使用params可观察对象策略,以防万一。
Navigating back to the list component
导航回列表组件
The HeroDetailComponent has a "Back" button wired to its gotoHeroes method that navigates imperatively
back to the HeroListComponent.
HeroDetailComponent组件有一个“Back”按钮,关联到它的gotoHeroes方法,该方法会导航回HeroListComponent组件。
The router navigate method takes the same one-item link parameters array
that you can bind to a [routerLink] directive.
It holds the path to the HeroListComponent:
路由的navigate方法同样接受一个单条目的链接参数数组,我们也可以把它绑定到[routerLink]指令上。
它保存着到HeroListComponent组件的路径:
src/app/heroes/hero-detail.component.ts (excerpt)
Route Parameters: Required or optional?
路由参数:必须还是可选?
Use route parameters to specify a required parameter value within the route URL
as you do when navigating to the HeroDetailComponent in order to view the hero with id15:
如果想导航到HeroDetailComponent以对id为15的英雄进行查看并编辑,就要在路由的URL中使用路由参数来指定必要参数值。
You can also add optional information to a route request. For example, when returning to the heroes list from the hero detail view, it would be nice if the viewed hero was preselected in the list.
我们也能在路由请求中添加可选信息。
比如,当从HeroDetailComponent返回英雄列表时,如果能自动选中刚刚查看过的英雄就好了。
You'll implement this feature in a moment by including the viewed hero's id
in the URL as an optional parameter when returning from the HeroDetailComponent.
如果我们能在从HeroDetailComponent返回时在URL中带上英雄Magneta的id,不就可以了吗?接下来我们就尝试实现这个场景。
Optional information takes other forms. Search criteria are often loosely structured, e.g., name='wind*'.
Multiple values are common—after='12/31/2015' & before='1/1/2017'—in no
particular order—before='1/1/2017' & after='12/31/2015'— in a
variety of formats—during='currentYear'.
可选信息有很多种形式。搜索条件通常就不是严格结构化的,比如name='wind*';有多个值也很常见,如after='12/31/2015'&before='1/1/2017';
而且顺序无关,如before='1/1/2017'&after='12/31/2015',还可能有很多种变体格式,如during='currentYear'。
These kinds of parameters don't fit easily in a URL path. Even if you could define a suitable URL token scheme, doing so greatly complicates the pattern matching required to translate an incoming URL to a named route.
这么多种参数要放在URL的路径中可不容易。即使我们能制定出一个合适的URL方案,实现起来也太复杂了,得通过模式匹配才能把URL翻译成命名路由。
Optional parameters are the ideal vehicle for conveying arbitrarily complex information during navigation. Optional parameters aren't involved in pattern matching and afford flexibility of expression.
可选参数是在导航期间传送任意复杂信息的理想载体。 可选参数不涉及到模式匹配并在表达上提供了巨大的灵活性。
The router supports navigation with optional parameters as well as required route parameters. Define optional parameters in a separate object after you define the required route parameters.
和必要参数一样,路由器也支持通过可选参数导航。 我们在定义完必要参数之后,通过一个独立的对象来定义可选参数。
In general, prefer a required route parameter when the value is mandatory (for example, if necessary to distinguish one route path from another); prefer an optional parameter when the value is optional, complex, and/or multivariate.
通常,对于强制性的值(比如用于区分两个路由路径的)使用必备参数;当这个值是可选的、复杂的或多值的时,使用可选参数。
Heroes list: optionally selecting a hero
英雄列表:选定一个英雄(也可不选)
When navigating to the HeroDetailComponent you specified the required id of the hero-to-edit in the
route parameter and made it the second item of the link parameters array.
当导航到HeroDetailComponent时,我们可以在路由参数中指定一个所要编辑的英雄id,只要把它作为链接参数数组中的第二个条目就可以了。
src/app/heroes/hero-list.component.ts (link-parameters-array)
The router embedded the id value in the navigation URL because you had defined it
as a route parameter with an :id placeholder token in the route path:
路由器在导航URL中内嵌了id的值,这是因为我们把它用一个:id占位符当做路由参数定义在了路由的path中:
src/app/heroes/heroes-routing.module.ts (hero-detail-route)
When the user clicks the back button, the HeroDetailComponent constructs another link parameters array
which it uses to navigate back to the HeroListComponent.
当用户点击后退按钮时,HeroDetailComponent构造了另一个链接参数数组,可以用它导航回HeroListComponent。
src/app/heroes/hero-detail.component.ts (gotoHeroes)
This array lacks a route parameter because you had no reason to send information to the HeroListComponent.
该数组缺少一个路由参数,这是因为我们那时没有理由往HeroListComponent发送信息。
Now you have a reason. You'd like to send the id of the current hero with the navigation request so that the
HeroListComponent can highlight that hero in its list.
This is a nice-to-have feature; the list will display perfectly well without it.
但现在有了。我们要在导航请求中同时发送当前英雄的id,以便HeroListComponent可以在列表中高亮这个英雄。
这是一个有更好,没有也无所谓的特性,就算没有它,列表照样能显示得很完美。
Send the id with an object that contains an optional id parameter.
For demonstration purposes, there's an extra junk parameter (foo) in the object that the HeroListComponent should ignore.
Here's the revised navigation statement:
我们传送一个包含可选id参数的对象。
为了演示,我们还在对象中定义了一个没用的额外参数(foo),HeroListComponent应该忽略它。
下面是修改过的导航语句:
src/app/heroes/hero-detail.component.ts (go to heroes)
The application still works. Clicking "back" returns to the hero list view.
该应用仍然能工作。点击“back”按钮返回英雄列表视图。
Look at the browser address bar.
注意浏览器的地址栏。
To see the URL changes in the browser address bar of the live example, open it again in the Plunker editor by clicking the icon in the upper right, then pop out the preview window by clicking the blue 'X' button in the upper right corner. 要看到这个在线例子中浏览器地址栏的URL变化情况,请点击右上角的图标,在Plunker编辑器中打开它,接下来在弹出的预览窗口中点击右上角的蓝色'X'按钮就可以了。 | |
It should look something like this, depending on where you run it:
它应该是这样的,不过也取决于你在哪里运行它:
The id value appears in the URL as (;id=15;foo=foo), not in the URL path.
The path for the "Heroes" route doesn't have an :id token.
id的值像这样出现在URL中(;id=15;foo=foo),但不在URL的路径部分。
“Heroes”路由的路径部分并没有定义:id。
The optional route parameters are not separated by "?" and "&" as they would be in the URL query string. They are separated by semicolons ";" This is matrix URL notation — something you may not have seen before.
可选的路由参数没有使用“?”和“&”符号分隔,因为它们将用在URL查询字符串中。 它们是用“;”分隔的。 这是矩阵URL标记法 —— 我们以前可能从未见过。
Matrix URL notation is an idea first introduced in a 1996 proposal by the founder of the web, Tim Berners-Lee.
Matrix URL写法首次提出是在1996提案中,提出者是Web的奠基人:Tim Berners-Lee。
Although matrix notation never made it into the HTML standard, it is legal and it became popular among browser routing systems as a way to isolate parameters belonging to parent and child routes. The Router is such a system and provides support for the matrix notation across browsers.
虽然Matrix写法未曾进入过HTML标准,但它是合法的。而且在浏览器的路由系统中,它作为从父路由和子路由中单独隔离出参数的方式而广受欢迎。Angular的路由器正是这样一个路由系统,并支持跨浏览器的Matrix写法。
The syntax may seem strange to you but users are unlikely to notice or care as long as the URL can be emailed and pasted into a browser address bar as this one can.
这种语法对我们来说可能有点奇怪,不过用户不会在意这一点,因为该URL可以正常的通过邮件发出去或粘贴到浏览器的地址栏中。
Route parameters in the ActivatedRoute service
ActivatedRoute服务中的路由参数
The list of heroes is unchanged. No hero row is highlighted.
英雄列表仍没有改变,没有哪个英雄列被加亮显示。
The
The HeroListComponent isn't expecting any parameters at all and wouldn't know what to do with them.
You can change that.
HeroListComponent还完全不需要任何参数,也不知道该怎么处理它们。我们这就改变这一点。
Previously, when navigating from the HeroListComponent to the HeroDetailComponent,
you subscribed to the route params Observable and made it available to the HeroDetailComponent
in the ActivatedRoute service.
You injected that service in the constructor of the HeroDetailComponent.
以前,当从HeroListComponent导航到HeroDetailComponent时,我们通过ActivatedRoute服务订阅了路由参数这个Observable,并让它能用在HeroDetailComponent中。我们把该服务注入到了HeroDetailComponent的构造函数中。
This time you'll be navigating in the opposite direction, from the HeroDetailComponent to the HeroListComponent.
这次,我们要进行反向导航,从HeroDetailComponent到HeroListComponent。
First you extend the router import statement to include the ActivatedRoute service symbol:
首先,我们扩展该路由的导入语句,以包含进ActivatedRoute服务的类;
src/app/heroes/hero-list.component.ts (import)
Import the switchMap operator to perform an operation on the Observable of route parameters.
我们将导入switchMap操作符,在路由参数的Observable对象上执行操作。
src/app/heroes/hero-list.component.ts (rxjs imports)
Then you inject the ActivatedRoute in the HeroListComponent constructor.
接着,我们注入ActivatedRoute到HeroListComponent的构造函数中。
src/app/heroes/hero-list.component.ts (constructor and ngOnInit)
The ActivatedRoute.params property is an Observable of route parameters. The params emits new id values
when the user navigates to the component. In ngOnInit you subscribe to those values, set the selectedId,
and get the heroes.
ActivatedRoute.params属性是一个路由参数的可观察对象。当用户导航到这个组件时,params会发射一个新的id值。 在ngOnInit中,我们订阅了这些值,设置到selectedId,并获取英雄数据。
All route/query parameters are strings.
The (+) in front of the params['id'] expression is a JavaScript trick to convert the string to an integer.
所有的路由参数或查询参数都是字符串。
params['id']表达式前面的加号(+)是一个JavaScript的小技巧,用来把字符串转换成整数。
Add an isSelected method that returns true when a hero's id matches the selected id.
我们添加了一个isSelected方法,当英雄的id和选中的id匹配时,它返回真值。
src/app/heroes/hero-list.component.ts (isSelected)
Finally, update the template with a class binding to that isSelected method.
The binding adds the selected CSS class when the method returns true and removes it when false.
Look for it within the repeated <li> tag as shown here:
最后,我们用CSS类绑定更新模板,把它绑定到isSelected方法上。
如果该方法返回true,此绑定就会添加CSS类selected,否则就移除它。
在<li>标记中找到它,就像这样:
src/app/heroes/hero-list.component.ts (template)
When the user navigates from the heroes list to the "Magneta" hero and back, "Magneta" appears selected:
当用户从英雄列表导航到英雄“Magneta”并返回时,“Magneta”看起来是选中的:
The optional foo route parameter is harmless and continues to be ignored.
这儿可选的foo路由参数人畜无害,并继续被忽略。
Adding animations to the routed component
为路由组件添加动画
The heroes feature module is almost complete, but what is a feature without some smooth transitions?
这个“英雄”特性模块就要完成了,但这个特性还没有平滑的转场效果。
This section shows you how to add some animations
to the HeroDetailComponent.
在这一节,我们将为英雄详情组件添加一些动画。
First import BrowserAnimationsModule:
首先导入BrowserAnimationsModule:
src/app/app.module.ts (@NgModule imports excerpt) (animations-module)
Create an animations.ts file in the root src/app/ folder. The contents look like this:
在根目录src/app/下创建一个animations.ts。内容如下:
src/app/animations.ts (excerpt)
This file does the following:
该文件做了如下工作:
Imports the animation symbols that build the animation triggers, control state, and manage transitions between states.
导入动画符号以构建动画触发器、控制状态并管理状态之间的过渡。
Exports a constant named
slideInDownAnimationset to an animation trigger namedrouteAnimation; animated components will refer to this name.导出了一个名叫
slideInDownAnimation的常量,并把它设置为一个名叫*routeAnimation的动画触发器。带动画的组件将会引用这个名字。Specifies the wildcard state ,
*, that matches any animation state that the route component is in.指定了一个通配符状态 ——
*,它匹配该路由组件存在时的任何动画状态。Defines two transitions, one to ease the component in from the left of the screen as it enters the application view (
:enter), the other to animate the component down as it leaves the application view (:leave).定义两个过渡效果,其中一个(
:enter)在组件进入应用视图时让它从屏幕左侧缓动进入(ease-in),另一个(:leave)在组件离开应用视图时让它向下飞出。
You could create more triggers with different transitions for other route components. This trigger is sufficient for the current milestone.
我们可以为其它路由组件用不同的转场效果创建更多触发器。现在这个触发器已经足够当前的里程碑用了。
Back in the HeroDetailComponent, import the slideInDownAnimation from './animations.ts.
Add the HostBinding decorator to the imports from @angular/core; you'll need it in a moment.
返回HeroDetailComponent,从'./animations.ts中导入slideInDownAnimation。
从@angular/core中导入HostBinding装饰器,我们很快就会用到它。
Add an animations array to the @Component metadata's that contains the slideInDownAnimation.
把一个包含slideInDownAnimation的animations数组添加到@Component的元数据中。
Then add three @HostBinding properties to the class to set the animation and styles for the route component's element.
然后把三个@HostBinding属性添加到类中以设置这个路由组件元素的动画和样式。
src/app/heroes/hero-detail.component.ts (host bindings)
The '@routeAnimation' passed to the first @HostBinding matches
the name of the slideInDownAnimation trigger, routeAnimation.
Set the routeAnimation property to true because you only care about the :enter and :leave states.
传给了第一个@HostBinding的'@routeAnimation'匹配了slideInDownAnimation触发器的名字routeAnimation。
把routeAnimation属性设置为true,因为我们只关心:enter和:leave这两个状态。
The other two @HostBinding properties style the display and position of the component.
另外两个@HostBinding属性指定组件的外观和位置。
The HeroDetailComponent will ease in from the left when routed to and will slide down when navigating away.
当进入该路由时,HeroDetailComponent将会从左侧缓动进入屏幕,而离开路由时,将会向下划出。
Applying route animations to individual components works for a simple demo, but in a real life app, it is better to animate routes based on route paths.
由特性模块提供的路由将会被路由器和它们导入的模块提供的路由组合在一起。这让我们可以继续定义特性路由,而不用修改主路由配置。
Milestone 3 wrap up
里程碑#3的总结
You've learned how to do the following:
我们学到了如何:
Organize the app into feature areas.
把应用组织成特性区
Navigate imperatively from one component to another.
命令式的从一个组件导航到另一个
Pass information along in route parameters and subscribe to them in the component.
通过路由参数传递信息,并在组件中订阅它们
Import the feature area NgModule into the
AppModule.把这个特性分区模块导入根模块
AppModuleApply animations to the route component.
把动画应用到路由组件上
After these changes, the folder structure looks like this:
做完这些修改之后,目录结构是这样的:
Here are the relevant files for this version of the sample application.
这里是当前版本的范例程序相关文件。
Milestone 4: Crisis center feature
里程碑#4:危机中心
It's time to add real features to the app's current placeholder crisis center.
是时候往该应用的危机中心(现在是占位符)中添加一些真实的特性了。
Begin by imitating the heroes feature:
我们先从模仿“英雄管理”中的特性开始:
Delete the placeholder crisis center file.
删除危机中心的占位文件。
Create an
app/crisis-centerfolder.创建
app/crisis-center文件夹。Copy the files from
app/heroesinto the new crisis center folder.把
app/heroes中的文件复制到新的危机中心文件夹。In the new files, change every mention of "hero" to "crisis", and "heroes" to "crises".
在这些新文件中,把每一个对“hero”替换为“crisis”,并把“heroes”替换为“crises”。
You'll turn the CrisisService into a purveyor of mock crises instead of mock heroes:
我们将会把CrisisService转换成模拟的危机列表,而不再是模拟的英雄列表:
src/app/crisis-center/crisis.service.ts (mock-crises)
The resulting crisis center is a foundation for introducing a new concept—child routing. You can leave Heroes in its current state as a contrast with the Crisis Center and decide later if the differences are worthwhile.
最终的危机中心可以作为引入子路由这个新概念的基础。 我们把英雄管理保持在当前状态,以便和危机中心进行对比,以后再根据这些差异是否有价值来决定后续行动。
In keeping with the
Separation of Concerns principle,
changes to the Crisis Center won't affect the AppModule or
any other feature's component.
遵循关注点分离(Separation of Concerns)原则,
对危机中心的修改不会影响AppModule或其它特性模块中的组件。
A crisis center with child routes
带有子路由的危机中心
This section shows you how to organize the crisis center to conform to the following recommended pattern for Angular applications:
本节会展示如何组织危机中心,来满足Angular应用所推荐的模式:
Each feature area resides in its own folder.
把每个特性放在自己的目录中。
Each feature has its own Angular feature module.
每个特性都有自己的Angular特性模块。
Each area has its own area root component.
每个特性区都有自己的根组件。
Each area root component has its own router outlet and child routes.
每个特性区的根组件中都有自己的路由出口及其子路由。
Feature area routes rarely (if ever) cross with routes of other features.
特性区的路由很少(或完全不)与其它特性区的路由交叉。
If your app had many feature areas, the app component trees might look like this:
如果我们有更多特性区,它们的组件树是这样的:

Child routing component
子路由组件
Add the following crisis-center.component.ts to the crisis-center folder:
往crisis-center目录下添加下列crisis-center.component.ts文件:
src/app/crisis-center/crisis-center.component.ts (minus imports)
The CrisisCenterComponent has the following in common with the AppComponent:
CrisisCenterComponent和AppComponent有下列共同点:
It is the root of the crisis center area, just as
AppComponentis the root of the entire application.它是危机中心特性区的根,正如
AppComponent是整个应用的根。It is a shell for the crisis management feature area, just as the
AppComponentis a shell to manage the high-level workflow.它是危机管理特性区的壳,正如
AppComponent是管理高层工作流的壳。
Like most shells, the CrisisCenterComponent class is very simple, simpler even than AppComponent:
it has no business logic, and its template has no links, just a title and
<router-outlet> for the crisis center child views.
就像大多数的壳一样,CrisisCenterComponent类也非常简单,甚至比AppComponent更简单:
它没有业务逻辑,它的模板中没有链接,只有一个标题和用于放置危机中心的子视图的<router-outlet>。
Unlike AppComponent, and most other components, it lacks a selector.
It doesn't need one since you don't embed this component in a parent template,
instead you use the router to navigate to it.
与AppComponent和大多数其它组件不同的是,它甚至都没有指定选择器selector。
它不需要选择器,因为我们不会把这个组件嵌入到某个父模板中,而是使用路由器导航到它。
Child route configuration
子路由配置
The CrisisCenterComponent is a routing component like the AppComponent.
It has its own RouterOutlet and its own child routes.
CrisisCenterComponent是一个像AppComponent一样的路由组件。
它有自己的RouterOutlet和自己的子路由。
Add the following crisis-center-home.component.ts to the crisis-center folder.
把下面的crisis-center-home.component.ts文件添加到crisis-center目录中。
src/app/crisis-center/crisis-center-home.component.ts (minus imports)
Create a crisis-center-routing.module.ts file as you did the heroes-routing.module.ts file.
This time, you define child routes within the parent crisis-center route.
像heroes-routing.module.ts文件一样,我们也创建一个crisis-center-routing.module.ts。
但这次,我们要把子路由定义在父路由crisis-center中。
src/app/crisis-center/crisis-center-routing.module.ts (Routes)
Notice that the parent crisis-center route has a children property
with a single route containing the CrisisListComponent. The CrisisListComponent route
also has a children array with two routes.
注意,父路由crisis-center有一个children属性,它有一个包含CrisisListComponent的路由。
CrisisListModule路由还有一个带两个路由的children数组。
These two routes navigate to the crisis center child components,
CrisisCenterHomeComponent and CrisisDetailComponent, respectively.
这两个路由导航到了危机中心的两个子组件:CrisisCenterHomeComponent和CrisisDetailComponent。
There are important differences in the way the router treats these child routes.
对这些路由的处理中有一些重要的不同。
The router displays the components of these routes in the RouterOutlet
of the CrisisCenterComponent, not in the RouterOutlet of the AppComponent shell.
路由器会把这些路由对应的组件放在CrisisCenterComponent的RouterOutlet中,而不是AppComponent壳组件中的。
The CrisisListComponent contains the crisis list and a RouterOutlet to
display the Crisis Center Home and Crisis Detail route components.
CrisisListComponent包含危机列表和一个RouterOutlet,用以显示Crisis Center Home和Crisis Detail这两个路由组件。
The Crisis Detail route is a child of the Crisis List. Since the router reuses components
by default, the Crisis Detail component will be re-used as you select different crises.
Crisis Detail路由是Crisis List的子路由。由于路由器默认会复用组件,因此当我们选择了另一个危机时,CrisisDetailComponent会被复用。
In contrast, back in the Hero Detail route, the component was recreated each time you selected a different hero.
作为对比,回到Hero Detail路由时,每当我们选择了不同的英雄时,该组件都会被重新创建。
At the top level, paths that begin with / refer to the root of the application.
But child routes extend the path of the parent route.
With each step down the route tree,
you add a slash followed by the route path, unless the path is empty.
在顶级,以/开头的路径指向的总是应用的根。
但这里是子路由。
它们是在父路由路径的基础上做出的扩展。
在路由树中每深入一步,我们就会在该路由的路径上添加一个斜线/(除非该路由的路径是空的)。
Apply that logic to navigation within the crisis center for which the parent path is /crisis-center.
如果把该逻辑应用到危机中心中的导航,那么父路径就是/crisis-center。
To navigate to the
CrisisCenterHomeComponent, the full URL is/crisis-center(/crisis-center+''+'').要导航到
CrisisCenterHomeComponent,完整的URL是/crisis-center(/crisis-center+''+'')。To navigate to the
CrisisDetailComponentfor a crisis withid=2, the full URL is/crisis-center/2(/crisis-center+''+'/2').要导航到
CrisisDetailComponent以展示id=2的危机,完整的URL是/crisis-center/2(/crisis-center+''+'/2')。
The absolute URL for the latter example, including the localhost origin, is
本例子中包含站点部分的绝对URL,就是:
Here's the complete crisis-center-routing.module.ts file with its imports.
这里是完整的crisis-center.routing.ts及其导入语句。
src/app/crisis-center/crisis-center-routing.module.ts (excerpt)
Import crisis center module into the AppModule routes
把危机中心模块导入到AppModule的路由中
As with the HeroesModule, you must add the CrisisCenterModule to the imports array of the AppModule
before the AppRoutingModule:
就像HeroesModule模块中一样,我们必须把CrisisCenterModule添加到AppModule的imports数组中,就在AppRoutingModule前面:
src/app/app.module.ts (import CrisisCenterModule)
Remove the initial crisis center route from the app-routing.module.ts.
The feature routes are now provided by the HeroesModule and the CrisisCenter modules.
我们还从app.routing.ts中移除了危机中心的初始路由。我们的路由现在是由HeroesModule和CrisisCenter特性模块提供的。
The app-routing.module.ts file retains the top-level application routes such as the default and wildcard routes.
我们将保持app.routing.ts文件中只有通用路由,本章稍后会讲解它。
src/app/app-routing.module.ts (v3)
Relative navigation
相对导航
While building out the crisis center feature, you navigated to the crisis detail route using an absolute path that begins with a slash.
虽然构建出了危机中心特性区,我们却仍在使用以斜杠开头的绝对路径来导航到危机详情的路由。
The router matches such absolute paths to routes starting from the top of the route configuration.
路由器会从路由配置的顶层来匹配像这样的绝对路径。
You could continue to use absolute paths like this to navigate inside the Crisis Center
feature, but that pins the links to the parent routing structure.
If you changed the parent /crisis-center path, you would have to change the link parameters array.
我们固然可以继续像危机中心特性区一样使用绝对路径,但是那样会把链接钉死在特定的父路由结构上。
如果我们修改了父路径/crisis-center,那就不得不修改每一个链接参数数组。
You can free the links from this dependency by defining paths that are relative to the current URL segment. Navigation within the feature area remains intact even if you change the parent route path to the feature.
通过改成定义相对于当前URL的路径,我们可以把链接从这种依赖中解放出来。 当我们修改了该特性区的父路由路径时,该特性区内部的导航仍然完好无损。
Here's an example:
例子如下:
The router supports directory-like syntax in a link parameters list to help guide route name lookup:
在链接参数数组中,路由器支持“目录式”语法来指导我们如何查询路由名:
./ or no leading slash is relative to the current level.
./或无前导斜线形式是相对于当前级别的。
../ to go up one level in the route path.
../会回到当前路由路径的上一级。
You can combine relative navigation syntax with an ancestor path.
If you must navigate to a sibling route, you could use the ../<sibling> convention to go up
one level, then over and down the sibling route path.
我们可以把相对导航语法和一个祖先路径组合起来用。
如果不得不导航到一个兄弟路由,我们可以用../<sibling>来回到上一级,然后进入兄弟路由路径中。
To navigate a relative path with the Router.navigate method, you must supply the ActivatedRoute
to give the router knowledge of where you are in the current route tree.
用Router.navigate方法导航到相对路径时,我们必须提供当前的ActivatedRoute,来让路由器知道我们现在位于路由树中的什么位置。
After the link parameters array, add an object with a relativeTo property set to the ActivatedRoute.
The router then calculates the target URL based on the active route's location.
在链接参数数组中,添加一个带有relativeTo属性的对象,并把它设置为当前的ActivatedRoute。
这样路由器就会基于当前激活路由的位置来计算出目标URL。
Always specify the complete absolute path when calling router's navigateByUrl method.
当调用路由器的navigateByUrl时,总是要指定完整的绝对路径。
Navigate to crisis detail with a relative URL
用相对URL导航到危机详情
Update the Crisis List onSelect method to use relative navigation so you don't have
to start from the top of the route configuration.
把危机列表的onSelect方法改成使用相对导航,以便我们不用每次都从路由配置的顶层开始。
You've already injected the ActivatedRoute that you need to compose the relative navigation path.
我们已经注入过了ActivatedRoute,我们需要它来和相对导航路径组合在一起。
src/app/crisis-center/crisis-list.component.ts (constructor)
When you visit the Crisis Center, the ancestor path is /crisis-center,
so you only need to add the id of the Crisis Center to the existing path.
当访问危机中心时,其祖先路径是/crisis-center,所以我们只需要把危机的id添加到现有路径中就可以了。
src/app/crisis-center/crisis-list.component.ts (relative navigation)
If you were using a RouterLink to navigate instead of the Router service, you'd use the same
link parameters array, but you wouldn't provide the object with the relativeTo property.
The ActivatedRoute is implicit in a RouterLink directive.
如果我们用RouterLink来代替Router服务进行导航,就要使用相同的链接参数数组,不过不再需要提供relativeTo属性。
ActivatedRoute已经隐含在了RouterLink指令中。
src/app/crisis-center/crisis-list.component.ts (relative routerLink)
Update the gotoCrises method of the CrisisDetailComponent to navigate back to the Crisis Center list using relative path navigation.
修改CrisisDetailComponent的gotoCrises方法,来使用相对路径返回危机中心列表。
src/app/crisis-center/crisis-detail.component.ts (relative navigation)
Notice that the path goes up a level using the ../ syntax.
If the current crisis id is 3, the resulting path back to the crisis list is /crisis-center/;id=3;foo=foo.
注意这个路径使用了../语法返回上一级。
如果当前危机的id是3,那么最终返回到的路径就是/crisis-center/;id=3;foo=foo。
Displaying multiple routes in named outlets
用命名出口(outlet)显示多重路由
You decide to give users a way to contact the crisis center. When a user clicks a "Contact" button, you want to display a message in a popup view.
我们决定给用户提供一种方式来联系危机中心。 当用户点击“Contact”按钮时,我们要在一个弹出框中显示一条消息。
The popup should stay open, even when switching between pages in the application, until the user closes it by sending the message or canceling. Clearly you can't put the popup in the same outlet as the other pages.
即使在应用中的不同页面之间切换,这个弹出框也应该始终保持打开状态,直到用户发送了消息或者手动取消。 显然,我们不能把这个弹出框跟其它放到页面放到同一个路由出口中。
Until now, you've defined a single outlet and you've nested child routes under that outlet to group routes together. The router only supports one primary unnamed outlet per template.
迄今为止,我们只定义过单路由出口,并且在其中嵌套了子路由以便对路由分组。 在每个模板中,路由器只能支持一个无名主路由出口。
A template can also have any number of named outlets. Each named outlet has its own set of routes with their own components. Multiple outlets can be displaying different content, determined by different routes, all at the same time.
模板还可以有多个命名的路由出口。 每个命名出口都自己有一组带组件的路由。 多重出口可以在同一时间根据不同的路由来显示不同的内容。
Add an outlet named "popup" in the AppComponent, directly below the unnamed outlet.
在AppComponent中添加一个名叫“popup”的出口,就在无名出口的下方。
src/app/app.component.ts (outlets)
That's where a popup will go, once you learn how to route a popup component to it.
一旦我们学会了如何把一个弹出框组件路由到该出口,那里就是将会出现弹出框的地方。
Secondary routes
第二路由
Named outlets are the targets of secondary routes.
命名出口是第二路由的目标。
Secondary routes look like primary routes and you configure them the same way. They differ in a few key respects.
第二路由很像主路由,配置方式也一样。它们只有一些关键的不同点:
They are independent of each other.
它们彼此互不依赖。
They work in combination with other routes.
它们与其它路由组合使用。
They are displayed in named outlets.
它们显示在命名出口中。
Create a new component named ComposeMessageComponent in src/app/compose-message.component.ts.
It displays a simple form with a header, an input box for the message,
and two buttons, "Send" and "Cancel".
在src/app/compose-message.component.ts中创建一个名叫ComposeMessageComponent的新组件。
它显示一个简单的表单,包括一个头、一个消息输入框和两个按钮:“Send”和“Cancel”。
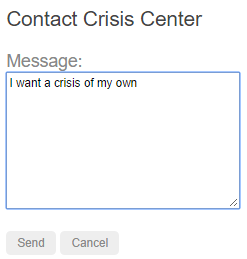
Here's the component and its template:
下面是该组件及其模板:
It looks about the same as any other component you've seen in this guide. There are two noteworthy differences.
它看起来几乎和我们以前看到的其它组件一样,但有两个值得注意的区别。
Note that the send() method simulates latency by waiting a second before "sending" the message and closing the popup.
主要send()方法在发送消息和关闭弹出框之前通过等待模拟了一秒钟的延迟。
The closePopup() method closes the popup view by navigating to the popup outlet with a null.
That's a peculiarity covered below.
closePopup()方法用把popup出口导航到null的方式关闭了弹出框。
这个奇怪的用法在稍后的部分有讲解。
As with other application components, you add the ComposeMessageComponent to the declarations of an NgModule.
Do so in the AppModule.
像其它组件一样,我们还要把ComposeMessageComponent添加到AppModule的declarations中。
Add a secondary route
添加第二路由
Open the AppRoutingModule and add a new compose route to the appRoutes.
打开AppRoutingModule,并把一个新的compose路由添加到appRoutes中。
src/app/app-routing.module.ts (compose route)
The path and component properties should be familiar.
There's a new property, outlet, set to 'popup'.
This route now targets the popup outlet and the ComposeMessageComponent will display there.
对path和component属性应该很熟悉了吧。
注意这个新的属性outlet被设置成了'popup'。
这个路由现在指向了popup出口,而ComposeMessageComponent也将显示在那里。
The user needs a way to open the popup.
Open the AppComponent and add a "Contact" link.
用户需要某种途径来打开这个弹出框。
打开AppComponent,并添加一个“Contact”链接。
src/app/app.component.ts (contact-link)
Although the compose route is pinned to the "popup" outlet, that's not sufficient for wiring the route to a RouterLink directive.
You have to specify the named outlet in a link parameters array and bind it to the RouterLink with a property binding.
虽然compose路由被钉死在了popup出口上,但这仍然不足以向RouterLink指令表明要加载该路由。
我们还要在链接参数数组中指定这个命名出口,并通过属性绑定的形式把它绑定到RouterLink上。
The link parameters array contains an object with a single outlets property whose value
is another object keyed by one (or more) outlet names.
In this case there is only the "popup" outlet property and its value is another link parameters array that specifies the compose route.
链接参数数组包含一个只有一个outlets属性的对象,它的值是另一个对象,这个对象以一个或多个路由的出口名作为属性名。
在这里,它只有一个出口名“popup”,它的值则是另一个链接参数数组,用于指定compose路由。
You are in effect saying, when the user clicks this link, display the component associated with the compose route in the popup outlet.
意思是,当用户点击此链接时,在路由出口popup中显示与compose路由相关联的组件。
This outlets object within an outer object was completely unnecessary
when there was only one route and one unnamed outlet to think about.
当有且只有一个无名出口时,外部对象中的这个outlets对象并不是必须的。
The router assumed that your route specification targeted the unnamed primary outlet and created these objects for you.
路由器假设这个路由指向了无名的主出口,并为我们创建这些对象。
Routing to a named outlet has revealed a previously hidden router truth:
you can target multiple outlets with multiple routes in the same RouterLink directive.
当路由到一个命名出口时,我们就会发现一个以前被隐藏的真相:
我们可以在同一个RouterLink指令中为多个路由出口指定多个路由。
You're not actually doing that here. But to target a named outlet, you must use the richer, more verbose syntax.
这里我们实际上没能这样做。要想指向命名出口,我们就得使用一种更强大也更啰嗦的语法。
Secondary route navigation: merging routes during navigation
第二路由导航:在导航期间合并路由
Navigate to the Crisis Center and click "Contact". you should see something like the following URL in the browser address bar.
导航到危机中心并点击“Contact”,我们将会在浏览器的地址栏看到如下URL:
The interesting part of the URL follows the ...:
这个URL中有意思的部分是...后面的这些:
The
crisis-centeris the primary navigation.crisis-center是主导航。Parentheses surround the secondary route.
圆括号包裹的部分是第二路由。
The secondary route consists of an outlet name (
popup), acolonseparator, and the secondary route path (compose).第二路由包括一个出口名称(
popup)、一个冒号分隔符和第二路由的路径(compose)。
Click the Heroes link and look at the URL again.
点击Heroes链接,并再次查看URL:
The primary navigation part has changed; the secondary route is the same.
主导航的部分变化了,而第二路由没有变。
The router is keeping track of two separate branches in a navigation tree and generating a representation of that tree in the URL.
路由器在导航树中对两个独立的分支保持追踪,并在URL中对这棵树进行表达。
You can add many more outlets and routes, at the top level and in nested levels, creating a navigation tree with many branches. The router will generate the URL to go with it.
我们还可以添加更多出口和更多路由(无论是在顶层还是在嵌套的子层)来创建一个带有多个分支的导航树。 路由器将会生成相应的URL。
You can tell the router to navigate an entire tree at once by filling out the outlets object mentioned above.
Then pass that object inside a link parameters array to the router.navigate method.
通过像前面那样填充outlets对象,我们可以告诉路由器立即导航到一棵完整的树。
然后把这个对象通过一个链接参数数组传给router.navigate方法。
Experiment with these possibilities at your leisure.
有空的时候你可以自行试验这些可能性。
Clearing secondary routes
清除第二路由
As you've learned, a component in an outlet persists until you navigate away to a new component. Secondary outlets are no different in this regard.
正如我们刚刚学到的,除非导航到新的组件,否则路由出口中的组件会始终存在。 这里涉及到的第二出口也同样如此。
Each secondary outlet has its own navigation, independent of the navigation driving the primary outlet. Changing a current route that displays in the primary outlet has no effect on the popup outlet. That's why the popup stays visible as you navigate among the crises and heroes.
每个第二出口都有自己独立的导航,跟主出口的导航彼此独立。
修改主出口中的当前路由并不会影响到popup出口中的。
这就是为什么在危机中心和英雄管理之间导航时,弹出框始终都是可见的。
Clicking the "send" or "cancel" buttons does clear the popup view.
To see how, look at the closePopup() method again:
点击“send”或“cancel”按钮,则会清除弹出框视图。
为何如此?我们再来看看closePopup()方法:
src/app/compose-message.component.ts (closePopup)
It navigates imperatively with the Router.navigate() method, passing in a link parameters array.
它使用Router.navigate()方法进行强制导航,并传入了一个链接参数数组。
Like the array bound to the Contact RouterLink in the AppComponent,
this one includes an object with an outlets property.
The outlets property value is another object with outlet names for keys.
The only named outlet is 'popup'.
就像在AppComponent中绑定到的Contact RouterLink一样,它也包含了一个带outlets属性的对象。
outlets属性的值是另一个对象,该对象用一些出口名称作为属性名。
唯一的命名出口是'popup'。
This time, the value of 'popup' is null. That's not a route, but it is a legitimate value.
Setting the popup RouterOutlet to null clears the outlet and removes
the secondary popup route from the current URL.
但这次,'popup'的值是null。null不是一个路由,但却是一个合法的值。
把popup这个RouterOutlet设置为null会清除该出口,并且从当前URL中移除第二路由popup。
Milestone 5: Route guards
里程碑5:路由守卫
At the moment, any user can navigate anywhere in the application anytime. That's not always the right thing to do.
现在,任何用户都能在任何时候导航到任何地方。 但有时候这样是不对的。
Perhaps the user is not authorized to navigate to the target component.
该用户可能无权导航到目标组件。
Maybe the user must login (authenticate) first.
可能用户得先登录(认证)。
Maybe you should fetch some data before you display the target component.
在显示目标组件前,我们可能得先获取某些数据。
You might want to save pending changes before leaving a component.
在离开组件前,我们可能要先保存修改。
You might ask the user if it's OK to discard pending changes rather than save them.
我们可能要询问用户:你是否要放弃本次更改,而不用保存它们?
You can add guards to the route configuration to handle these scenarios.
我们可以往路由配置中添加守卫,来处理这些场景。
A guard's return value controls the router's behavior:
守卫返回一个值,以控制路由器的行为:
If it returns
true, the navigation process continues.如果它返回
true,导航过程会继续If it returns
false, the navigation process stops and the user stays put.如果它返回
false,导航过程会终止,且用户会留在原地。
The guard can also tell the router to navigate elsewhere, effectively canceling the current navigation.
守卫还可以告诉路由器导航到别处,这样也取消当前的导航。
The guard might return its boolean answer synchronously. But in many cases, the guard can't produce an answer synchronously. The guard could ask the user a question, save changes to the server, or fetch fresh data. These are all asynchronous operations.
守卫可以用同步的方式返回一个布尔值。但在很多情况下,守卫无法用同步的方式给出答案。 守卫可能会向用户问一个问题、把更改保存到服务器,或者获取新数据,而这些都是异步操作。
Accordingly, a routing guard can return an Observable<boolean> or a Promise<boolean> and the
router will wait for the observable to resolve to true or false.
因此,路由的守卫可以返回一个Observable<boolean>或Promise<boolean>,并且路由器会等待这个可观察对象被解析为true或false。
The router supports multiple kinds of guards:
路由器支持多种守卫:
CanActivateto mediate navigation to a route.用
CanActivate来处理导航到某路由的情况。CanActivateChild()to mediate navigation to a child route.用
CanActivateChild处理导航到子路由的情况。CanDeactivateto mediate navigation away from the current route.用
CanDeactivate来处理从当前路由离开的情况。Resolveto perform route data retrieval before route activation.用
Resolve在路由激活之前获取路由数据。CanLoadto mediate navigation to a feature module loaded asynchronously.用
CanLoad来处理异步导航到某特性模块的情况。
You can have multiple guards at every level of a routing hierarchy.
The router checks the CanDeactivate() and CanActivateChild() guards first, from the deepest child route to the top.
Then it checks the CanActivate() guards from the top down to the deepest child route. If the feature module
is loaded asynchronously, the CanLoad() guard is checked before the module is loaded.
If any guard returns false, pending guards that have not completed will be canceled,
and the entire navigation is canceled.
在分层路由的每个级别上,我们都可以设置多个守卫。
路由器会先按照从最深的子路由由下往上检查的顺序来检查CanDeactivate()和CanActivateChild()守卫。
然后它会按照从上到下的顺序检查CanActivate()和CanActivateChild()守卫。
如果特性模块是异步加载的,在加载它之前还会检查CanLoad()守卫。
如果任何一个守卫返回false,其它尚未完成的守卫会被取消,这样整个导航就被取消了。
There are several examples over the next few sections.
我们会在接下来的小节中看到一些例子。
CanActivate: requiring authentication
CanActivate: 要求认证
Applications often restrict access to a feature area based on who the user is. You could permit access only to authenticated users or to users with a specific role. You might block or limit access until the user's account is activated.
应用程序通常会根据访问者来决定是否授予某个特性区的访问权。 我们可以只对已认证过的用户或具有特定角色的用户授予访问权,还可以阻止或限制用户访问权,直到用户账户激活为止。
The CanActivate guard is the tool to manage these navigation business rules.
CanActivate守卫是一个管理这些导航类业务规则的工具。
Add an admin feature module
添加一个“管理”特性模块
In this next section, you'll extend the crisis center with some new administrative features.
Those features aren't defined yet.
But you can start by adding a new feature module named AdminModule.
在下一节,我们将会使用一些新的管理特性来扩展危机中心。
那些特性尚未定义,但是我们可以先从添加一个名叫AdminModule的特性模块开始。
Create an admin folder with a feature module file, a routing configuration file, and supporting components.
创建一个admin目录,它带有一个特性模块文件、一个路由配置文件和一些支持性组件。
The admin feature file structure looks like this:
管理特性区的文件是这样的:
The admin feature module contains the AdminComponent used for routing within the
feature module, a dashboard route and two unfinished components to manage crises and heroes.
管理特性模块包含AdminComponent,它用于在特性模块内的仪表盘路由以及两个尚未完成的用于管理危机和英雄的组件之间进行路由。
Since the admin dashboard RouterLink is an empty path route in the AdminComponent, it
is considered a match to any route within the admin feature area.
You only want the Dashboard link to be active when the user visits that route.
Adding an additional binding to the Dashboard routerLink,
[routerLinkActiveOptions]="{ exact: true }", marks the ./ link as active when
the user navigates to the /admin URL and not when navigating to any of the child routes.
由于AdminModule中AdminComponent中的RouterLink是一个空路径的路由,所以它会匹配到管理特性区的任何路由。
但我们只有在访问Dashboard路由时才希望该链接被激活。
所以我们往Dashboard这个routerLink上添加了另一个绑定[routerLinkActiveOptions]="{ exact: true }",
这样就只有当我们导航到/admin这个URL时才会激活它,而不会在导航到它的某个子路由时。
The initial admin routing configuration:
我们的初始管理路由配置如下:
src/app/admin/admin-routing.module.ts (admin routing)
Component-less route: grouping routes without a component
无组件路由: 不借助组件对路由进行分组
Looking at the child route under the AdminComponent, there is a path and a children
property but it's not using a component.
You haven't made a mistake in the configuration.
You've defined a component-less route.
来看AdminComponent下的子路由,我们有一个带path和children的子路由,
但它没有使用component。这并不是配置中的失误,而是在使用无组件路由。
The goal is to group the Crisis Center management routes under the admin path.
You don't need a component to do it.
A component-less route makes it easier to guard child routes.
我们的目标是对admin路径下的危机中心管理类路由进行分组,但并不需要另一个仅用来分组路由的组件。
一个无组件的路由就能让我们轻松的守卫子路由。
Next, import the AdminModule into app.module.ts and add it to the imports array
to register the admin routes.
接下来,我们把AdminModule导入到app.module.ts中,并把它加入imports数组中来注册这些管理类路由。
src/app/app.module.ts (admin module)
Add an "Admin" link to the AppComponent shell so that users can get to this feature.
然后我们往壳组件AppComponent中添加一个链接,让用户能点击它,以访问该特性。
src/app/app.component.ts (template)
Guard the admin feature
守护“管理特性”区
Currently every route within the Crisis Center is open to everyone. The new admin feature should be accessible only to authenticated users.
现在“危机中心”的每个路由都是对所有人开放的。这些新的管理特性应该只能被已登录用户访问。
You could hide the link until the user logs in. But that's tricky and difficult to maintain.
我们可以在用户登录之前隐藏这些链接,但这样会有点复杂并难以维护。
Instead you'll write a CanActivate() guard to redirect anonymous users to the
login page when they try to enter the admin area.
我们换种方式:写一个CanActivate()守卫,当匿名用户尝试访问管理组件时,把它/她重定向到登录页。
This is a general purpose guard—you can imagine other features
that require authenticated users—so you create an
auth-guard.service.ts in the application root folder.
这是一种具有通用性的守护目标(通常会有其它特性需要登录用户才能访问),所以我们在应用的根目录下创建一个auth-guard.ts文件。
At the moment you're interested in seeing how guards work so the first version does nothing useful.
It simply logs to console and returns true immediately, allowing navigation to proceed:
此刻,我们的兴趣在于看看守卫是如何工作的,所以我们第一个版本没做什么有用的事情。它只是往控制台写日志,并且立即返回true,让导航继续:
src/app/auth-guard.service.ts (excerpt)
Next, open admin-routing.module.ts, import the AuthGuard class, and
update the admin route with a CanActivate() guard property that references it:
接下来,打开crisis-center.routes.ts,导入AuthGuard类,修改管理路由并通过CanActivate()守卫来引用AuthGuard:
src/app/admin/admin-routing.module.ts (guarded admin route)
The admin feature is now protected by the guard, albeit protected poorly.
我们的管理特性区现在受此守卫保护了,不过这样的保护还不够。
Teach AuthGuard to authenticate
教AuthGuard进行认证
Make the AuthGuard at least pretend to authenticate.
我们先让AuthGuard至少能“假装”进行认证。
The AuthGuard should call an application service that can login a user and retain information about the current user.
Here's a demo AuthService:
AuthGuard可以调用应用中的一项服务,该服务能让用户登录,并且保存当前用户的信息。下面是一个AuthService的示范:
src/app/auth.service.ts (excerpt)
Although it doesn't actually log in, it has what you need for this discussion.
It has an isLoggedIn flag to tell you whether the user is authenticated.
Its login method simulates an API call to an external service by returning an
Observable that resolves successfully after a short pause.
The redirectUrl property will store the attempted URL so you can navigate to it after authenticating.
虽然它不会真的进行登录,但足够让我们进行这个讨论了。
它有一个isLoggedIn标志,用来标识是否用户已经登录过了。
它的login方法会仿真一个对外部服务的API调用,返回一个可观察对象(observable)。在短暂的停顿之后,这个可观察对象就会解析成功。
redirectUrl属性将会保存在URL中,以便认证完之后导航到它。
Revise the AuthGuard to call it.
我们这就修改AuthGuard来调用它。
src/app/auth-guard.service.ts (v2)
Notice that you inject the AuthService and the Router in the constructor.
You haven't provided the AuthService yet but it's good to know that you can inject helpful services into routing guards.
注意,我们把AuthService和Router服务注入到构造函数中。
我们还没有提供AuthService,这里要说明的是:可以往路由守卫中注入有用的服务。
This guard returns a synchronous boolean result. If the user is logged in, it returns true and the navigation continues.
该守卫返回一个同步的布尔值。如果用户已经登录,它就返回true,导航会继续。
The ActivatedRouteSnapshot contains the future route that will be activated and the RouterStateSnapshot
contains the future RouterState of the application, should you pass through the guard check.
这个ActivatedRouteSnapshot包含了即将被激活的路由,而RouterStateSnapshot包含了该应用即将到达的状态。
它们要通过我们的守卫进行检查。
If the user is not logged in, you store the attempted URL the user came from using the RouterStateSnapshot.url and
tell the router to navigate to a login page—a page you haven't created yet.
This secondary navigation automatically cancels the current navigation; checkLogin() returns
false just to be clear about that.
如果用户还没有登录,我们会用RouterStateSnapshot.url保存用户来自的URL并让路由器导航到登录页(我们尚未创建该页)。
这间接导致路由器自动中止了这次导航,checkLogin()返回false并不是必须的,但这样可以更清楚的表达意图。
Add the LoginComponent
添加LoginComponent
You need a LoginComponent for the user to log in to the app. After logging in, you'll redirect
to the stored URL if available, or use the default URL.
There is nothing new about this component or the way you wire it into the router configuration.
我们需要一个LoginComponent来让用户登录进这个应用。在登录之后,我们跳转到前面保存的URL,如果没有,就跳转到默认URL。
该组件没有什么新内容,我们把它放进路由配置的方式也没什么新意。
Register a /login route in the login-routing.module.ts and add the necessary providers to the providers
array. In app.module.ts, import the LoginComponent and add it to the AppModule declarations.
Import and add the LoginRoutingModule to the AppModule imports as well.
我们将在login-routing.module.ts中注册一个/login路由,并把必要的提供商添加providers数组中。
在app.module.ts中,我们导入LoginComponent并把它加入根模块的declarations中。
同时在AppModule中导入并添加LoginRoutingModule。
Guards and the service providers they require must be provided at the module-level. This allows
the Router access to retrieve these services from the Injector during the navigation process.
The same rule applies for feature modules loaded asynchronously.
它们所需的守卫和服务提供商必须在模块一级提供。这让路由器在导航过程中可以通过Injector来取得这些服务。
同样的规则也适用于异步加载的特性模块。
CanActivateChild: guarding child routes
CanAcitvateChild:保护子路由
You can also protect child routes with the CanActivateChild guard.
The CanActivateChild guard is similar to the CanActivate guard.
The key difference is that it runs before any child route is activated.
我们还可以使用CanActivateChild守卫来保护子路由。
CanActivateChild守卫和CanAcitvate守卫很像。
它们的区别在于,CanActivateChild会在任何子路由被激活之前运行。
You protected the admin feature module from unauthorized access. You should also protect child routes within the feature module.
我们要保护管理特性模块,防止它被非授权访问,还要保护这个特性模块内部的那些子路由。
Extend the AuthGuard to protect when navigating between the admin routes.
Open auth-guard.service.ts and add the CanActivateChild interface to the imported tokens from the router package.
扩展AuthGuard以便在admin路由之间导航时提供保护。
打开auth-guard.service.ts并从路由库中导入CanActivateChild接口。
Next, implement the CanActivateChild method which takes the same arguments as the CanActivate method:
an ActivatedRouteSnapshot and RouterStateSnapshot.
The CanActivateChild method can return an Observable<boolean> or Promise<boolean> for
async checks and a boolean for sync checks.
This one returns a boolean:
接下来,实现CanAcitvateChild方法,它所接收的参数与CanAcitvate方法一样:一个ActivatedRouteSnapshot和一个RouterStateSnapshot。
CanAcitvateChild方法可以返回Observable<boolean>或Promise<boolean>来支持异步检查,或boolean来支持同步检查。
这里返回的是boolean:
src/app/auth-guard.service.ts (excerpt)
Add the same AuthGuard to the component-less admin route to protect all other child routes at one time
instead of adding the AuthGuard to each route individually.
同样把这个AuthGuard添加到“无组件的”管理路由,来同时保护它的所有子路由,而不是为每个路由单独添加这个AuthGuard。
src/app/admin/admin-routing.module.ts (excerpt)
CanDeactivate: handling unsaved changes
CanDeactivate:处理未保存的更改
Back in the "Heroes" workflow, the app accepts every change to a hero immediately without hesitation or validation.
回到“Heroes”工作流,该应用毫不犹豫的接受对英雄的任何修改,不作任何校验。
In the real world, you might have to accumulate the users changes. You might have to validate across fields. You might have to validate on the server. You might have to hold changes in a pending state until the user confirms them as a group or cancels and reverts all changes.
在现实世界中,我们得先把用户的改动积累起来。 我们可能不得不进行跨字段的校验,可能要找服务器进行校验,可能得把这些改动保存成一种待定状态,直到用户或者把这些改动作为一组进行确认或撤销所有改动。
What do you do about unapproved, unsaved changes when the user navigates away? You can't just leave and risk losing the user's changes; that would be a terrible experience.
当用户要导航到外面时,该怎么处理这些既没有审核通过又没有保存过的改动呢? 我们不能马上离开,不在乎丢失这些改动的风险,那显然是一种糟糕的用户体验。
It's better to pause and let the user decide what to do. If the user cancels, you'll stay put and allow more changes. If the user approves, the app can save.
我们应该暂停,并让用户决定该怎么做。如果用户选择了取消,我们就留下来,并允许更多改动。如果用户选择了确认,那就进行保存。
You still might delay navigation until the save succeeds. If you let the user move to the next screen immediately and the save were to fail (perhaps the data are ruled invalid), you would lose the context of the error.
在保存成功之前,我们还可以继续推迟导航。如果我们让用户立即移到下一个界面,而保存却失败了(可能因为数据不符合有效性规则),我们就会丢失该错误的上下文环境。
You can't block while waiting for the server—that's not possible in a browser. You need to stop the navigation while you wait, asynchronously, for the server to return with its answer.
在等待服务器的答复时,我们没法阻塞它 —— 这在浏览器中是不可能的。 我们只能用异步的方式在等待服务器答复之前先停止导航。
You need the CanDeactivate guard.
我们需要CanDeactivate守卫。
Cancel and save
The sample application doesn't talk to a server. Fortunately, you have another way to demonstrate an asynchronous router hook.
我们的范例应用不会与服务器通讯。 幸运的是,我们有另一种方式来演示异步的路由器钩子。
Users update crisis information in the CrisisDetailComponent.
Unlike the HeroDetailComponent, the user changes do not update the crisis entity immediately.
Instead, the app updates the entity when the user presses the Save button and
discards the changes when the user presses the Cancel button.
用户在CrisisDetailComponent中更新危机信息。
与HeroDetailComponent不同,用户的改动不会立即更新危机的实体对象。当用户按下了Save按钮时,我们就更新这个实体对象;如果按了Cancel按钮,那就放弃这些更改。
Both buttons navigate back to the crisis list after save or cancel.
这两个按钮都会在保存或取消之后导航回危机列表。
src/app/crisis-center/crisis-detail.component.ts (cancel and save methods)
What if the user tries to navigate away without saving or canceling? The user could push the browser back button or click the heroes link. Both actions trigger a navigation. Should the app save or cancel automatically?
如果用户尝试不保存或撤销就导航到外面该怎么办? 用户可以按浏览器的后退按钮,或点击英雄的链接。 这些操作都会触发导航。本应用应该自动保存或取消吗?
This demo does neither. Instead, it asks the user to make that choice explicitly in a confirmation dialog box that waits asynchronously for the user's answer.
都不行。我们应该弹出一个确认对话框来要求用户明确做出选择,该对话框会用异步的方式等用户做出选择。
You could wait for the user's answer with synchronous, blocking code. The app will be more responsive—and can do other work—by waiting for the user's answer asynchronously. Waiting for the user asynchronously is like waiting for the server asynchronously.
我们也能用同步的方式等用户的答复,阻塞代码。但如果能用异步的方式等待用户的答复,应用就会响应性更好,也能同时做别的事。异步等待用户的答复和等待服务器的答复是类似的。
The DialogService, provided in the AppModule for app-wide use, does the asking.
DialogService(为了在应用级使用,已经注入到了AppModule)就可以做到这些。
It returns a promise that
resolves when the user eventually decides what to do: either
to discard changes and navigate away (true) or to preserve the pending changes and stay in the crisis editor (false).
它返回promise,当用户最终决定了如何去做时,它就会被解析 —— 或者决定放弃更改直接导航离开(true),或者保留未完成的修改,留在危机编辑器中(false)。
Create a guard that checks for the presence of a canDeactivate method in a component—any component.
The CrisisDetailComponent will have this method.
But the guard doesn't have to know that.
The guard shouldn't know the details of any component's deactivation method.
It need only detect that the component has a canDeactivate() method and call it.
This approach makes the guard reusable.
我们创建了一个Guard,它将检查这个组件中canDeactivate函数的工作现场,在这里,它就是CrisisDetailComponent。我们并不需要知道CrisisDetailComponent确认退出激活状态的详情。这让我们的守卫可以被复用,这是一次轻而易举的胜利。
src/app/can-deactivate-guard.service.ts
Alternatively, you could make a component-specific CanDeactivate guard for the CrisisDetailComponent.
The canDeactivate() method provides you with the current
instance of the component, the current ActivatedRoute,
and RouterStateSnapshot in case you needed to access
some external information. This would be useful if you only
wanted to use this guard for this component and needed to get
the component's properties or confirm whether the router should allow navigation away from it.
另外,我们也可以为CrisisDetailComponent创建一个特定的CanDeactivate守卫。在需要访问外部信息时,canDeactivate()方法为提供了组件、ActivatedRoute和RouterStateSnapshot的当前实例。如果只想为这个组件使用该守卫,并且需要使用该组件属性、或者需要路由器确认是否允许从该组件导航出去时,这个守卫就非常有用。
src/app/can-deactivate-guard.service.ts (component-specific)
Looking back at the CrisisDetailComponent, it implements the confirmation workflow for unsaved changes.
看看CrisisDetailComponent组件,我们已经实现了对未保存的更改进行确认的工作流。
src/app/crisis-center/crisis-detail.component.ts (excerpt)
Notice that the canDeactivate method can return synchronously;
it returns true immediately if there is no crisis or there are no pending changes.
But it can also return a Promise or an Observable and the router will wait for that
to resolve to truthy (navigate) or falsy (stay put).
注意,canDeactivate方法可以同步返回,如果没有危机,或者没有未定的修改,它就立即返回true。但是它也可以返回一个承诺(Promise)或可观察对象(Observable),路由器将等待它们被解析为真值(继续导航)或假值(留下)。
Add the Guard to the crisis detail route in crisis-center-routing.module.ts using the canDeactivate array.
我们往crisis-center.routing.ts的危机详情路由中用canDeactivate数组添加一个Guard(守卫)。
src/app/crisis-center/crisis-center-routing.module.ts (can deactivate guard)
Add the Guard to the main AppRoutingModule providers array so the
Router can inject it during the navigation process.
我们还要把这个Guard添加到appRoutingModule的providers中去,以便Router可以在导航过程中注入它。
Now you have given the user a safeguard against unsaved changes.
现在,我们已经给了用户一个能保护未保存更改的安全守卫。
Resolve: pre-fetching component data
Resolve: 预先获取组件数据
In the Hero Detail and Crisis Detail, the app waited until the route was activated to fetch the respective hero or crisis.
在Hero Detail和Crisis Detail中,它们等待路由读取完对应的英雄和危机。
This worked well, but there's a better way. If you were using a real world API, there might be some delay before the data to display is returned from the server. You don't want to display a blank component while waiting for the data.
这种方式没有问题,但是它们还有进步的空间。 如果我们在使用真实api,很有可能数据返回有延迟,导致无法即时显示。 在这种情况下,直到数据到达前,显示一个空的组件不是最好的用户体验。
It's preferable to pre-fetch data from the server so it's ready the
moment the route is activated. This also allows you to handle errors before routing to the component.
There's no point in navigating to a crisis detail for an id that doesn't have a record.
It'd be better to send the user back to the Crisis List that shows only valid crisis centers.
我们最好预先从服务器上获取完数据,这样在路由激活的那一刻数据就准备好了。
还要在路由到此组件之前处理好错误。
但当某个id无法对应到一个危机详情时,我们没办法处理它。
这时我们最好把用户带回到“危机列表”中,那里显示了所有有效的“危机”。
In summary, you want to delay rendering the routed component until all necessary data have been fetched.
总之,你希望的是只有当所有必要数据都已经拿到之后,才渲染这个路由组件。
You need a resolver.
我们需要Resolve守卫。
Fetch data before navigating
导航前预先加载路由信息
At the moment, the CrisisDetailComponent retrieves the selected crisis.
If the crisis is not found, it navigates back to the crisis list view.
目前,CrisisDetailComponent会接收选中的危机。
如果该危机没有找到,它就会导航回危机列表视图。
The experience might be better if all of this were handled first, before the route is activated.
A CrisisDetailResolver service could retrieve a Crisis or navigate away if the Crisis does not exist
before activating the route and creating the CrisisDetailComponent.
如果能在该路由将要激活时提前处理了这个问题,那么用户体验会更好。
CrisisDetailResolver服务可以接收一个Crisis,而如果这个Crisis不存在,就会在激活该路由并创建CrisisDetailComponent之前先行离开。
Create the crisis-detail-resolver.service.ts file within the Crisis Center feature area.
在“危机中心”特性区中创建crisis-detail-resolver.service.ts文件。
src/app/crisis-center/crisis-detail-resolver.service.ts
Take the relevant parts of the crisis retrieval logic in CrisisDetailComponent.ngOnInit
and move them into the CrisisDetailResolver.
Import the Crisis model, CrisisService, and the Router
so you can navigate elsewhere if you can't fetch the crisis.
在CrisisDetailComponent.ngOnInit中拿到相关的危机检索逻辑,并且把它们移到CrisisDetailResolver中。
导入Crisis模型、CrisisService和Router以便让我们可以在找不到指定的危机时导航到别处。
Be explicit. Implement the Resolve interface with a type of Crisis.
为了更明确一点,可以实现一个带有Crisis类型的Resolve接口。
Inject the CrisisService and Router and implement the resolve() method.
That method could return a Promise, an Observable, or a synchronous return value.
注入CrisisService和Router,并实现resolve()方法。
该方法可以返回一个Promise、一个Observable来支持异步方式,或者直接返回一个值来支持同步方式。
The CrisisService.getCrisis method returns a promise.
Return that promise to prevent the route from loading until the data is fetched.
If it doesn't return a valid Crisis, navigate the user back to the CrisisListComponent,
canceling the previous in-flight navigation to the CrisisDetailComponent.
CrisisService.getCrisis方法返回了一个Promise。
返回Promise可以阻止路由被加载,直到数据获取完毕。
如果它没有返回一个有效的Crisis,就把用户导航回CrisisListComponent,并取消以前到CrisisDetailComponent尚未完成的导航。
Import this resolver in the crisis-center-routing.module.ts
and add a resolve object to the CrisisDetailComponent route configuration.
把这个解析器(resolver)导入到crisis-center-routing.module.ts中,并往CrisisDetailComponent的路由配置中添加一个resolve对象。
Remember to add the CrisisDetailResolver service to the CrisisCenterRoutingModule's providers array.
别忘了把CrisisDetailResolver服务添加到CrisisCenterRoutingModule的providers数组中。
src/app/crisis-center/crisis-center-routing.module.ts (resolver)
The CrisisDetailComponent should no longer fetch the crisis.
Update the CrisisDetailComponent to get the crisis from the ActivatedRoute.data.crisis property instead;
that's where you said it should be when you re-configured the route.
It will be there when the CrisisDetailComponent ask for it.
CrisisDetailComponent不应该再去获取这个危机的详情。
把CrisisDetailComponent改成从ActivatedRoute.data.crisis属性中获取危机详情,这正是我们重新配置路由的恰当时机。
当CrisisDetailComponent要求取得危机详情时,它就已经在那里了。
src/app/crisis-center/crisis-detail.component.ts (ngOnInit v2)
Two critical points
两个关键点
The router's
Resolveinterface is optional. TheCrisisDetailResolverdoesn't inherit from a base class. The router looks for that method and calls it if found.路由器的这个
Resolve接口是可选的。CrisisDetailResolver没有继承自某个基类。路由器只要找到了这个方法,就会调用它。Rely on the router to call the resolver. Don't worry about all the ways that the user could navigate away. That's the router's job. Write this class and let the router take it from there.
我们依赖路由器调用此守卫。不必关心用户用哪种方式导航离开,这是路由器的工作。我们只要写出这个类,等路由器从那里取出它就可以了。
The relevant Crisis Center code for this milestone follows.
本里程碑中与危机中心有关的代码如下:
Query parameters and fragments
查询参数及片段
In the route parameters example, you only dealt with parameters specific to the route, but what if you wanted optional parameters available to all routes? This is where query parameters come into play.
在这个查询参数例子中,我们只为路由指定了参数,但是该如何定义一些所有路由中都可用的可选参数呢? 这就该“查询参数”登场了。
Fragments refer to certain elements on the page
identified with an id attribute.
片段可以引用页面中带有特定id属性的元素.
Update the AuthGuard to provide a session_id query that will remain after navigating to another route.
接下来,我们将更新AuthGuard来提供session_id查询参数,在导航到其它路由后,它还会存在。
Add an anchor element so you can jump to a certain point on the page.
再添加一个锚点(A)元素,来让你能跳转到页面中的正确位置。
Add the NavigationExtras object to the router.navigate method that navigates you to the /login route.
我们还将为router.nativate方法传入一个NavigationExtras对象,用来导航到/login路由。
src/app/auth-guard.service.ts (v3)
You can also preserve query parameters and fragments across navigations without having to provide them
again when navigating. In the LoginComponent, you'll add an object as the
second argument in the router.navigate function
and provide the preserveQueryParams and preserveFragment to pass along the current query parameters
and fragment to the next route.
还可以再导航之间保留查询参数和片段,而无需再次再导航中提供。在LoginComponent中的router.navigate方法中,添加第二个参数,该对象提供了preserveQueryParams和 preserveFragment,用于传递到当前的查询参数中并为下一个路由提供片段。
src/app/login.component.ts (preserve)
Since you'll be navigating to the Admin Dashboard route after logging in, you'll update it to handle the query parameters and fragment.
由于要在登录后导航到危机管理特征区的路由,所以我们还得更新它,来处理这些全局查询参数和片段。
src/app/admin/admin-dashboard.component.ts (v2)
Query Parameters and Fragments are also available through the ActivatedRoute service.
Just like route parameters, the query parameters and fragments are provided as an Observable.
The updated Crisis Admin component feeds the Observable directly into the template using the AsyncPipe.
查询参数和片段可通过Router服务的routerState属性使用。和路由参数类似,全局查询参数和片段也是Observable对象。
在更新过的英雄管理组件中,我们将直接把Observable传给模板,借助AsyncPipe在组件被销毁时自动取消对Observable的订阅。
To see the URL changes in the browser address bar of the live example, open it again in the Plunker editor by clicking the icon in the upper right, then pop out the preview window by clicking the blue 'X' button in the upper right corner. 要看到这个在线例子中浏览器地址栏的URL变化情况,请点击右上角的图标,在Plunker编辑器中打开它,接下来在弹出的预览窗口中点击右上角的蓝色'X'按钮就可以了。 | |
Now, you can click on the Admin button, which takes you to the Login
page with the provided query params and fragment. After you click the login button, notice that
you have been redirected to the Admin Dashboard page with the query params and fragment still intact.
按照下列步骤试验下:点击Crisis Admin按钮,它会带着我们提供的“查询参数”和“片段”跳转到登录页。
点击登录按钮,我们就会被带到Crisis Admin页,仍然带着上一步提供的“查询参数”和“片段”。
You can use these persistent bits of information for things that need to be provided across pages like authentication tokens or session ids.
我们可以用这些持久化信息来携带需要为每个页面都提供的信息,如认证令牌或会话的ID等。
The query params and fragment can also be preserved using a RouterLink with
the preserveQueryParams and preserveFragment bindings respectively.
“查询参数”和“片段”也可以分别用RouterLink中的preserveQueryParams和preserveFragment保存。
Milestone 6: Asynchronous routing
里程碑6:异步路由
As you've worked through the milestones, the application has naturally gotten larger. As you continue to build out feature areas, the overall application size will continue to grow. At some point you'll reach a tipping point where the application takes long time to load.
完成上面的里程碑后,我们的应用程序很自然的长大了。在继续构建特征区的过程中,应用的尺寸将会变得更大。在某一个时间点,我们将达到一个顶点,应用将会需要过多的时间来加载。
How do you combat this problem? With asynchronous routing, which loads feature modules lazily, on request. Lazy loading has multiple benefits.
如何才能解决这个问题呢?我们引进了异步路由到应用程序中,并获得在请求时才惰性加载特性模块的能力。这样给我们带来了下列好处:
You can load feature areas only when requested by the user.
我们可以只在用户请求时才加载某些特性区。
You can speed up load time for users that only visit certain areas of the application.
对于那些只访问应用程序某些区域的用户,这样能加快加载速度。
You can continue expanding lazy loaded feature areas without increasing the size of the initial load bundle.
我们可以持续扩充惰性加载特性区的功能,而不用增加初始加载的包体积。
You're already made part way there.
By organizing the application into modules—AppModule,
HeroesModule, AdminModule and CrisisCenterModule—you
have natural candidates for lazy loading.
我们已经完成了一部分。通过把应用组织成一些模块:AppModule、HeroesModule、AdminModule和CrisisCenterModule,
我们已经有了可用于实现惰性加载的候选者。
Some modules, like AppModule, must be loaded from the start.
But others can and should be lazy loaded.
The AdminModule, for example, is needed by a few authorized users, so
you should only load it when requested by the right people.
有些模块(比如AppModule)必须在启动时加载,但其它的都可以而且应该惰性加载。
比如AdminModule就只有少数已认证的用户才需要它,所以我们应该只有在正确的人请求它时才加载。
Lazy Loading route configuration
惰性加载路由配置
Change the admin path in the admin-routing.module.ts from 'admin' to an empty string, '', the empty path.
把admin-routing.module.ts中的admin路径从'admin'改为空路径''。
The Router supports empty path routes;
use them to group routes together without adding any additional path segments to the URL.
Users will still visit /admin and the AdminComponent still serves as the Routing Component containing child routes.
Router支持空路径路由,可以使用它们来分组路由,而不用往URL中添加额外的路径片段。
用户仍旧访问/admin,并且AdminComponent仍然作为用来包含子路由的路由组件。
Open the AppRoutingModule and add a new admin route to its appRoutes array.
打开AppRoutingModule,并把一个新的admin路由添加到它的appRoutes数组中。
Give it a loadChildren property (not a children property!), set to the address of the AdminModule.
The address is the AdminModule file location (relative to the app root),
followed by a # separator,
followed by the name of the exported module class, AdminModule.
给它一个loadChildren属性(注意不是children属性),把它设置为AdminModule的地址。
该地址是AdminModule的文件路径(相对于app目录的),加上一个#分隔符,再加上导出模块的类名AdminModule。
app-routing.module.ts (load children)
When the router navigates to this route, it uses the loadChildren string to dynamically load the AdminModule.
Then it adds the AdminModule routes to its current route configuration.
Finally, it loads the requested route to the destination admin component.
当路由器导航到这个路由时,它会用loadChildren字符串来动态加载AdminModule,然后把AdminModule添加到当前的路由配置中,
最后,它把所请求的路由加载到目标admin组件中。
The lazy loading and re-configuration happen just once, when the route is first requested; the module and routes are available immediately for subsequent requests.
惰性加载和重新配置工作只会发生一次,也就是在该路由首次被请求时。在后续的请求中,该模块和路由都是立即可用的。
Angular provides a built-in module loader that supports SystemJS to load modules asynchronously. If you were using another bundling tool, such as Webpack, you would use the Webpack mechanism for asynchronously loading modules.
Angular提供一个内置模块加载器,支持SystemJS来异步加载模块。如果我们使用其它捆绑工具比如Webpack,则使用Webpack的机制来异步加载模块。
Take the final step and detach the admin feature set from the main application.
The root AppModule must neither load nor reference the AdminModule or its files.
最后一步是把管理特性区从主应用中完全分离开。
根模块AppModule既不能加载也不能引用AdminModule及其文件。
In app.module.ts, remove the AdminModule import statement from the top of the file
and remove the AdminModule from the Angular module's imports array.
在app.module.ts中,从顶部移除AdminModule的导入语句,并且从Angular模块的imports数组中移除AdminModule。
CanLoad Guard: guarding unauthorized loading of feature modules
CanLoad守卫:保护对特性模块的未授权加载
You're already protecting the AdminModule with a CanActivate guard that prevents unauthorized users from
accessing the admin feature area.
It redirects to the login page if the user is not authorized.
我们已经使用CanAcitvate保护AdminModule了,它会阻止未授权用户访问管理特性区。如果用户未登录,它就会跳转到登录页。
But the router is still loading the AdminModule even if the user can't visit any of its components.
Ideally, you'd only load the AdminModule if the user is logged in.
但是路由器仍然会加载AdminModule —— 即使用户无法访问它的任何一个组件。
理想的方式是,只有在用户已登录的情况下我们才加载AdminModule。
Add a CanLoad guard that only loads the AdminModule once the user is logged in and attempts to access the admin feature area.
添加一个CanLoad守卫,它只在用户已登录并且尝试访问管理特性区的时候,才加载AdminModule一次。
The existing AuthGuard already has the essential logic in
its checkLogin() method to support the CanLoad guard.
现有的AuthGuard的checkLogin()方法中已经有了支持CanLoad守卫的基础逻辑。
Open auth-guard.service.ts.
Import the CanLoad interface from @angular/router.
Add it to the AuthGuard class's implements list.
Then implement canLoad as follows:
打开auth-guard.service.ts,从@angular/router中导入CanLoad接口。
把它添加到AuthGuard类的implements列表中。
然后实现canLoad,代码如下:
src/app/auth-guard.service.ts (CanLoad guard)
The router sets the canLoad() method's route parameter to the intended destination URL.
The checkLogin() method redirects to that URL once the user has logged in.
路由器会把canLoad()方法的route参数设置为准备访问的目标URL。
如果用户已经登录了,checkLogin()方法就会重定向到那个URL。
Now import the AuthGuard into the AppRoutingModule and add the AuthGuard to the canLoad
array for the admin route.
The completed admin route looks like this:
现在,把AuthGuard导入到AppRoutingModule中,并把AuthGuard添加到admin路由的canLoad数组中。
完整的admin路由是这样的:
app-routing.module.ts (lazy admin route)
Preloading: background loading of feature areas
预加载:特性区的后台加载
You've learned how to load modules on-demand. You can also load modules asynchronously with preloading.
我们已经学会了如何按需加载模块,接下来再看看如何使用预加载技术异步加载模块。
This may seem like what the app has been doing all along. Not quite.
The AppModule is loaded when the application starts; that's eager loading.
Now the AdminModule loads only when the user clicks on a link; that's lazy loading.
看起来好像应用一直都是这么做的,但其实并非如此。
AppModule在应用启动时就被加载了,它是立即加载的。
而AdminModule只有当用户点击某个链接时才会加载,它是惰性加载的。
Preloading is something in between.
Consider the Crisis Center.
It isn't the first view that a user sees.
By default, the Heroes are the first view.
For the smallest initial payload and fastest launch time,
you should eagerly load the AppModule and the HeroesModule.
预加载是介于两者之间的一种方式。
我们来看看危机中心。
用户第一眼不会看到它。
默认情况下,英雄管理才是第一视图。
为了获得尽可能小的初始加载体积和最快的加载速度,我们应该对AppModule和HeroesModule进行立即加载。
You could lazy load the Crisis Center.
But you're almost certain that the user will visit the Crisis Center within minutes of launching the app.
Ideally, the app would launch with just the AppModule and the HeroesModule loaded
and then, almost immediately, load the CrisisCenterModule in the background.
By the time the user navigates to the Crisis Center, its module will have been loaded and ready to go.
我们可以惰性加载危机中心。
但是,我们几乎可以肯定用户会在启动应用之后的几分钟内访问危机中心。
理想情况下,应用启动时应该只加载AppModule和HeroesModule,然后几乎立即开始后台加载CrisisCenterModule。
在用户浏览到危机中心之前,该模块应该已经加载完毕,可供访问了。
That's preloading.
这就是预加载。
How preloading works
预加载的工作原理
After each successful navigation, the router looks in its configuration for an unloaded module that it can preload. Whether it preloads a module, and which modules it preloads, depends upon the preload strategy.
在每次成功的导航后,路由器会在自己的配置中查找尚未加载并且可以预加载的模块。 是否加载某个模块,以及要加载哪些模块,取决于预加载策略。
The Router offers two preloading strategies out of the box:
Router内置了两种预加载策略:
No preloading at all which is the default. Lazy loaded feature areas are still loaded on demand.
完全不预加载,这是默认值。惰性加载的特性区仍然会按需加载。
Preloading of all lazy loaded feature areas.
预加载所有惰性加载的特性区。
Out of the box, the router either never preloads, or preloads every lazy load module.
The Router also supports custom preloading strategies for
fine control over which modules to preload and when.
默认情况下,路由器或者完全不预加载或者预加载每个惰性加载模块。 路由器还支持自定义预加载策略,以便完全控制要预加载哪些模块以及何时加载。
In this next section, you'll update the CrisisCenterModule to load lazily
by default and use the PreloadAllModules strategy
to load it (and all other lazy loaded modules) as soon as possible.
在下一节,我们将会把CrisisCenterModule改为默认惰性加载的,并使用PreloadAllModules策略来尽快加载它(以及所有其它惰性加载模块)。
Lazy load the crisis center
惰性加载危机中心
Update the route configuration to lazy load the CrisisCenterModule.
Take the same steps you used to configure AdminModule for lazy load.
修改路由配置,来惰性加载CrisisCenterModule。修改的步骤和配置惰性加载AdminModule时一样。
Change the
crisis-centerpath in theCrisisCenterRoutingModuleto an empty string.把
CrisisCenterRoutingModule中的路径从crisis-center改为空字符串。Add a
crisis-centerroute to theAppRoutingModule.往
AppRoutingModule中添加一个crisis-center路由。Set the
loadChildrenstring to load theCrisisCenterModule.设置
loadChildren字符串来加载CrisisCenterModule。Remove all mention of the
CrisisCenterModulefromapp.module.ts.从
app.module.ts中移除所有对CrisisCenterModule的引用。
Here are the updated modules before enabling preload:
下面是打开预加载之前的模块修改版:
You could try this now and confirm that the CrisisCenterModule loads after you click the "Crisis Center" button.
我们可以现在尝试它,并确认在点击了“Crisis Center”按钮之后加载了CrisisCenterModule。
To enable preloading of all lazy loaded modules, import the PreloadAllModules token from the Angular router package.
要为所有惰性加载模块启用预加载功能,请从Angular的路由模块中导入PreloadAllModules。
The second argument in the RouterModule.forRoot method takes an object for additional configuration options.
The preloadingStrategy is one of those options.
Add the PreloadAllModules token to the forRoot call:
RouterModule.forRoot方法的第二个参数接受一个附加配置选项对象。
preloadingStrategy就是其中之一。
把PreloadAllModules添加到forRoot调用中:
src/app/app-routing.module.ts (preload all)
This tells the Router preloader to immediately load all lazy loaded routes (routes with a loadChildren property).
这会让Router预加载器立即加载所有惰性加载路由(带loadChildren属性的路由)。
When you visit http://localhost:3000, the /heroes route loads immediately upon launch
and the router starts loading the CrisisCenterModule right after the HeroesModule loads.
当访问http://localhost:3000时,/heroes路由立即随之启动,并且路由器在加载了HeroesModule之后立即开始加载CrisisCenterModule。
Surprisingly, the AdminModule does not preload. Something is blocking it.
意外的是,AdminModule没有预加载,有什么东西阻塞了它。
CanLoad blocks preload
CanLoad会阻塞预加载
The PreloadAllModules strategy does not load feature areas protected by a CanLoad guard.
This is by design.
PreloadAllModules策略不会加载被CanLoad守卫所保护的特性区。这是刻意设计的。
You added a CanLoad guard to the route in the AdminModule a few steps back
to block loading of that module until the user is authorized.
That CanLoad guard takes precedence over the preload strategy.
我们几步之前刚刚给AdminModule中的路由添加了CanLoad守卫,以阻塞加载那个模块,直到用户认证结束。
CanLoad守卫的优先级高于预加载策略。
If you want to preload a module and guard against unauthorized access,
drop the canLoad guard and rely on the CanActivate guard alone.
如果我们要加载一个模块并且保护它防止未授权访问,请移除canLoad守卫,只单独依赖CanActivate守卫。
Custom Preloading Strategy
自定义预加载策略
Preloading every lazy loaded modules works well in many situations, but it isn't always the right choice, especially on mobile devices and over low bandwidth connections. You may choose to preload only certain feature modules, based on user metrics and other business and technical factors.
在大多数场景下,预加载每个惰性加载模块就很好了,但是有时候它却并不是正确的选择,特别是在移动设备和低带宽连接下。 我们可能出于用户的测量和其它商业和技术因素而选择只对某些特性模块进行预加载。
You can control what and how the router preloads with a custom preloading strategy.
使用自定义预加载策略,我们可以控制路由器预加载哪些路由以及如何加载。
In this section, you'll add a custom strategy that only preloads routes whose data.preload flag is set to true.
Recall that you can add anything to the data property of a route.
在这一节,我们将添加一个自定义策略,它只预加载那些data.preload标志为true的路由。
回忆一下,我们可以往路由的data属性中添加任何东西。
Set the data.preload flag in the crisis-center route in the AppRoutingModule.
在AppRoutingModule的crisis-center路由中设置data.preload标志。
src/app/app-routing.module.ts (route data preload)
Add a new file to the project called selective-preloading-strategy.ts
and define a SelectivePreloadingStrategy service class as follows:
往项目中添加一个新的名叫selective-preloading-strategy.ts的文件,并在其中定义一个服务类SelectivePreloadingStrategy,代码如下:
src/app/selective-preloading-strategy.ts (excerpt)
SelectivePreloadingStrategy implements the PreloadingStrategy, which has one method, preload.
SelectivePreloadingStrategy实现了PreloadingStrategy,它只有一个方法preload。
The router calls the preload method with two arguments:
路由器会用两个参数调用调用preload方法:
The route to consider.
要加载的路由。
A loader function that can load the routed module asynchronously.
一个加载器(loader)函数,它能异步加载带路由的模块。
An implementation of preload must return an Observable.
If the route should preload, it returns the observable returned by calling the loader function.
If the route should not preload, it returns an Observable of null.
preload的实现必须返回一个Observable。
如果该路由应该预加载,它就会返回调用加载器函数所返回的Observable。
如果该路由不应该预加载,它就返回一个null值的Observable对象。
In this sample, the preload method loads the route if the route's data.preload flag is truthy.
在这个例子中,preload方法只有在路由的data.preload标识为真时才会加载该路由。
It also has a side-effect.
SelectivePreloadingStrategy logs the path of a selected route in its public preloadedModules array.
它还有一个副作用。
SelectivePreloadingStrategy会把所选路由的path记录在它的公共数组preloadedModules中。
Shortly, you'll extend the AdminDashboardComponent to inject this service and display its preloadedModules array.
很快,我们就会扩展AdminDashboardComponent来注入该服务,并且显示它的preloadedModules数组。
But first, make a few changes to the AppRoutingModule.
但是首先,要对AppRoutingModule做少量修改。
Import
SelectivePreloadingStrategyintoAppRoutingModule.把
SelectivePreloadingStrategy导入到AppRoutingModule中。Replace the
PreloadAllModulesstrategy in the call toforRootwith thisSelectivePreloadingStrategy.把
PreloadAllModules策略替换成对forRoot的调用,并且传入这个SelectivePreloadingStrategy。Add the
SelectivePreloadingStrategystrategy to theAppRoutingModuleproviders array so it can be injected elsewhere in the app.把
SelectivePreloadingStrategy策略添加到AppRoutingModule的providers数组中,以便它可以注入到应用中的任何地方。
Now edit the AdminDashboardComponent to display the log of preloaded routes.
现在,编辑AdminDashboardComponent以显示这些预加载路由的日志。
Import the
SelectivePreloadingStrategy(it's a service).导入
SelectivePreloadingStrategy(它是一个服务)。Inject it into the dashboard's constructor.
把它注入到仪表盘的构造函数中。
Update the template to display the strategy service's
preloadedModulesarray.修改模板来显示这个策略服务的
preloadedModules数组。
When you're done it looks like this.
当完成时,代码如下:
src/app/admin/admin-dashboard.component.ts (preloaded modules)
Once the application loads the initial route, the CrisisCenterModule is preloaded.
Verify this by logging in to the Admin feature area and noting that the crisis-center is listed in the Preloaded Modules.
It's also logged to the browser's console.
一旦应用加载完了初始路由,CrisisCenterModule也被预加载了。
通过Admin特性区中的记录就可以验证它,我们会看到“Preloaded Modules”中没有列出crisis-center。
它也被记录到了浏览器的控制台。
Inspect the router's configuration
审查路由器配置
You put a lot of effort into configuring the router in several routing module files and were careful to list them in the proper order. Are routes actually evaluated as you planned? How is the router really configured?
我们把大量的精力投入到在一系列路由模块文件里配置路由器上,并且小心的以合适的顺序列出它们。 这些路由是否真的如同你预想的那样执行了? 路由器的真实配置是怎样的?
You can inspect the router's current configuration any time by injecting it and
examining its config property.
For example, update the AppModule as follows and look in the browser console window
to see the finished route configuration.
通过注入它(Router)并检查它的config属性,我们可以随时审查路由器的当前配置。
例如,把AppModule修改为这样,并在浏览器的控制台窗口中查看最终的路由配置。
src/app/app.module.ts (inspect the router config)
Wrap up and final app
总结与最终的应用
You've covered a lot of ground in this guide and the application is too big to reprint here.
Please visit the
本章中涉及到了很多背景知识,而且本应用程序也太大了,所以没法在这里显示。请访问
Appendices
附录
The balance of this guide is a set of appendices that elaborate some of the points you covered quickly above.
本章剩下的部分是一组附录,它详尽阐述了我们曾匆匆带过的一些知识点。
The appendix material isn't essential. Continued reading is for the curious.
该附件中的内容不是必须的,感兴趣的人才需要阅读它。
Appendix: link parameters array
附录:链接参数数组
A link parameters array holds the following ingredients for router navigation:
链接参数数组保存路由导航时所需的成分:
The path of the route to the destination component.
指向目标组件的那个路由的路径(path)
Required and optional route parameters that go into the route URL.
必备路由参数和可选路由参数,它们将进入该路由的URL
You can bind the RouterLink directive to such an array like this:
我们可以把RouterLink指令绑定到一个数组,就像这样:
You've written a two element array when specifying a route parameter like this:
在指定路由参数时,我们写过一个双元素的数组,就像这样:
You can provide optional route parameters in an object like this:
我们可以在对象中提供可选的路由参数,就像这样:
These three examples cover the need for an app with one level routing. The moment you add a child router, such as the crisis center, you create new link array possibilities.
这三个例子覆盖了我们在单级路由的应用中所需的一切。在添加一个像危机中心一样的子路由时,我们创建新链接数组组合。
Recall that you specified a default child route for the crisis center so this simple RouterLink is fine.
回忆一下,我们曾为危机中心指定过一个默认的子路由,以便能使用这种简单的RouterLink。
Parse it out.
分解一下。
The first item in the array identifies the parent route (
/crisis-center).数组中的第一个条目标记出了父路由(
/crisis-center)。There are no parameters for this parent route so you're done with it.
这个父路由没有参数,因此这步已经完成了。
There is no default for the child route so you need to pick one.
没有默认的子路由,因此我们得选取一个。
You're navigating to the
CrisisListComponent, whose route path is/, but you don't need to explicitly add the slash.我们决定跳转到
CrisisListComponent,它的路由路径是'/',但我们不用显式的添加它。Voilà!
['/crisis-center'].哇!
['/crisis-center']。
Take it a step further. Consider the following router link that navigates from the root of the application down to the Dragon Crisis:
在下一步,我们会用到它。这次,我们要构建一个从根组件往下导航到“巨龙危机”时的链接参数数组:
The first item in the array identifies the parent route (
/crisis-center).数组中的第一个条目用来标记出父路由('/crisis-center')。
There are no parameters for this parent route so you're done with it.
这个父路由没有参数,因此这步已经完成了。
The second item identifies the child route details about a particular crisis (
/:id).数组中的第二个条目('/:id')用来标记出到指定危机的详情页的子路由。
The details child route requires an
idroute parameter.详细的子路由需要一个
id路由参数。You added the
idof the Dragon Crisis as the second item in the array (1).我们把巨龙危机的
id添加为该数组中的第二个条目(1)。The resulting path is
/crisis-center/1.最终生成的路径是
/crisis-center/1。
If you wanted to, you could redefine the AppComponent template with Crisis Center routes exclusively:
只要想,我们也可以用危机中心路由单独重定义AppComponent的模板:
In sum, you can write applications with one, two or more levels of routing. The link parameters array affords the flexibility to represent any routing depth and any legal sequence of route paths, (required) router parameters, and (optional) route parameter objects.
总结:我们可以用一级、两级或多级路由来写应用程序。 链接参数数组提供了用来表示任意深度路由的链接参数数组以及任意合法的路由参数序列、必须的路由器参数以及可选的路由参数对象。
Appendix: LocationStrategy and browser URL styles
附录:LocationStrategy以及浏览器URL样式
When the router navigates to a new component view, it updates the browser's location and history with a URL for that view. This is a strictly local URL. The browser shouldn't send this URL to the server and should not reload the page.
当路由器导航到一个新的组件视图时,它会用该视图的URL来更新浏览器的当前地址以及历史。 严格来说,这个URL其实是本地的,浏览器不会把该URL发给服务器,并且不会重新加载此页面。
Modern HTML5 browsers support history.pushState, a technique that changes a browser's location and history without triggering a server page request. The router can compose a "natural" URL that is indistinguishable from one that would otherwise require a page load.
现代HTML 5浏览器支持history.pushState API, 这是一项可以改变浏览器的当前地址和历史,却又不会触发服务端页面请求的技术。 路由器可以合成出一个“自然的”URL,它看起来和那些需要进行页面加载的URL没什么区别。
Here's the Crisis Center URL in this "HTML5 pushState" style:
下面是危机中心的URL在“HTML 5 pushState”风格下的样子:
Older browsers send page requests to the server when the location URL changes unless the change occurs after a "#" (called the "hash"). Routers can take advantage of this exception by composing in-application route URLs with hashes. Here's a "hash URL" that routes to the Crisis Center.
老旧的浏览器在当前地址的URL变化时总会往服务器发送页面请求……唯一的例外规则是:当这些变化位于“#”(被称为“hash”)后面时不会发送。通过把应用内的路由URL拼接在#之后,路由器可以获得这条“例外规则”带来的优点。下面是到危机中心路由的“hash URL”:
The router supports both styles with two LocationStrategy providers:
路由器通过两种LocationStrategy提供商来支持所有这些风格:
PathLocationStrategy—the default "HTML5 pushState" style.PathLocationStrategy- 默认的策略,支持“HTML 5 pushState”风格。HashLocationStrategy—the "hash URL" style.HashLocationStrategy- 支持“hash URL”风格。
The RouterModule.forRoot function sets the LocationStrategy to the PathLocationStrategy,
making it the default strategy.
You can switch to the HashLocationStrategy with an override during the bootstrapping process if you prefer it.
RouterModule.forRoot函数把LocationStrategy设置成了PathLocationStrategy,使其成为了默认策略。
我们可以在启动过程中改写(override)它,来切换到HashLocationStrategy风格 —— 如果我们更喜欢这种。
Learn about providers and the bootstrap process in the Dependency Injection guide.
要学习关于“提供商”和启动过程的更多知识,参见依赖注入一章。
Which strategy is best?
哪种策略更好?
You must choose a strategy and you need to make the right call early in the project. It won't be easy to change later once the application is in production and there are lots of application URL references in the wild.
我们必须选择一种策略,并且在项目的早期就这么干。一旦该应用进入了生产阶段,要改起来可就不容易了,因为外面已经有了大量对应用URL的引用。
Almost all Angular projects should use the default HTML5 style. It produces URLs that are easier for users to understand. And it preserves the option to do server-side rendering later.
几乎所有的Angular项目都会使用默认的HTML 5风格。它生成的URL更易于被用户理解,它也为将来做服务端渲染预留了空间。
Rendering critical pages on the server is a technique that can greatly improve perceived responsiveness when the app first loads. An app that would otherwise take ten or more seconds to start could be rendered on the server and delivered to the user's device in less than a second.
在服务器端渲染指定的页面,是一项可以在该应用首次加载时大幅提升响应速度的技术。那些原本需要十秒甚至更长时间加载的应用,可以预先在服务端渲染好,并在少于一秒的时间内完整呈现在用户的设备上。
This option is only available if application URLs look like normal web URLs without hashes (#) in the middle.
只有当应用的URL看起来像是标准的Web URL,中间没有hash(#)时,这个选项才能生效。
Stick with the default unless you have a compelling reason to resort to hash routes.
除非你有强烈的理由不得不使用hash路由,否则就应该坚决使用默认的HTML 5路由风格。
HTML5 URLs and the <base href>
HTML 5 URL与<base href>
While the router uses the HTML5 pushState style by default, you must configure that strategy with a base href.
由于路由器默认使用“HTML 5 pushState”风格,所以我们必须用一个base href来配置该策略(Strategy)。
The preferred way to configure the strategy is to add a
<base href> element
tag in the <head> of the index.html.
配置该策略的首选方式是往index.html的<head>中添加一个<base href> element标签。
Without that tag, the browser may not be able to load resources (images, CSS, scripts) when "deep linking" into the app. Bad things could happen when someone pastes an application link into the browser's address bar or clicks such a link in an email.
如果没有此标签,当通过“深链接”进入该应用时,浏览器就不能加载资源(图片、CSS、脚本)。如果有人把应用的链接粘贴进浏览器的地址栏或从邮件中点击应用的链接时,这种问题就发生。
Some developers may not be able to add the <base> element, perhaps because they don't have
access to <head> or the index.html.
有些开发人员可能无法添加<base>元素,这可能是因为它们没有访问<head>或index.html的权限。
Those developers may still use HTML5 URLs by taking two remedial steps:
它们仍然可以使用HTML 5格式的URL,但要采取两个步骤进行补救:
Provide the router with an appropriate APP_BASE_HREF value.
用适当的APP_BASE_HREF值提供(provide)路由器。
Use root URLs for all web resources: CSS, images, scripts, and template HTML files.
对所有Web资源使用绝对地址:CSS、图片、脚本、模板HTML。
HashLocationStrategy
You can go old-school with the HashLocationStrategy by
providing the useHash: true in an object as the second argument of the RouterModule.forRoot
in the AppModule.
我们可以在根模块的RouterModule.forRoot的第二个参数中传入一个带有useHash: true的对象,以回到基于HashLocationStrategy的传统方式。